

How to Review and Refine Your Video With Chat and the Editor
Use conversation for story changes and the editor for precise scene control. This guide shows how to review the story, ask for focused changes, and edit scene by scene.
How should you review the story first?
Compare facts, product names, dates, and numbers with the approved source. Read the narration aloud, check the opening and ending, confirm each visual supports its scene, and check the language and pronunciation of important terms before you refine anything else.
Edit narration where the script-review controls allow it, or ask the agent for a precise correction. After a script change, check scene visuals and timing again.
How do you request a focused chat edit?
Name the scene, describe the change, and say what to preserve. Use a scene reference when the interface offers one. Wait for each request to finish and review its effect before you make another.
Tip: If you asked the agent to preserve narration word for word, explicitly ask it to rewrite the words you want changed. An uploaded recording keeps its original speech.
Step by step: refine in the editor
Step 1: Open the editor
Select Open in editor from the preview.
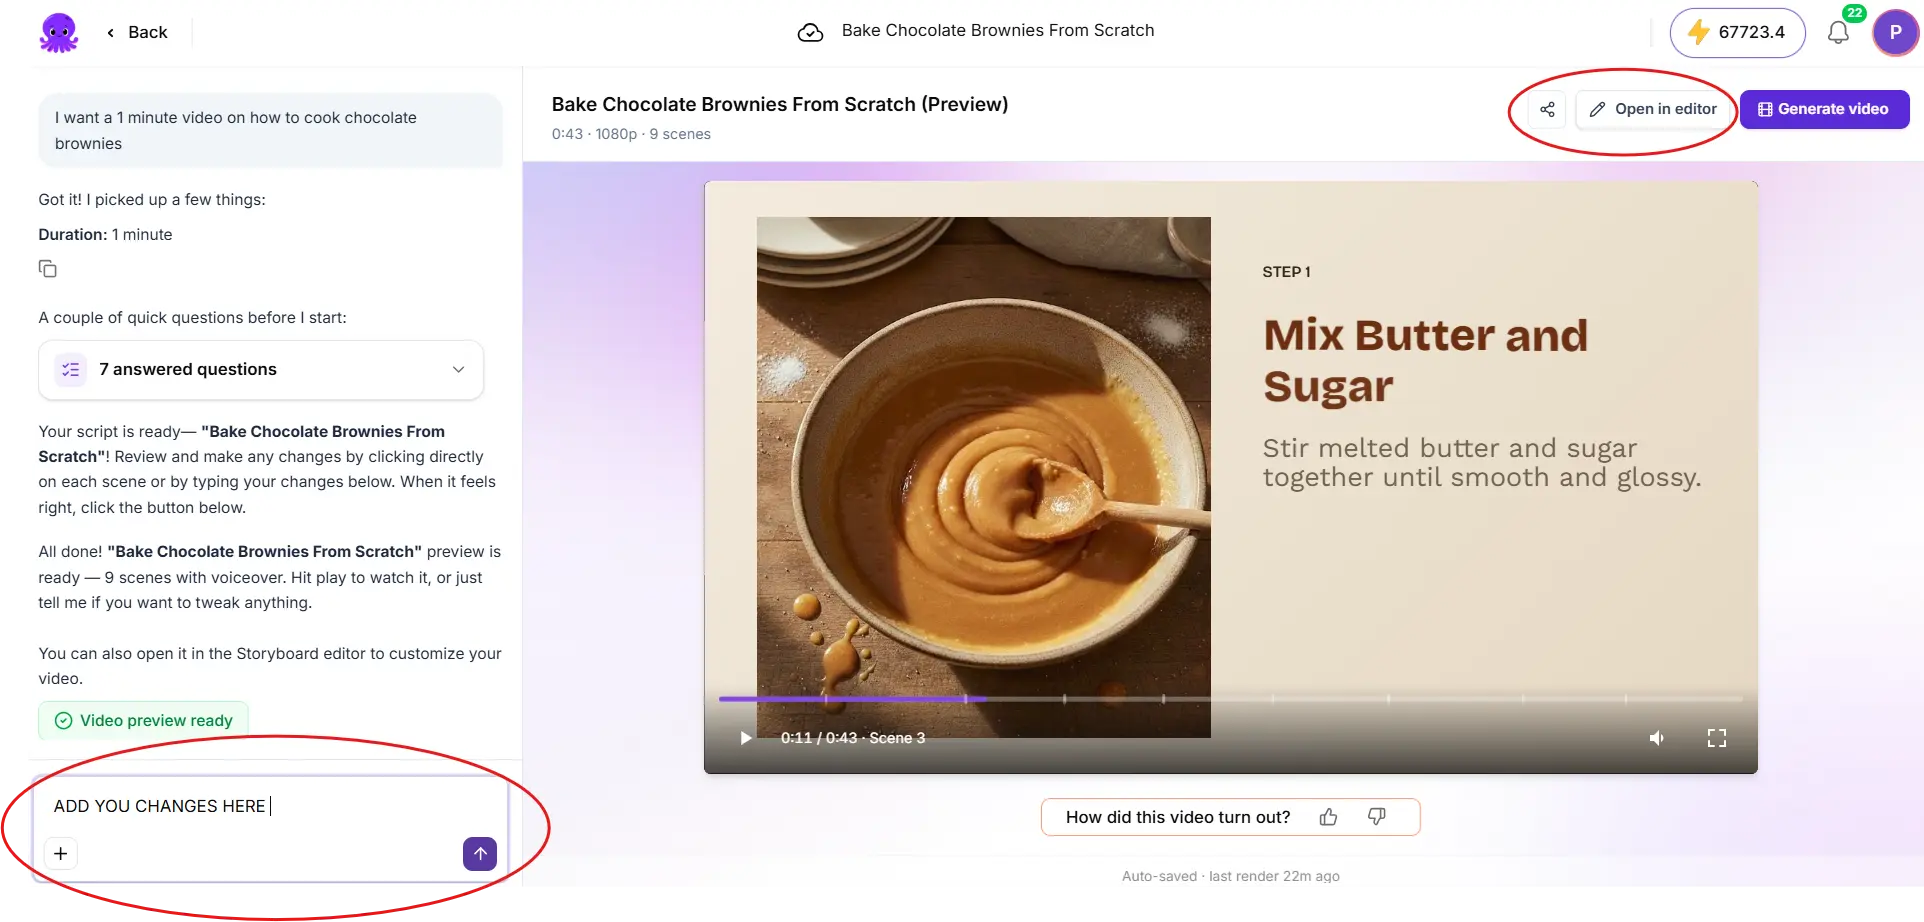
Step 2: Select a scene
Choose a scene in the scene strip or the Story panel. The canvas shows that scene.
Step 3: Select an element
Select an element on the canvas to reveal its controls.
- Story has narration and scene organization.
- Visuals and Avatars supply media and presenters.
- Audio has voiceover, music, and audio settings.
- Text, Elements, and Styles control on-screen content.
- Branding applies brand assets and settings.
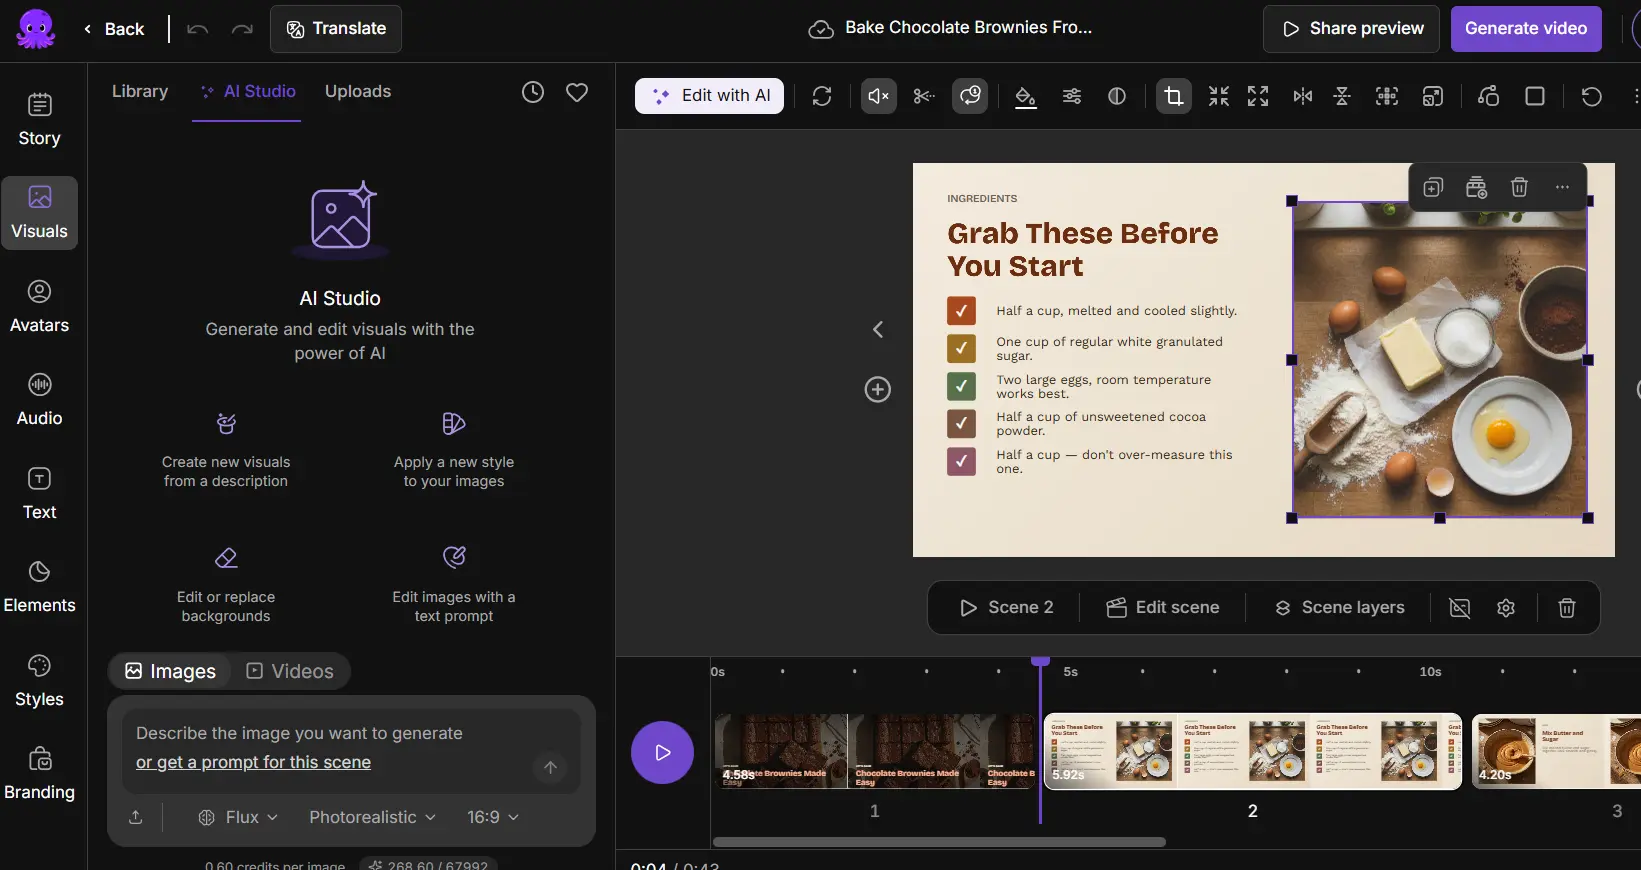
Step 4: Arrange the scenes
Drag scenes in the timeline to reorder them. Use the scene menu to duplicate or delete a scene, or use insertion controls before or after a scene where available.
Step 5: Play the neighboring scenes
Check for repeated narration after duplication, and play the neighboring scenes after you add, remove, or reorder.
How does the AI Scene editor work?
Select a scene and choose Edit scene below the preview. Describe a focused composition change, then review and play the proposal. Use Replace to replace the selected scene, or use the add control to keep the result as a new scene.
For example, ask to move the title above the image while preserving the wording and caption area. Use the main video conversation, not Edit scene, to change the script across several scenes.
Undo, Redo, and Apply Changes
- Use Undo and Redo for recent changes in the current session.
- After narration edits, use Apply Changes to update the AI voiceover.
- If the project reports a newer script or an editing lock, follow the reload or lock instructions before you continue.
- Preview the full sequence before you generate again.
- Confirm deletions, and keep at least one scene.
For visuals, captions, text, and layers, see Edit visuals, captions, text, and scene layers.
Try it on your next video
Bring a brief or a source and review the story before it renders.
Try Pictory free, no credit card required →Related Academy guides
Academy guide.
Academy guide.
Academy guide.
Academy guide.
The hub for everything in Pictory 3.
Frequently asked questions
How do I ask the agent to change just one scene?
Name the scene, describe the change, and say what to preserve. For example, ask it to replace the visual in scene 3 and keep the narration and scene order. Use a scene reference when the interface offers one, and wait for each request to finish before the next.
When should I use chat and when should I use the editor?
Use chat for story changes, such as adding or removing a scene, shortening a section, or improving the ending. Use the editor for precise control over a scene's visuals, audio, text, and branding. Both work on the same project, so switch freely.
What does Edit scene do?
Edit scene redesigns the composition of the selected scene from a description you give. You review and play the proposed result, then use Replace to swap it for the selected scene or the add control to keep it as a new scene beside the original.
Why isn't my voiceover matching my edited script?
After narration edits, the AI voiceover can be out of date. Select Apply Changes to update it, and choose the offered scope for changed scenes or the full script. Then listen again, and check that the spoken words and captions match.
Can I undo a change?
Yes. Undo and Redo cover recent changes in your current session. For a larger experiment, duplicate the project first so you keep a separate version. If the project reports an editing lock or a newer script, follow the displayed instructions before continuing.
How to Review and Refine Your Video With Chat and the Editor in Pictory 2
The AI Video Editor feature in Pictory AI lets you upload and enhance existing video content quickly and easily. Whether you want to trim, caption, add branding, or repurpose long-form footage, this workflow helps you edit like a pro in minutes without complex software.
What Is the AI Video Editor in Pictory?
The AI Video Editor is a powerful tool that allows you to edit your own uploaded videos using AI-assisted transcription and scene creation.
When you upload a video, Pictory automatically transcribes it, divides it into editable scenes, and gives you full access to text-based editing. You can highlight, delete, or rearrange sections, then generate captions, add voiceovers, and apply your brand style.
Pictory’s AI will:
Transcribe your uploaded video automatically
Segment it into editable scenes
Allow text-based editing of narration and subtitles
Create a storyboard ready for full customization
Perfect for:
Marketers repurposing webinars or long videos
Educators turning lectures into short training modules
Brands adding captions and branding to recorded content
Content creators refining YouTube or podcast videos
Step-by-Step: How to Use the AI Video Editor
Follow these steps to upload, edit, and finalize your video using the Pictory AI Video Editor workflow.
Step 1: Access the AI Video Editor
From your Pictory Home Page, select AI Video Editor.
Click Upload Video to begin.
Choose a video file from your computer or drag and drop it into the upload window.

File Requirements:
Maximum file size: 5 GB
Maximum length: 180 minutes
Supported formats: MP4, MOV, and other standard video types
You can also try the feature using a demo video if you do not have one ready.
Step 2: Select Language and Begin Upload
Before uploading, select the language spoken in your video (for example, English US or UK). Click Start Upload to begin processing.
A progress bar will appear with the message: “Transcription in progress. You will be notified once completed.”
You can return to the Home Page to work on other projects while your video is processing.

Step 3: Review the Transcript
Once the transcription is complete, your video opens in the Script and Transcript Editor.
Here you will see:
The transcribed text on the left
The video preview on the right
A timeline at the bottom showing video scenes

You can:
Edit the text to remove errors
Highlight or delete unwanted sections
Automatically remove filler words and silences
Search and replace phrases across the transcript
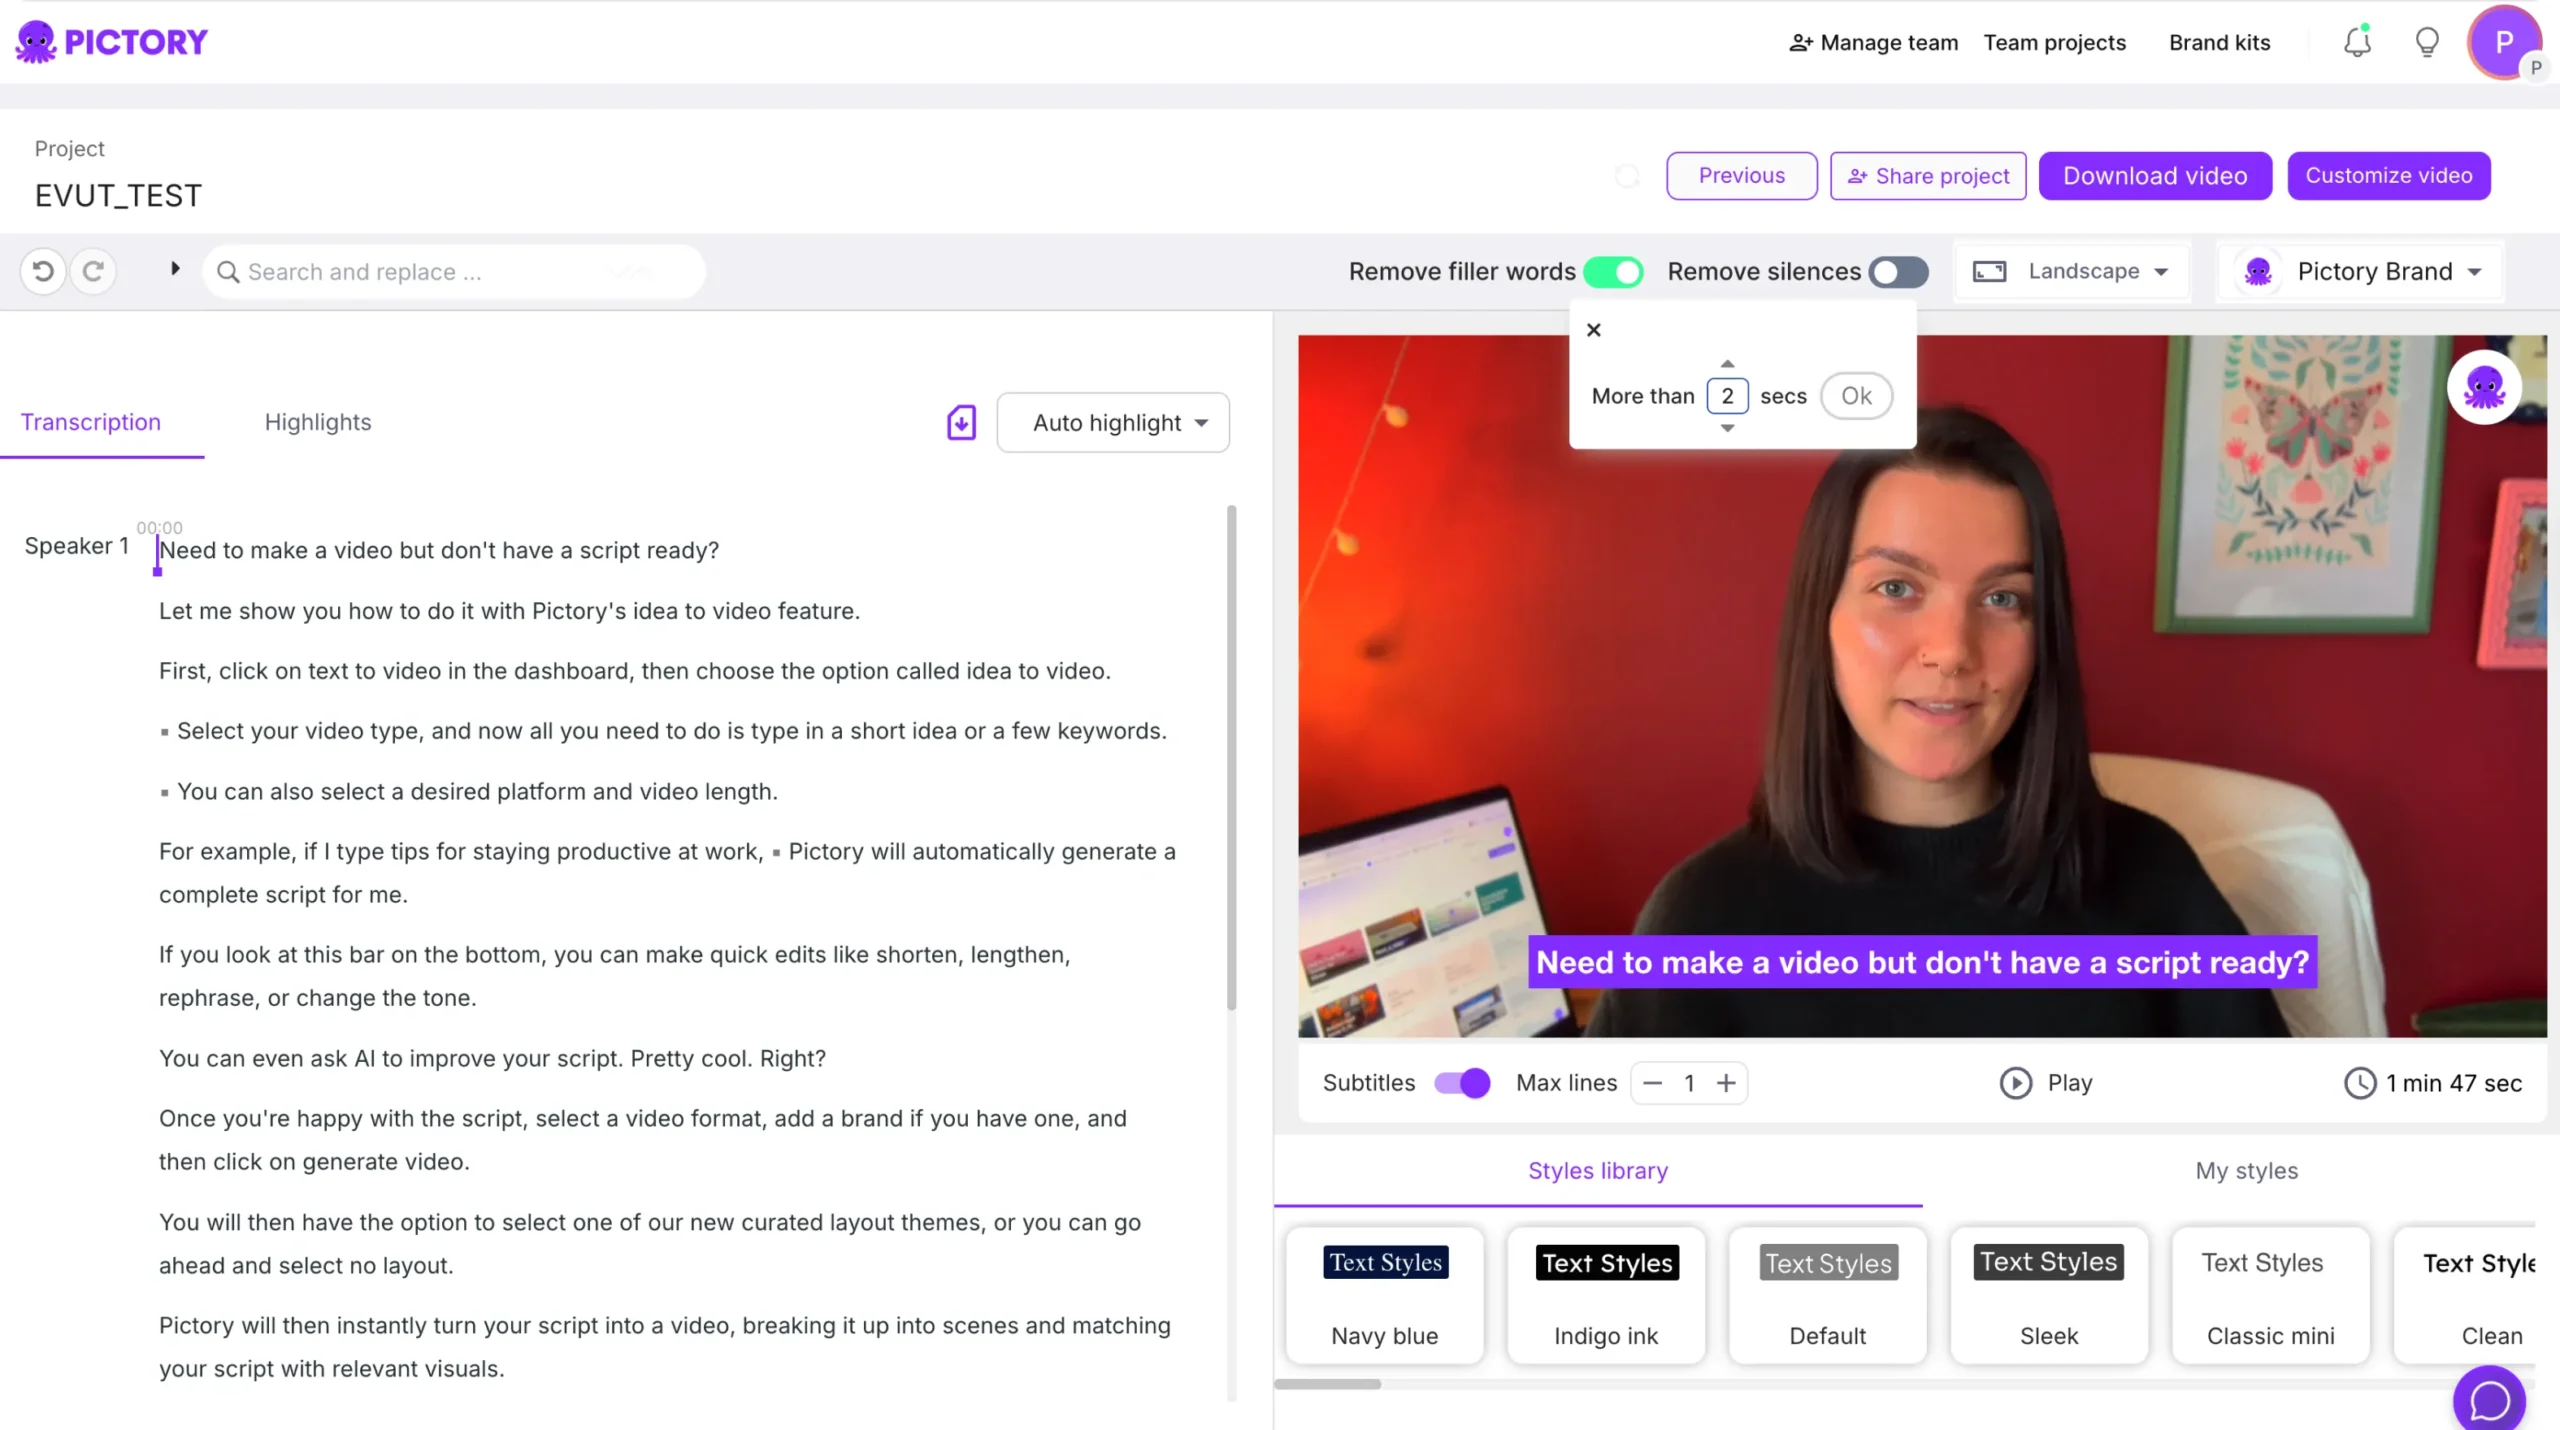
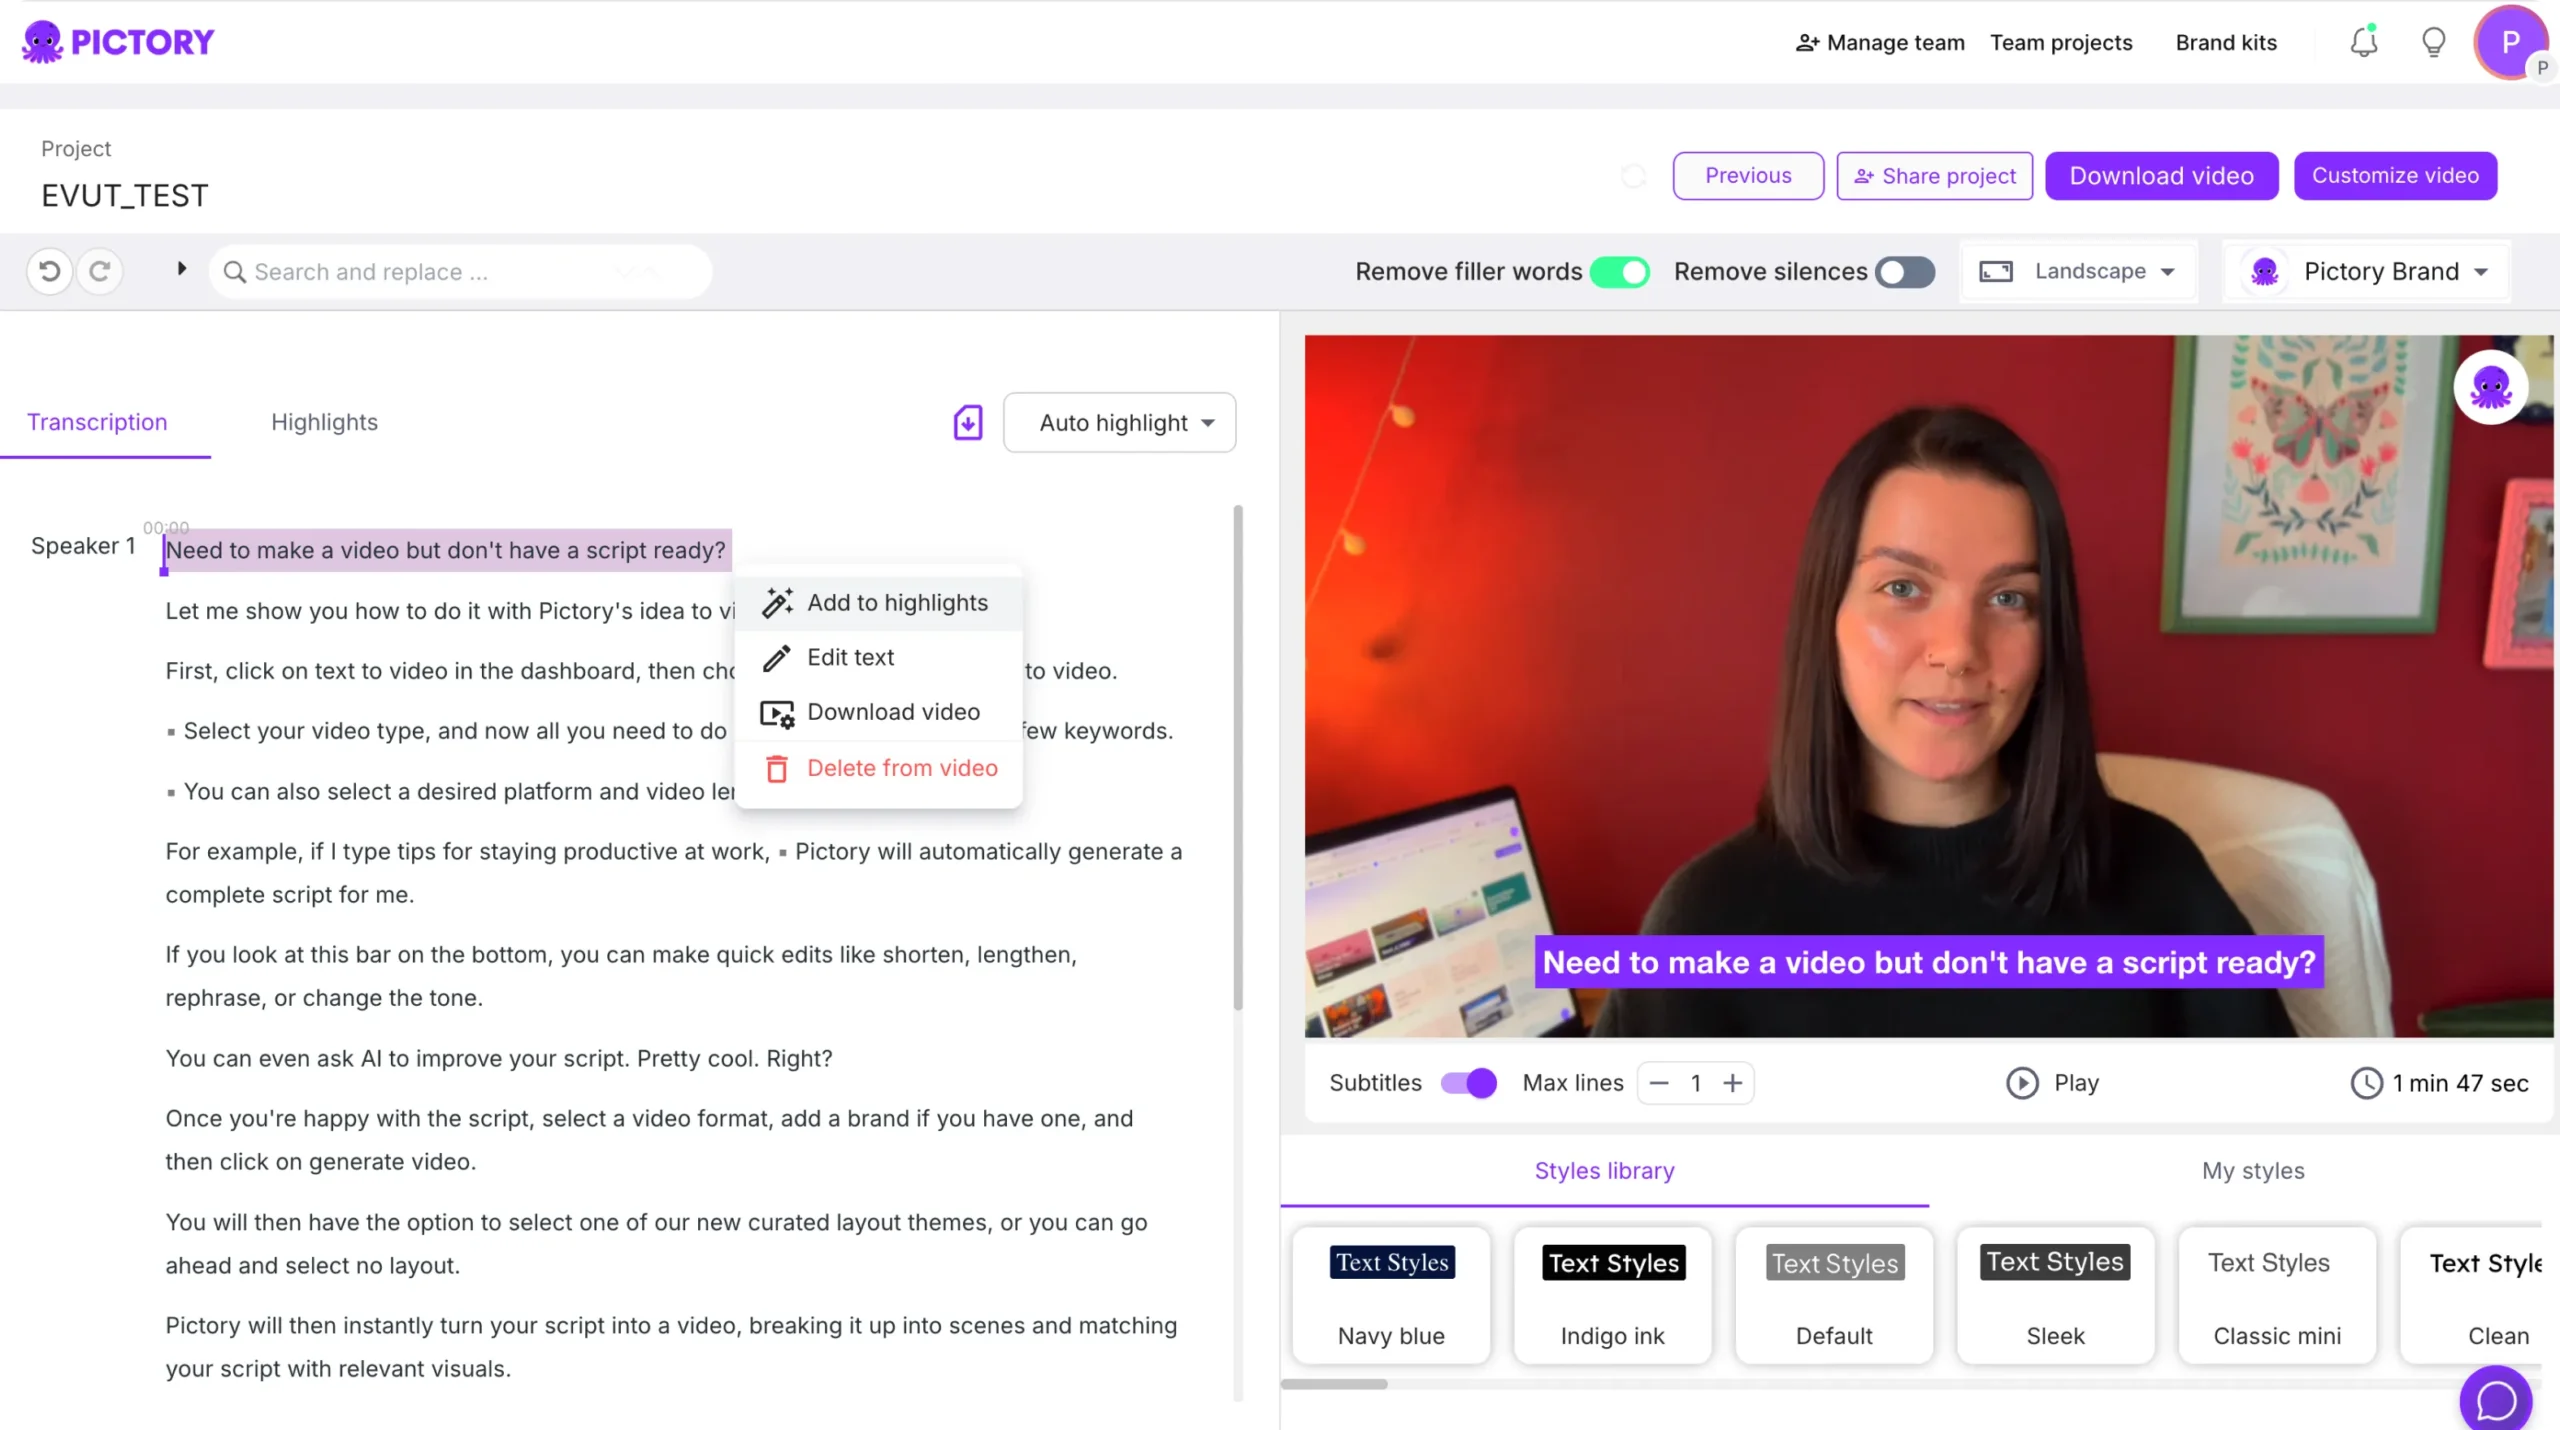
These edits will update your video instantly since the AI synchronizes text and visuals in real time.
Step 4: Adjust Subtitles and Captions
Open the Subtitles section to control how captions appear on your video. You can:
Set a maximum number of lines per subtitle
Change font styles, size, and position
Select from built-in text styles such as Sleek, Clean, or Bold Edge
Subtitles automatically sync with your spoken narration for professional accuracy.
Step 5: Apply Your Brand Kit
To keep your video consistent with your brand identity:
Open the Branding Tab.
Apply your Brand Kit, which includes your logo, brand colors, and preferred fonts.
Review the preview window to ensure your styling appears correctly.
This gives your video a cohesive and professional appearance instantly.
Step 6: Generate a Storyboard
After finalizing your transcript, click Create Storyboard.
Pictory’s AI will convert your text and edited scenes into a visual storyboard. During this process, you will see the message: “Please wait while the video storyboard is being created…”
A progress bar shows the percentage completed.
Once done, your video opens in the main AI Video Editor workspace, where you can review and refine every scene.
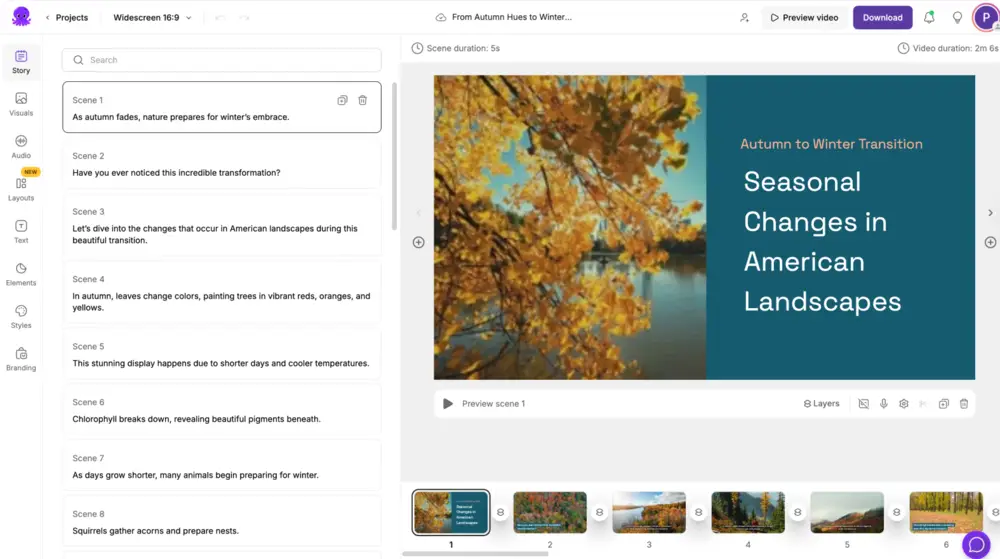
Step 7: Final Editing in the Video Editor
Inside the editor, you can:
Adjust visuals and timing for each scene
Replace visuals using Library, AI Studio, or Uploads
Add background music and AI voiceovers under the Audio Tab
Insert overlays, text, and graphics in the Text and Elements Tabs
Apply your Brand Kit again for consistent styling
Preview your video anytime before exporting.
Step 8: Export or Download Your Video
Once your edits are complete, click Download Video to export your project. You can also share it directly to your preferred platform such as YouTube, LinkedIn, or Facebook.
Your project will automatically save in My Projects for easy future editing or collaboration.
Pro Tips for Editing Uploaded Videos
Trim or delete unnecessary sections directly in the transcript.
Use Auto Remove Filler Words to polish speech.
Apply Brand Kits early for consistent results.
Choose AI Studio visuals if you need supporting imagery.
Preview the full video before exporting.
Why Use the AI Video Editor in Pictory
Pictory AI simplifies the process of editing existing videos by combining transcription, editing, and branding in one place.
You get:
Automatic transcription and scene segmentation
Editable captions and subtitles
Full branding and styling control
AI-assisted visuals and voiceovers
Quick preview and export workflow
It is the fastest way to turn raw video files into branded, polished content ready for publishing.
Frequently Asked Questions
What video formats are supported?
You can upload MP4, MOV, and other standard formats up to 5 GB or 180 minutes.
Can I remove filler words automatically?
Yes. Toggle the “Remove Filler Words” option in the transcript editor to clean up your narration.
Does the AI Video Editor generate subtitles?
Yes. Subtitles are created automatically during transcription and can be customized in the Subtitles section.
Can I add my own branding to the video?
Yes. Apply your Brand Kit with logos, fonts, and brand colors in the Branding Tab.
Can I replace visuals or add new clips?
Yes. After the storyboard is created, you can replace visuals using stock footage, AI Studio, or your own uploads.