Need to know how to make a playlist on YouTube?
This guide will show you the quick and easy steps to create, organize, and share your playlists.
Key Takeaways
-
Creating well-organized YouTube playlists can boost viewer engagement and channel visibility by grouping related videos for a seamless viewing experience.
-
To create a playlist, sign into your YouTube account, go to YouTube Studio, select ‘Playlists,’ click ‘New Playlist,’ and add videos with a catchy title and appropriate privacy settings.
-
Regularly updating your playlists with fresh content, optimizing titles and descriptions with relevant keywords, and using eye-catching thumbnails can significantly enhance discoverability and viewer retention.
How to Make a Playlist on YouTube: Easy Step-by-Step Guide
Creating a YouTube playlist can significantly enhance your content organization and viewer experience. It is a skill worth mastering, whether you’re a content creator or a casual viewer, to fully utilize the platform. This guide will walk you through the process, equipping you with the skills to create playlists like a professional swiftly.
The first step is to decide on which YouTube channel to host your playlist. This decision holds particular importance for those managing multiple channels. After determining the host channel, this guide will assist you in logging in, navigating to the appropriate section, and setting up your playlist with a fitting title and privacy settings.
By the end of this guide, you will be equipped to add videos and share your curated content globally.
Introduction
YouTube playlists go beyond being a simple tool to group videos. They wield the power to significantly influence your channel’s success and viewer engagement. Creating well-organized playlists not just simplifies the process of finding related content for your viewers, but also entices them to spend more time on your channel.
This increased watch time can boost your visibility in YouTube’s algorithm, potentially leading to more subscribers and views.
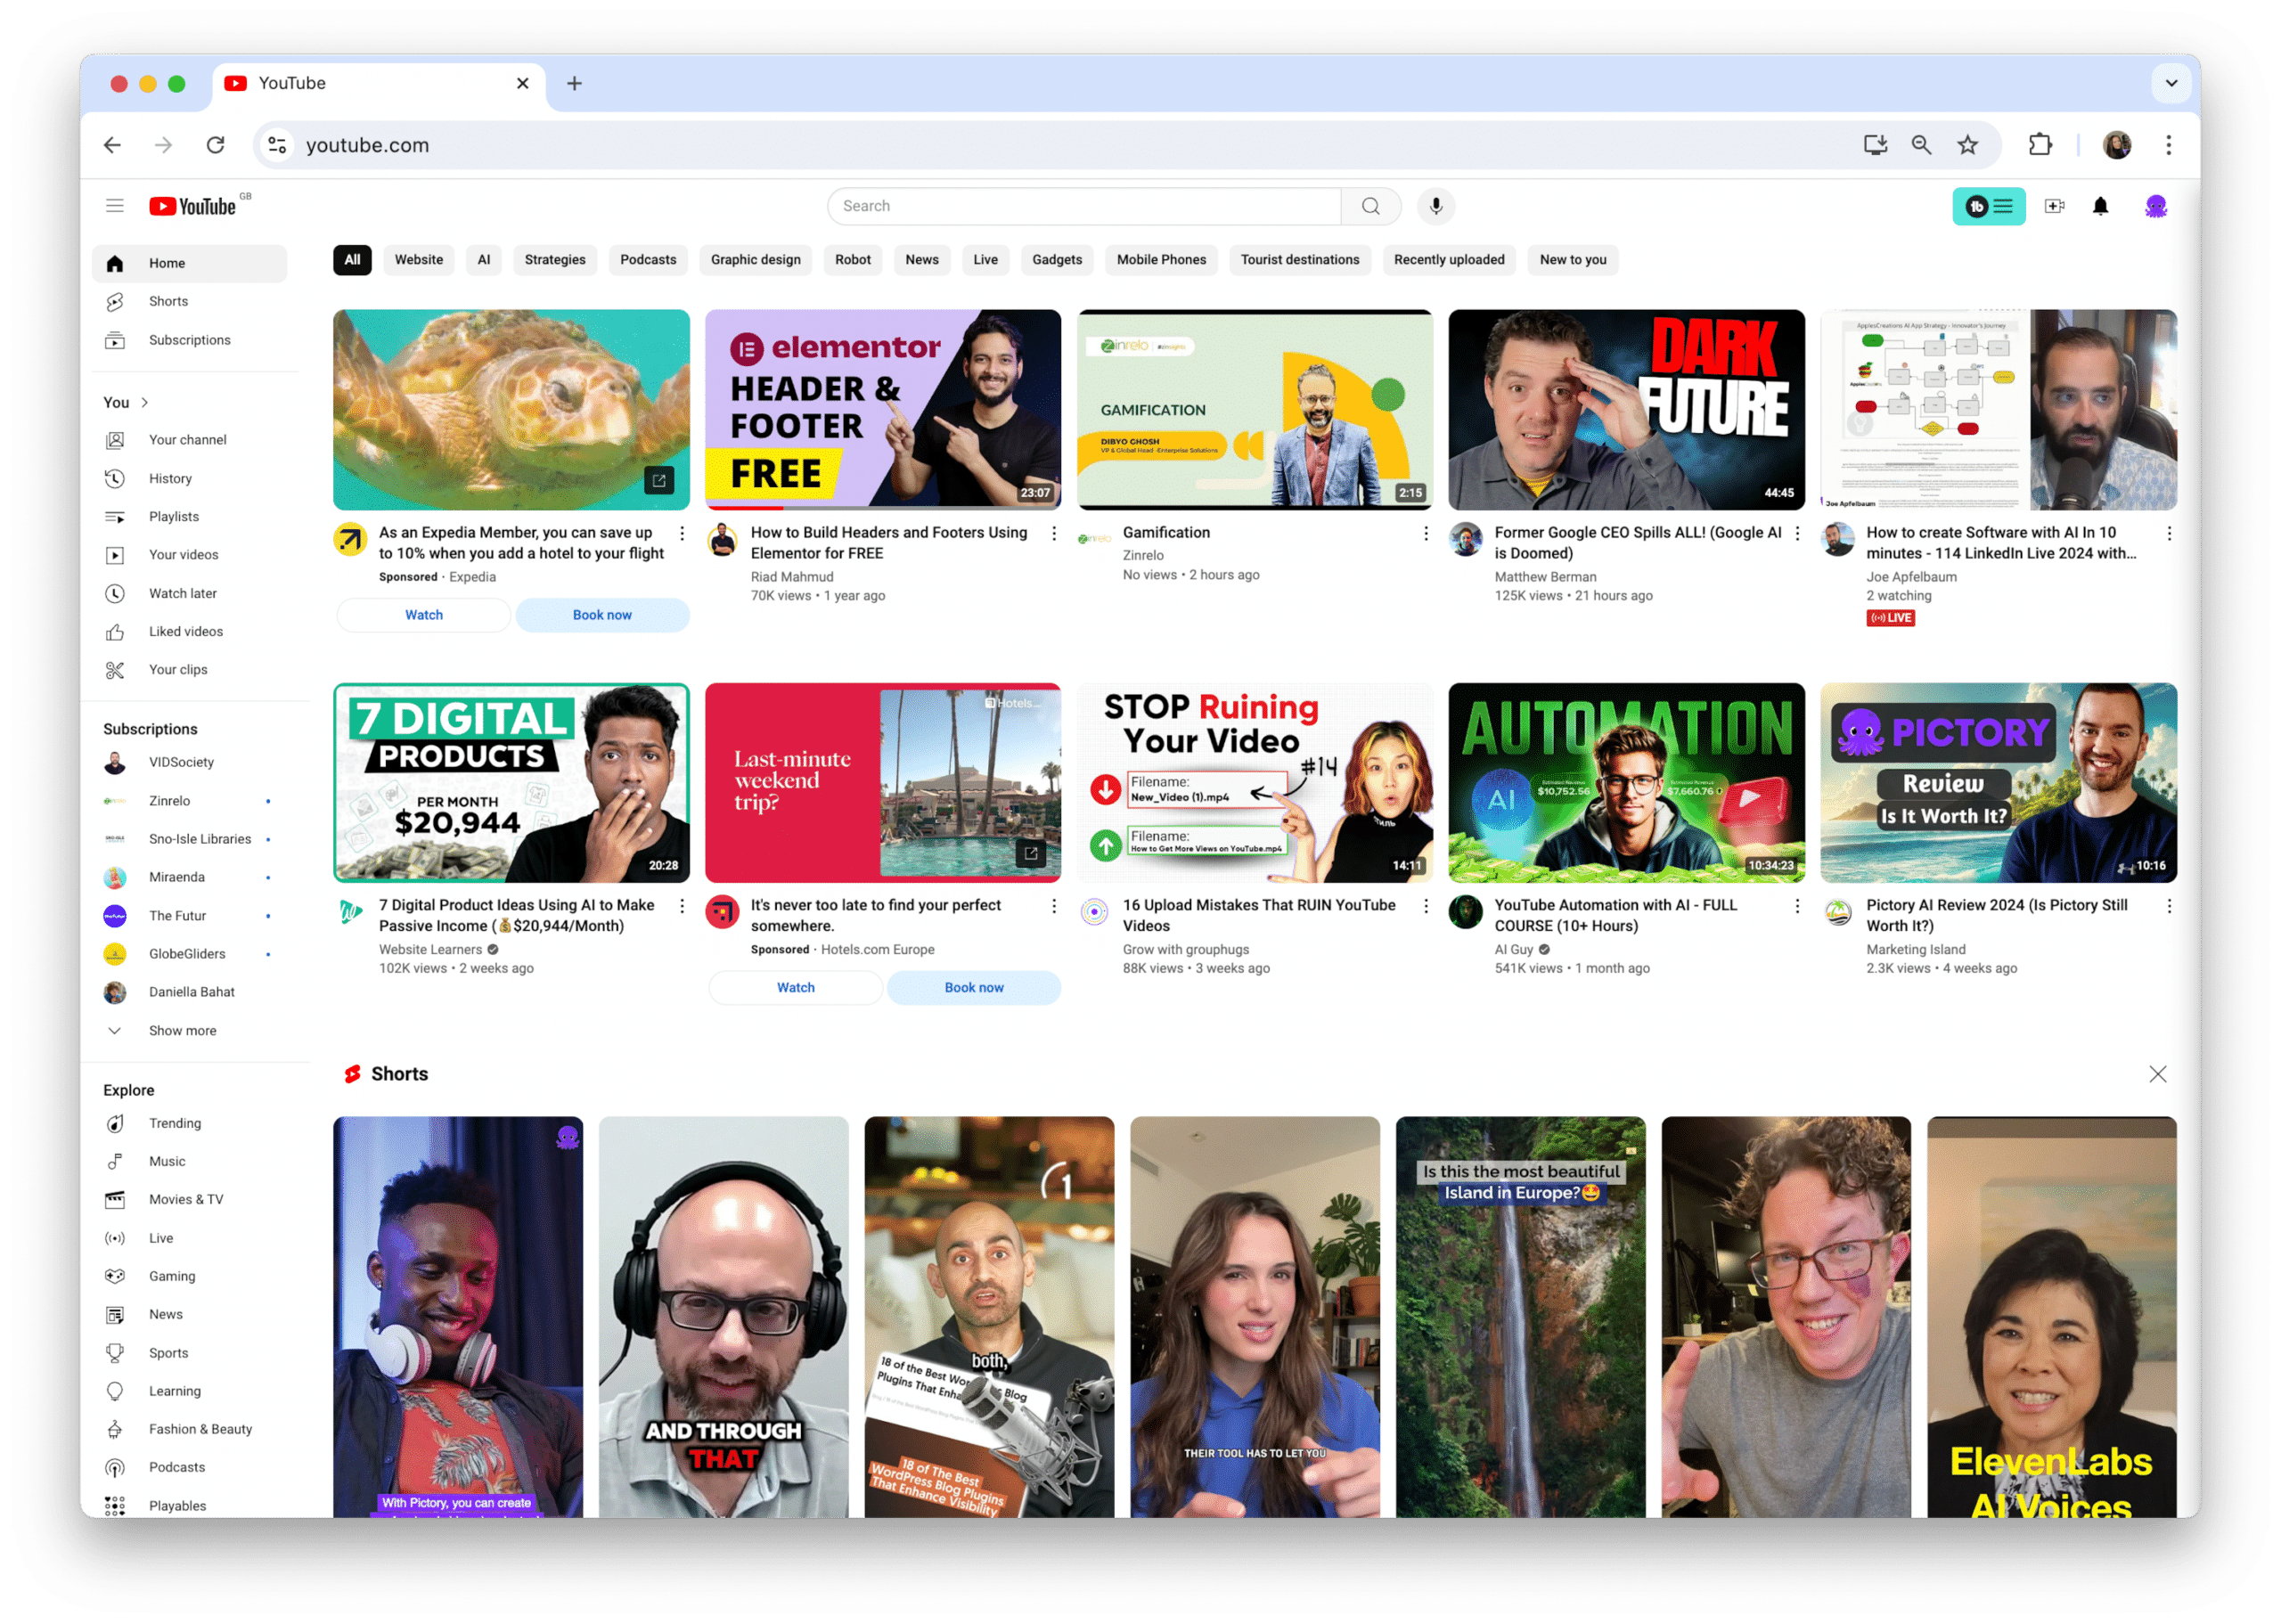
But the benefits don’t stop there. Playlists can enhance the overall viewer experience by providing a seamless, curated journey through your content. Imagine guiding your audience through a series of videos that tell a complete story or teach a comprehensive skill. This level of organization can turn casual viewers into loyal fans, eager to see what you’ll add to your playlists next.
As we progress further into this guide, you will learn to unlock the full potential of YouTube playlists to enhance your channel and engage your audience.
Understanding YouTube Playlists
Fundamentally, YouTube playlists are collections of videos assembled under a common theme or topic. Acting as a potent organizational tool, they enable content creators to cluster related videos and offer viewers a continuous stream of content without the need for manual video selection.
Think of playlists as curated channels within your main channel, each telling its own story or covering a specific aspect of your content.
The simple process of creating a playlist begins with:
-
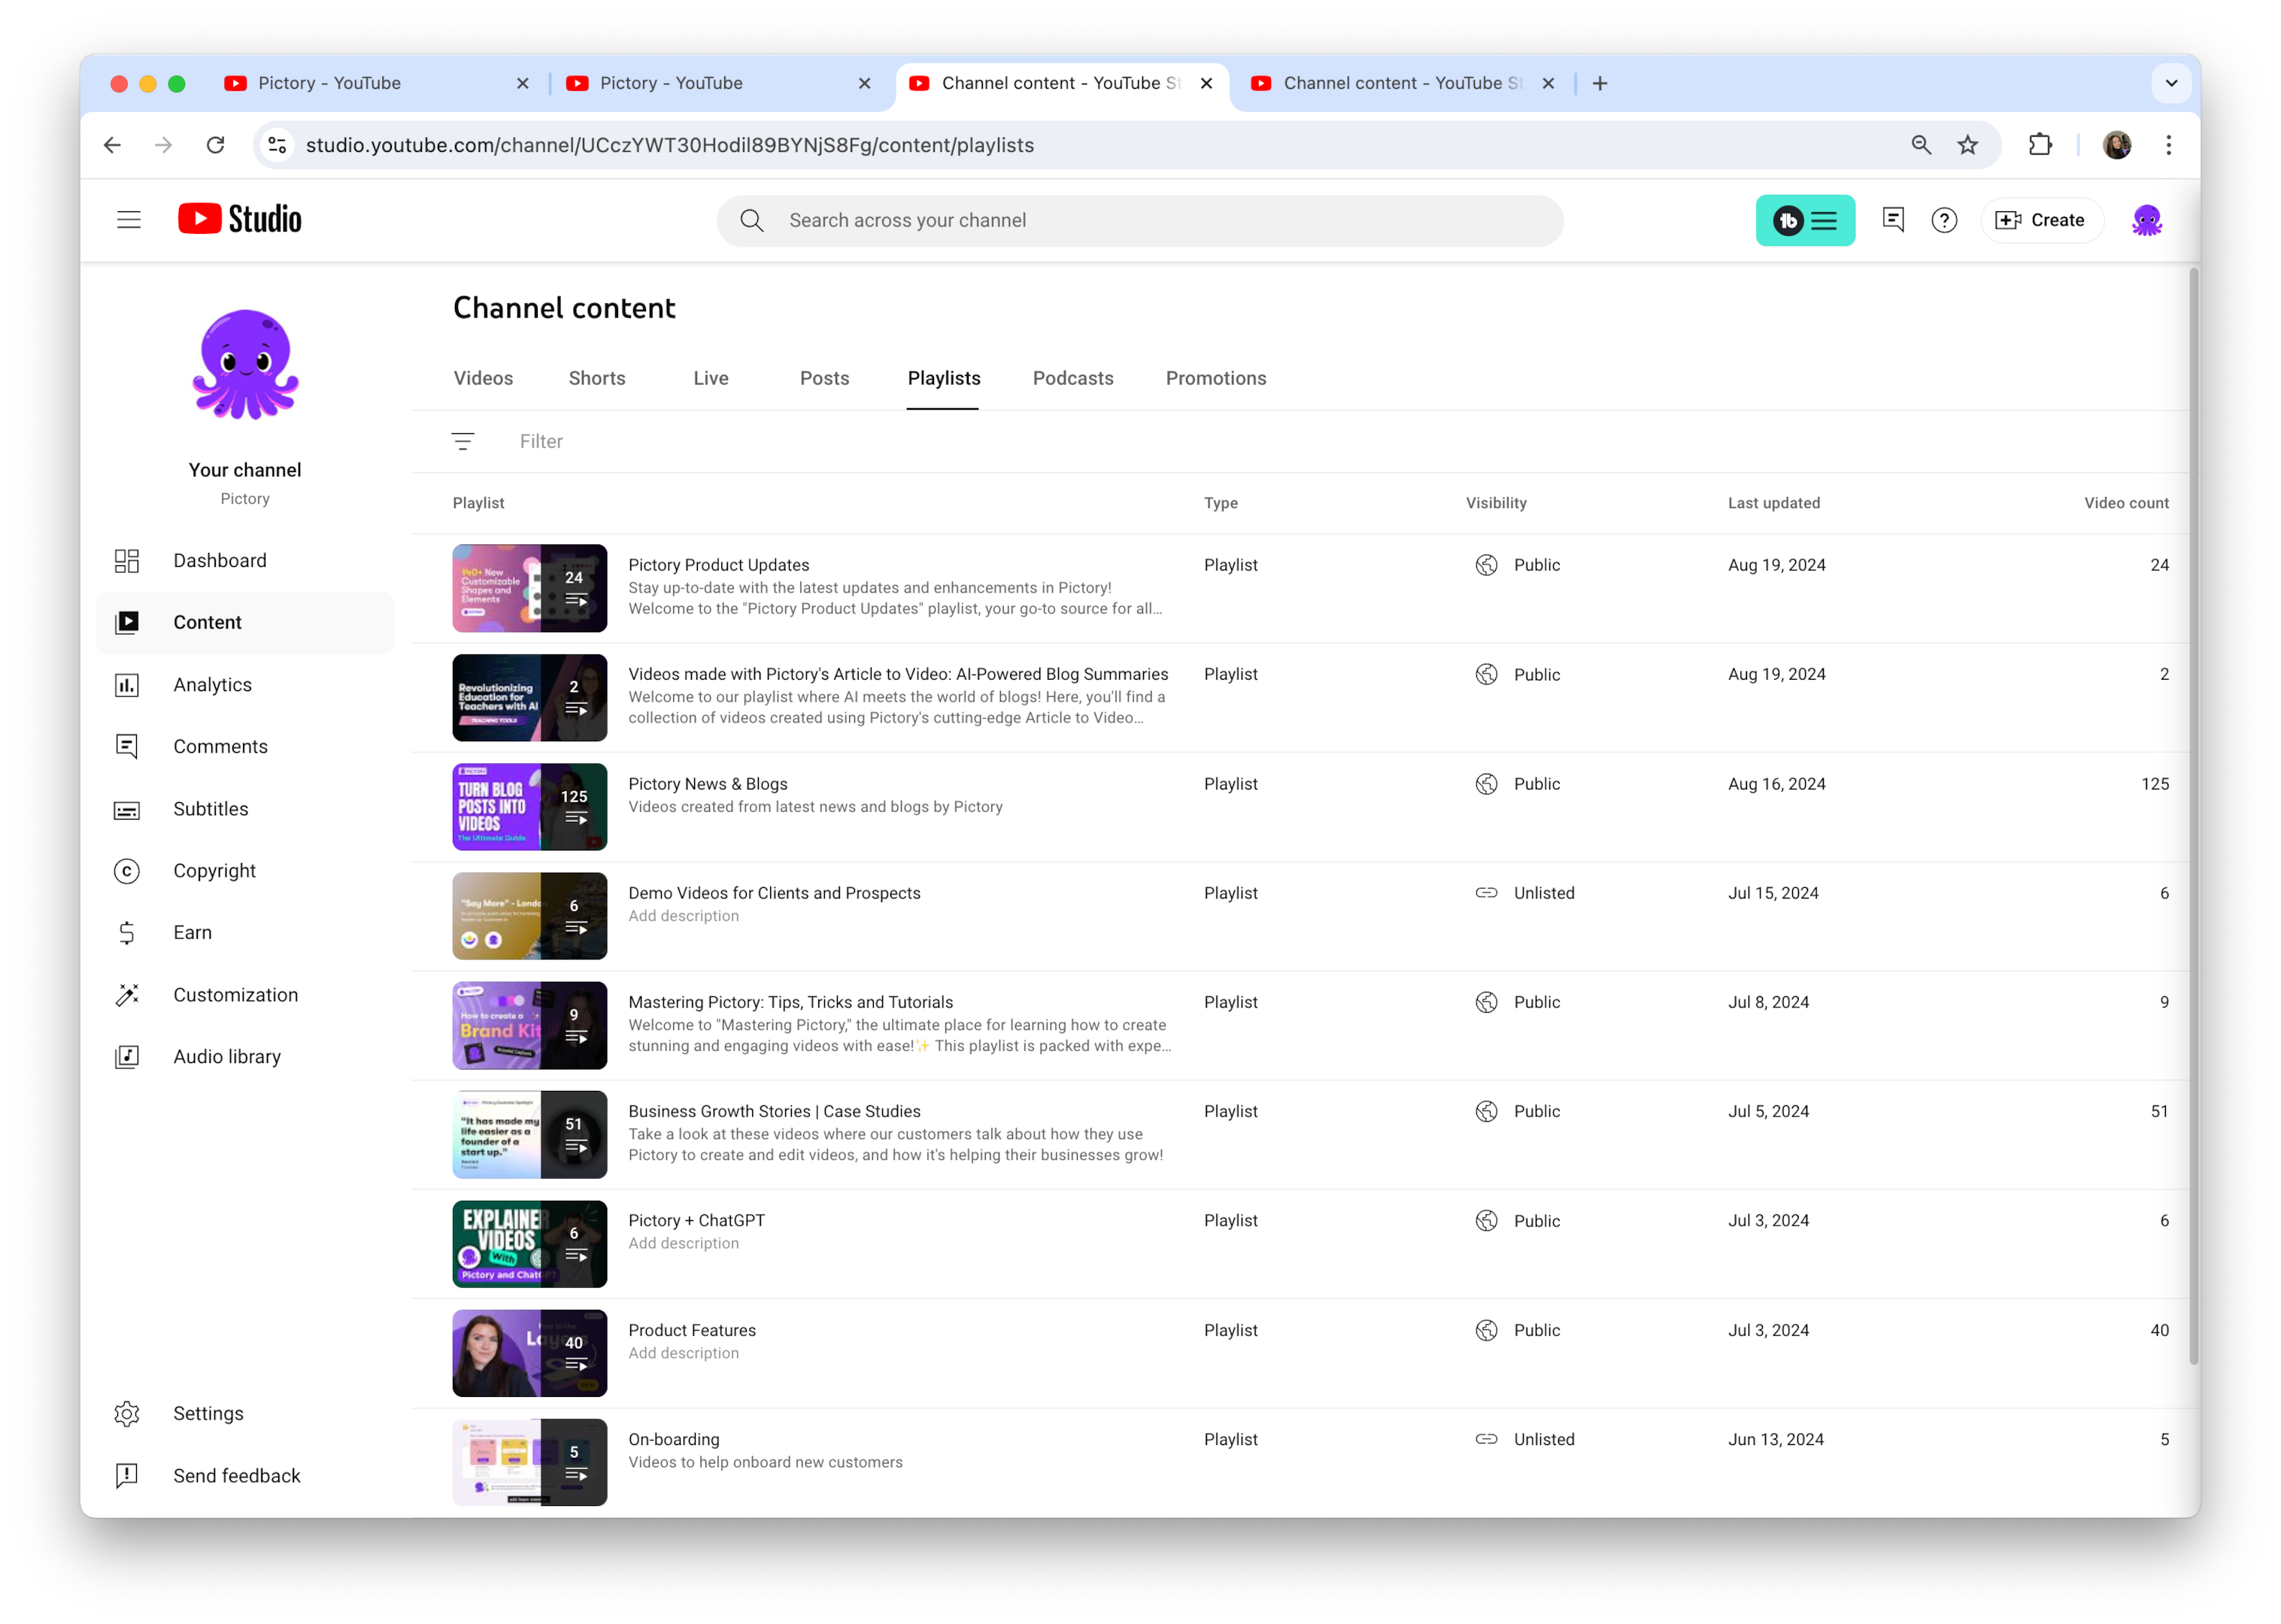
Logging into your YouTube account and accessing the YouTube Studio.
-
Selecting the ‘Playlists’ option from the left-hand side menu.
-
Clicking on ‘New Playlist’.
-
Giving your playlist a title.
-
Choosing its privacy settings (public, private, or unlisted).
-
Start adding videos.
The charm of playlists is their flexibility, allowing for continuous addition, removal, or reordering of videos to retain freshness and engagement in your content.
Benefits of Creating YouTube Playlists
Creating YouTube playlists unveils a plethora of opportunities for your channel. Here are some benefits of creating playlists:
-
Content curation: Playlists allow you to group related videos together, making it easier for viewers to find and enjoy content that interests them.
-
Improved user experience: Organizing your videos into playlists improves the user experience on your channel.
-
Collaboration: You can include videos from other creators in your playlists, potentially leading to cross-promotion and new partnerships.
The advantages continue. Playlists serve as an effective tool for enhancing your channel’s visibility. When you create a well-organized playlist, you’re essentially telling YouTube’s algorithm more about your content.
This increased context can boost your chances of being suggested to viewers, potentially increasing your reach and attracting new subscribers. Moreover, playlists allow you to breathe new life into older content by grouping it with newer videos, ensuring that your evergreen content continues to provide value.
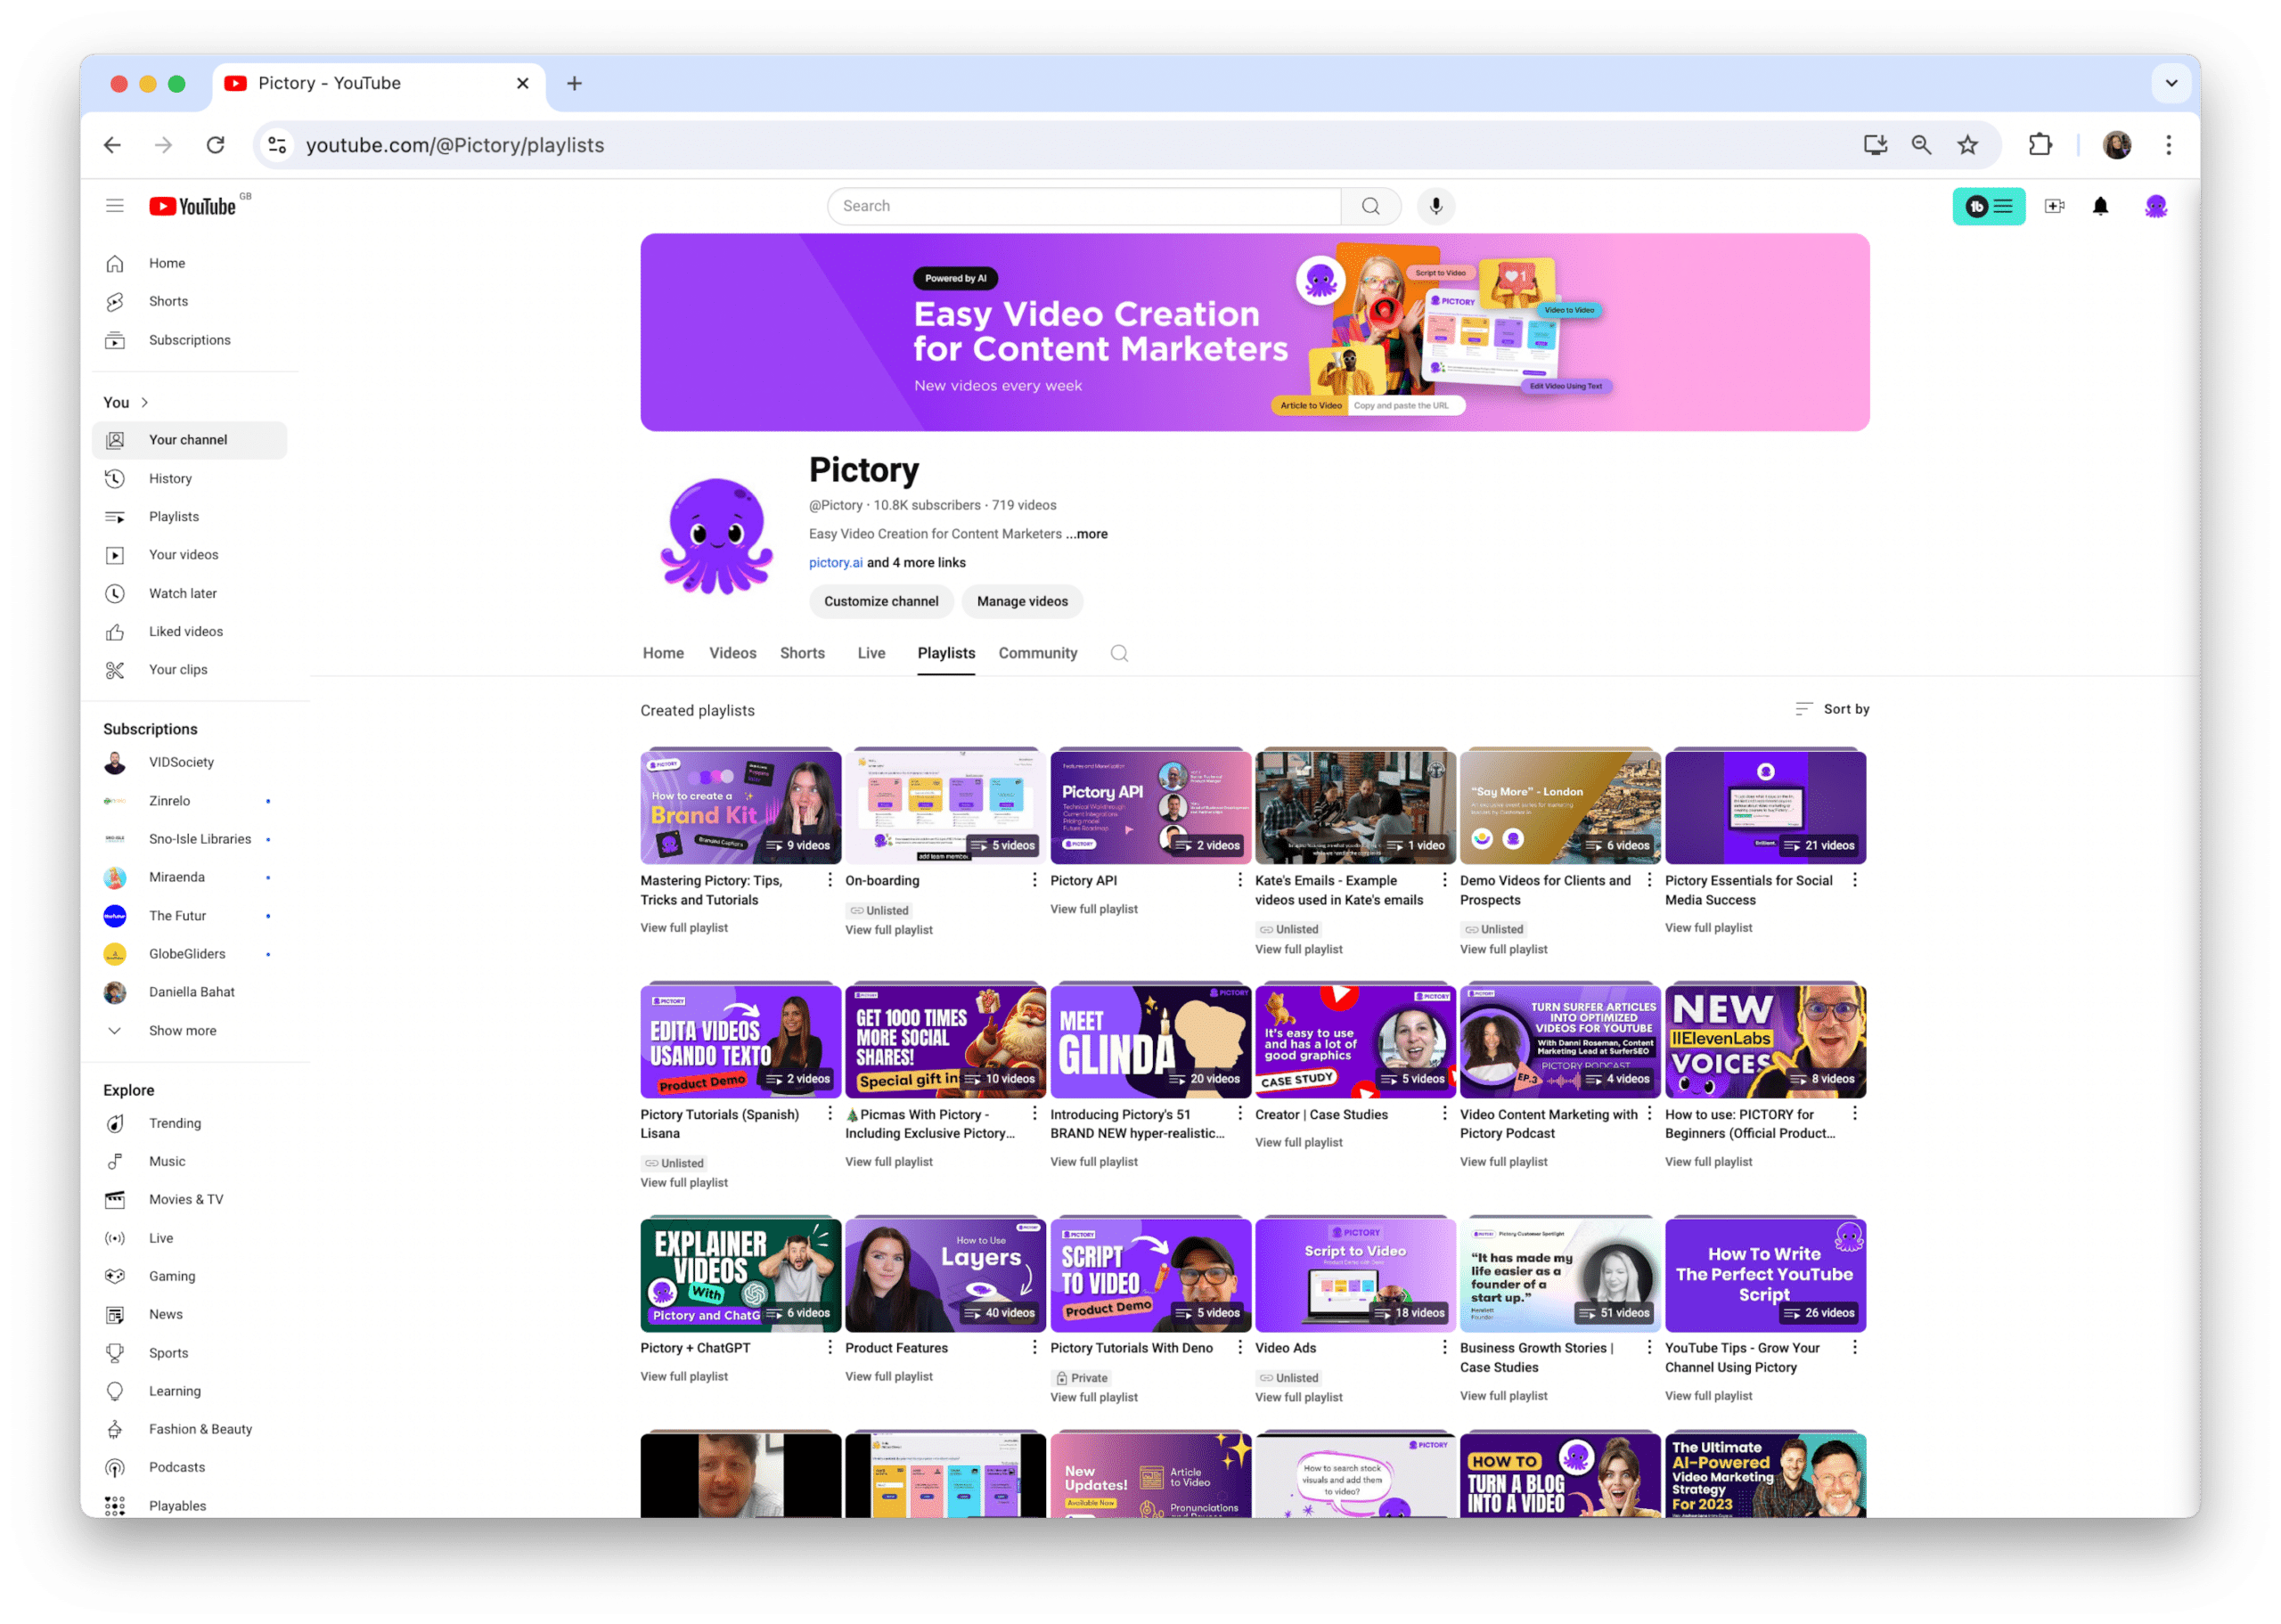
One of the key benefits of playlists is their ability to boost watch time. When a viewer initiates a video in a playlist, the subsequent video automatically begins playing as the current one concludes. This smooth transition motivates viewers to continue watching, potentially for extended durations.
Increased watch time is a crucial metric for YouTube’s algorithm, which can lead to better rankings in search results and more frequent appearances in recommended videos. By judiciously structuring your content into playlists, you not only enhance the viewer experience but also pave the way for your channel’s long-term success.
Improve Channel Exposure
Playlists serve as your clandestine arsenal for enhancing your channel’s visibility on YouTube. When you create a well-optimized playlist, you’re essentially giving YouTube’s search algorithm more information about your content. This increased context can help your videos appear in more search results, potentially attracting viewers who might not have found your individual videos otherwise. Moreover, playlists themselves can rank in search results, giving you another opportunity to capture attention.
By targeting new keywords with your playlist titles and descriptions, you can tap into different search queries and expand your reach.
Remember, a public playlist that’s well-organized and focused on a specific theme or topic is more likely to be recommended by YouTube’s algorithm, further increasing your channel’s exposure.
Enhance Viewer Experience
Playlists are not just about organizing your content; they’re about crafting an exceptional viewing experience for your audience. Grouping related videos together crafts a curated journey for your viewers, enabling them to delve into their topics of interest without the need for manually searching the next relevant video. This seamless viewing experience can significantly increase the time viewers spend on your channel, as they’re more likely to watch multiple videos in one session.
Moreover, well-organized playlists make it easier for viewers to find the specific content they’re looking for, improving their overall satisfaction with your channel.
Whether you’re creating a series of tutorials, compiling your best vlogs, or grouping videos by theme, playlists help you guide your audience through your content in a way that makes sense and keeps them engaged.
Boost Watch Time
One of the primary benefits of creating playlists is their potential to substantially boost your channel’s watch time. When a viewer starts watching a video in a playlist, YouTube automatically plays the next video when the current one ends.
This autoplay feature encourages viewers to keep watching, potentially turning a single video view into an extended viewing session. Increased watch time is a crucial metric for YouTube’s algorithm, as it signals that your content is engaging and valuable to viewers. The more watch time your channel accumulates, the more likely YouTube is to promote your content in search results and recommendations.
This virtuous cycle can lead to increased visibility, more subscribers, and ultimately, greater success for your channel. By methodically arranging your videos into playlists, you not only enhance the viewer experience but also prime your channel for algorithmic success.
How to Create a Playlist on YouTube (Desktop)
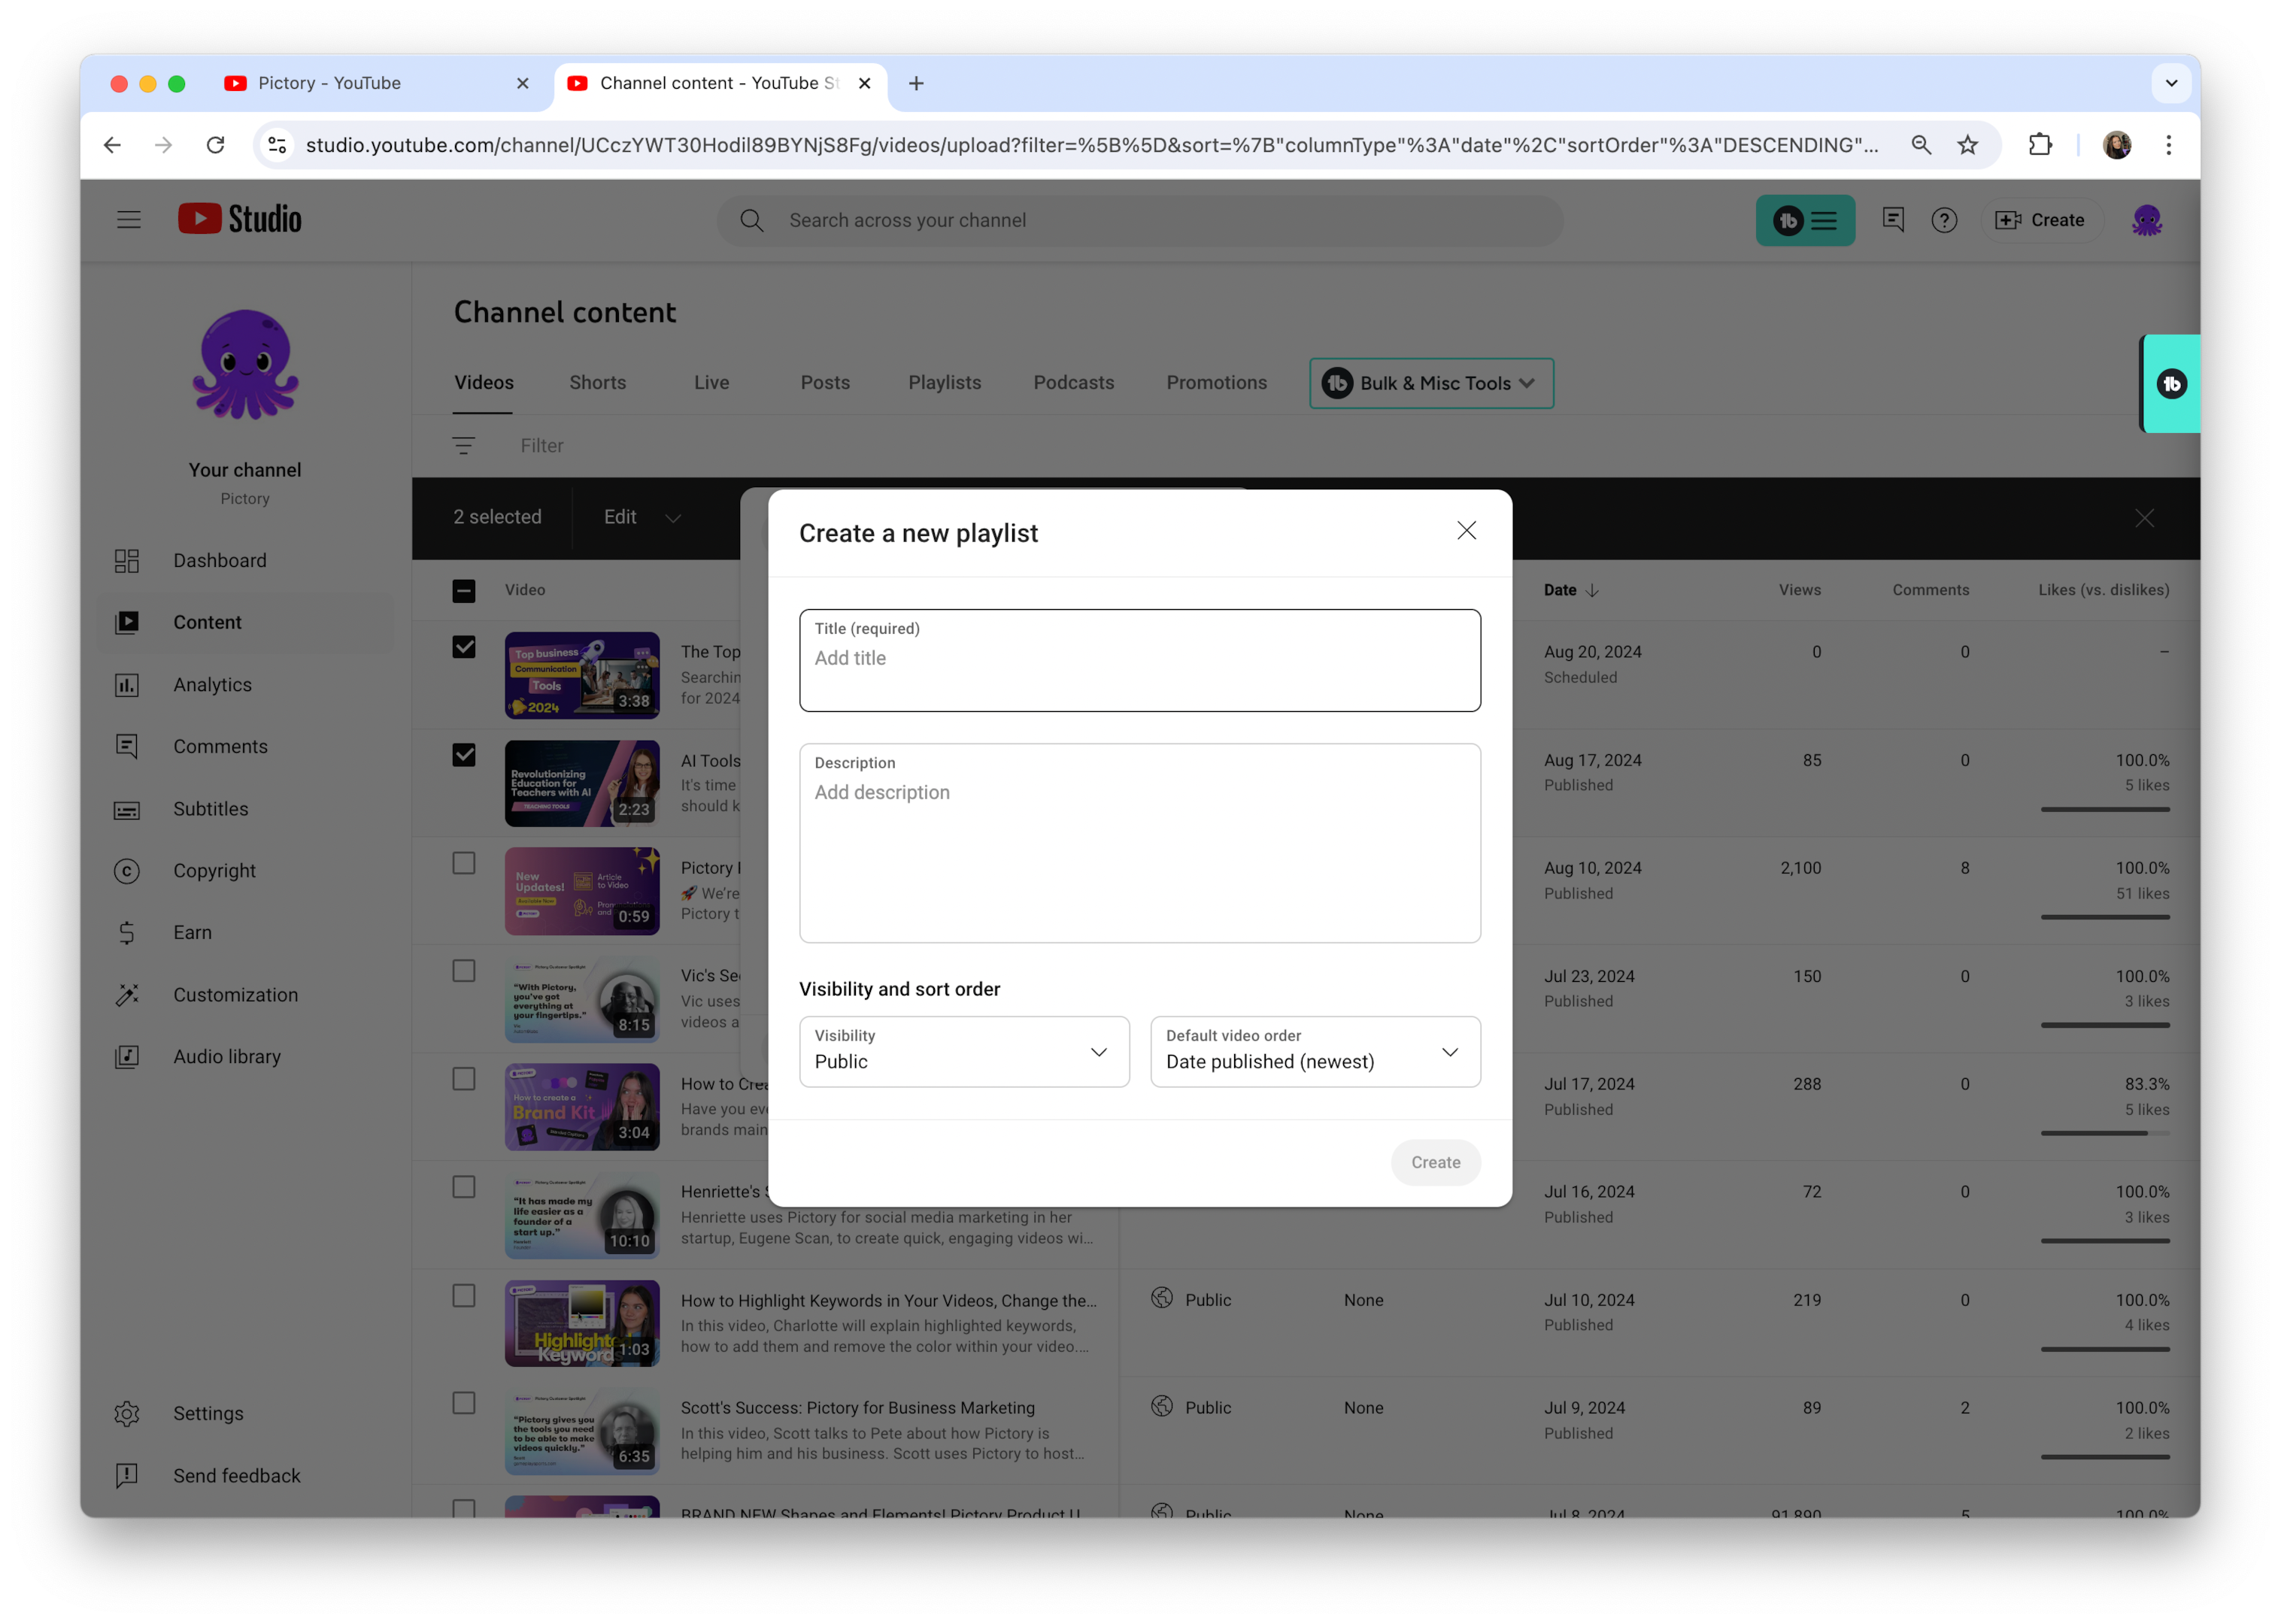
Creating a playlist on YouTube via your desktop is an uncomplicated task, leading to significant enhancements in your content organization. To begin, you’ll need to sign in to your YouTube account. Once you’re logged in, navigate to YouTube Studio by clicking on your profile picture in the top right corner and selecting ‘YouTube Studio’ from the dropdown menu. This is your command center for all things related to your channel, including playlist creation.
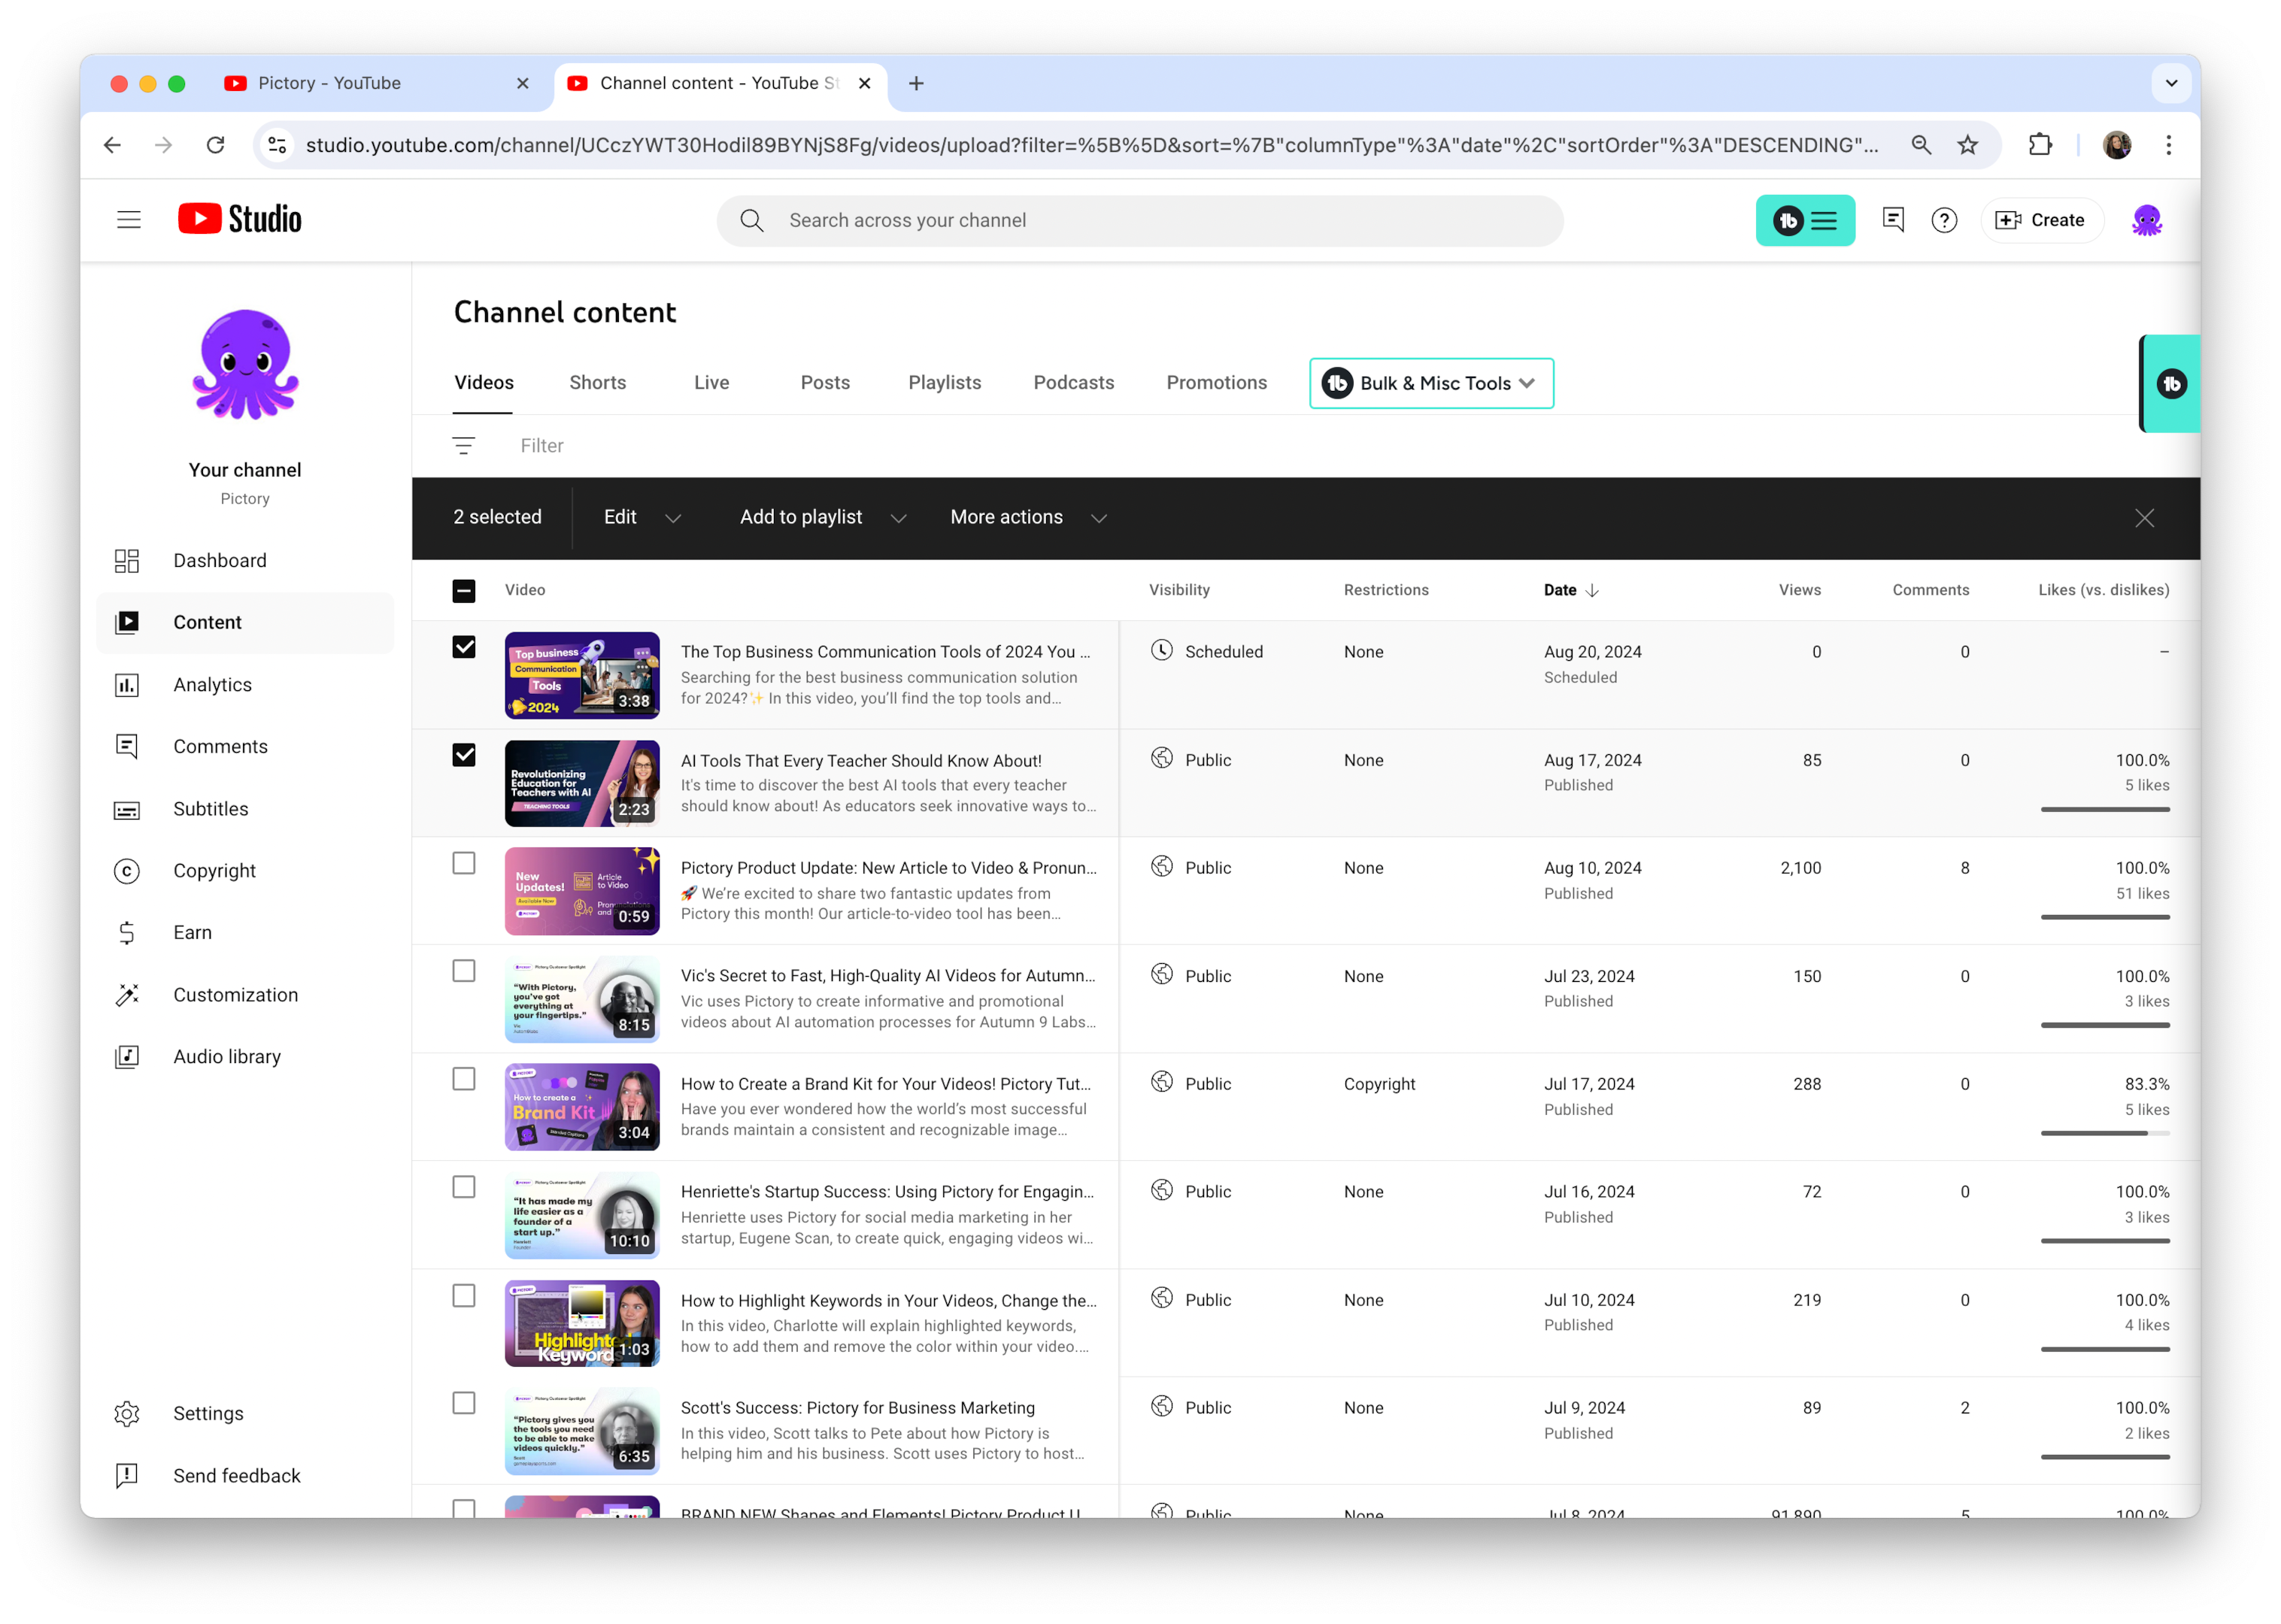
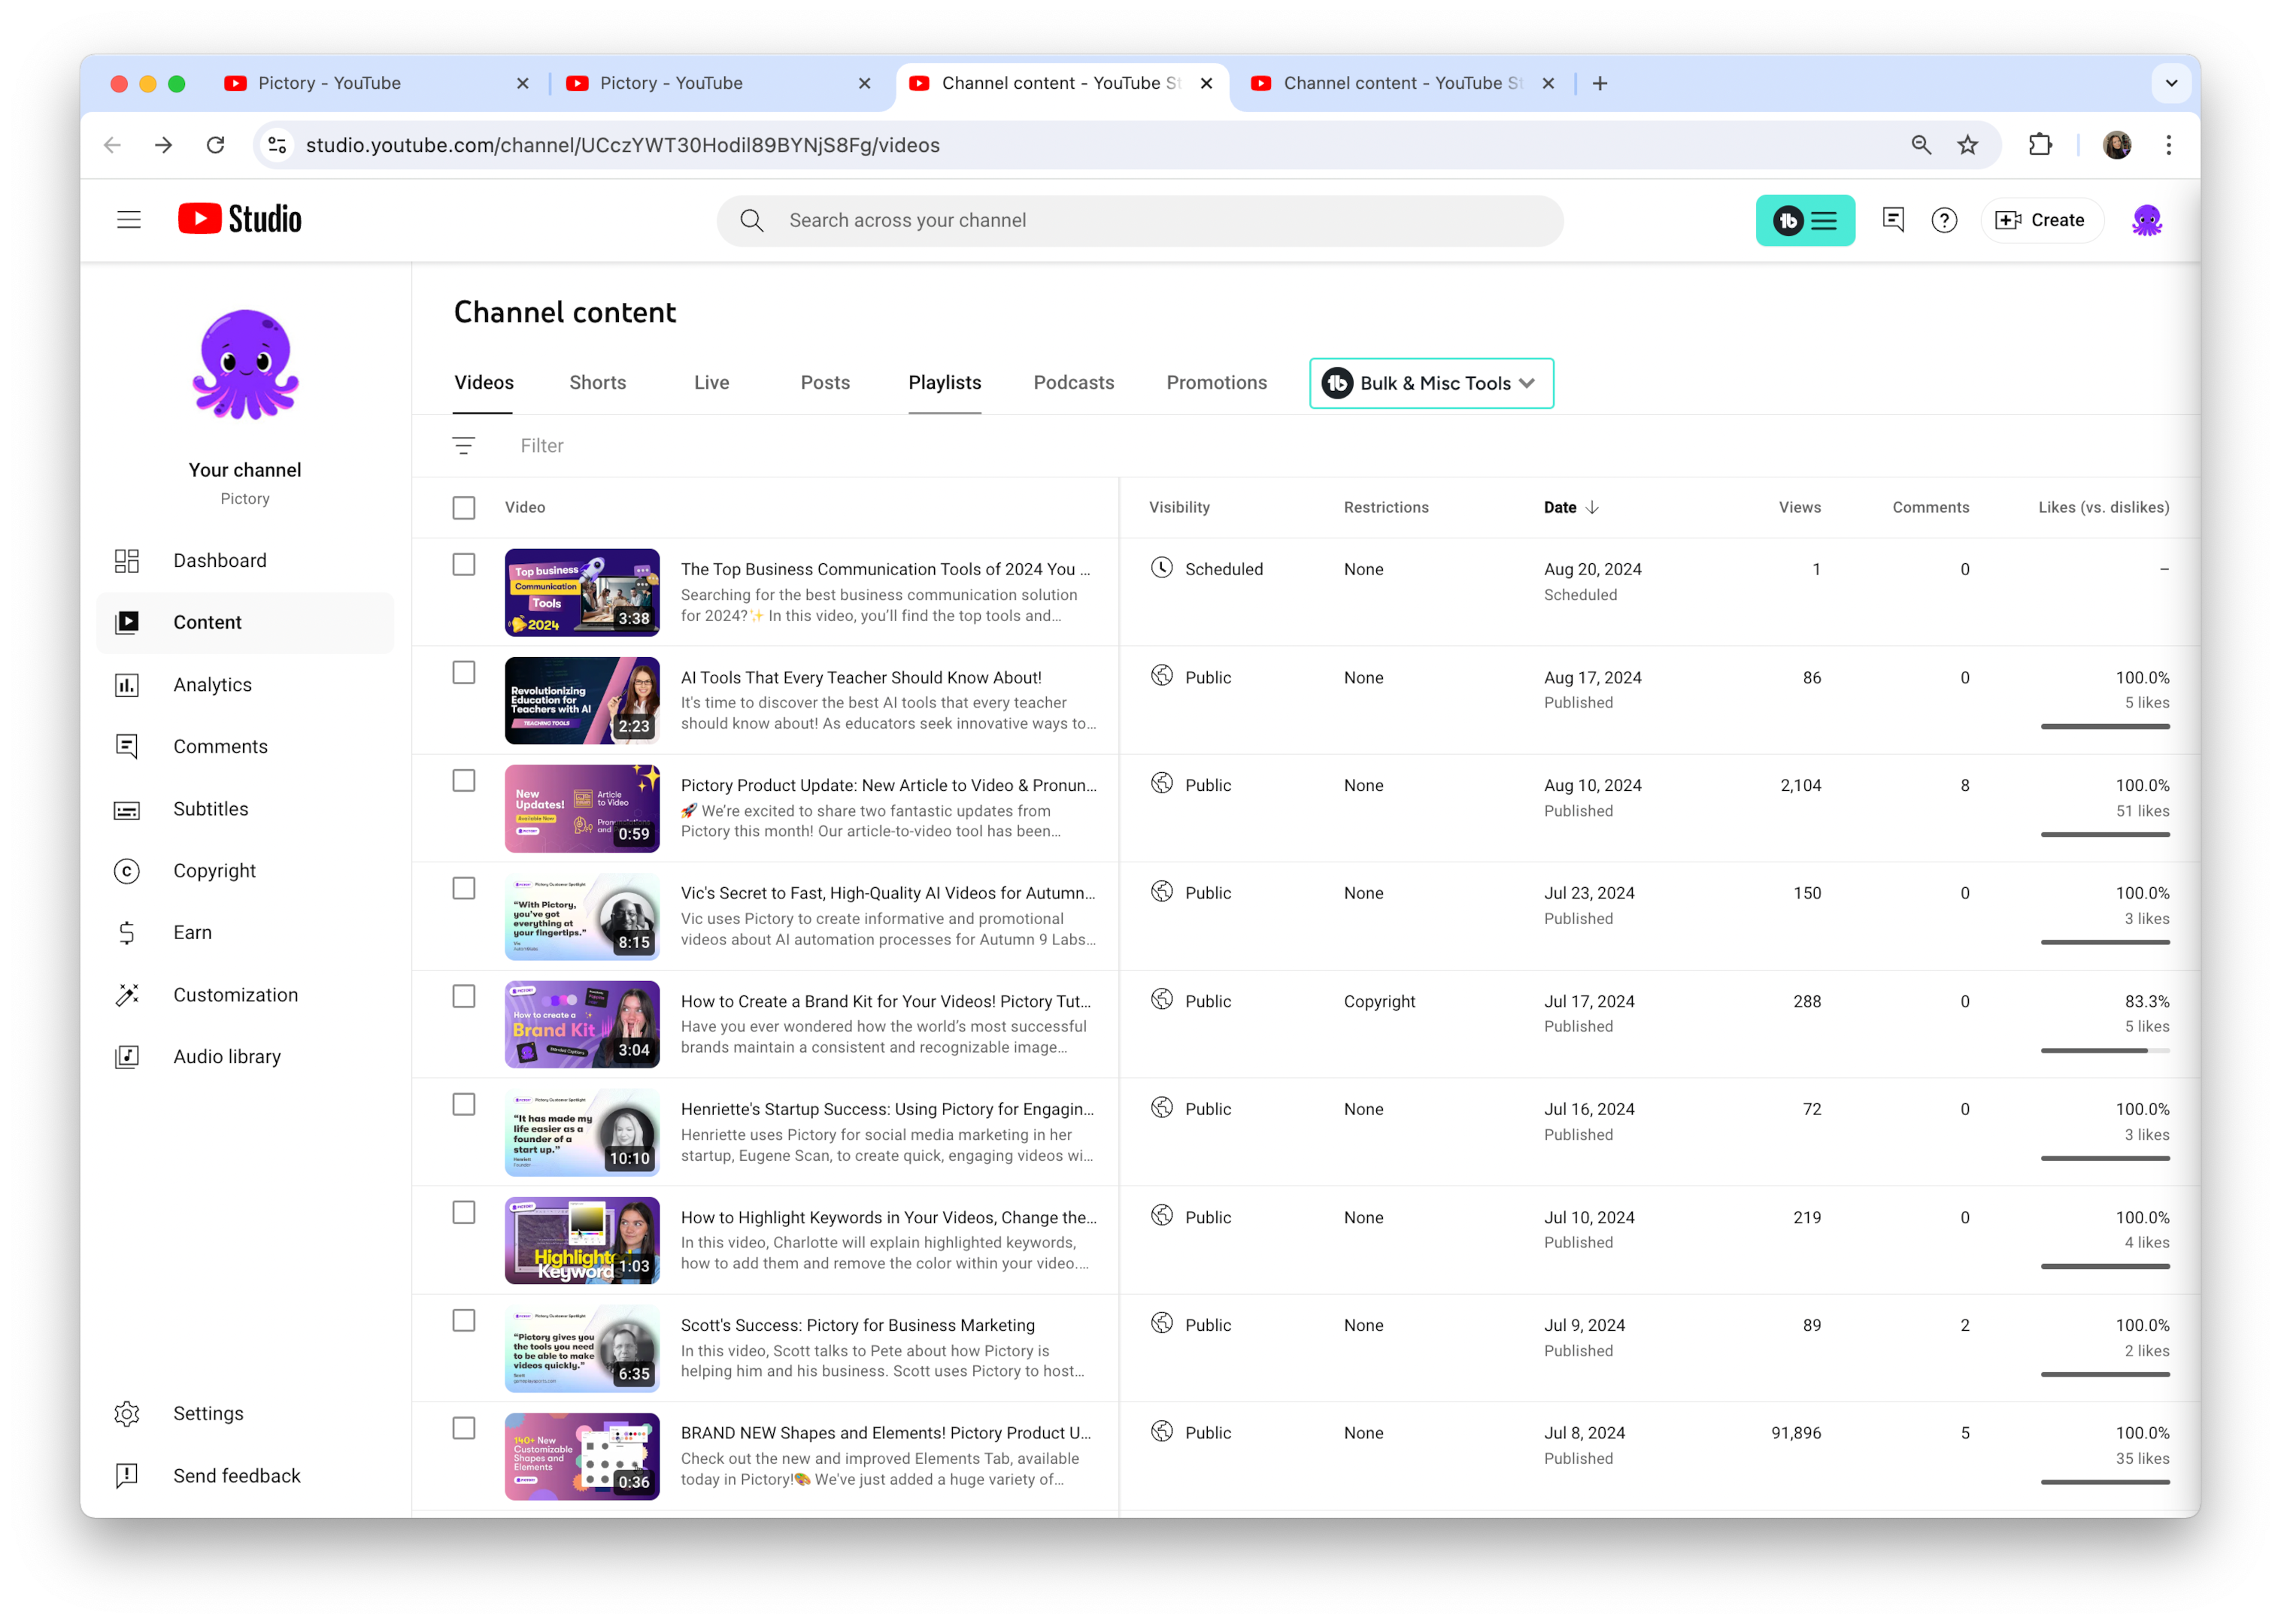
Once you’re in YouTube Studio, look for the ‘Content’ option in the left-hand menu. Click on it, and you’ll see all your uploaded videos. Now, it’s time to create your playlist. Here’s how:
-
Select the videos you want to include by checking the boxes next to them.
-
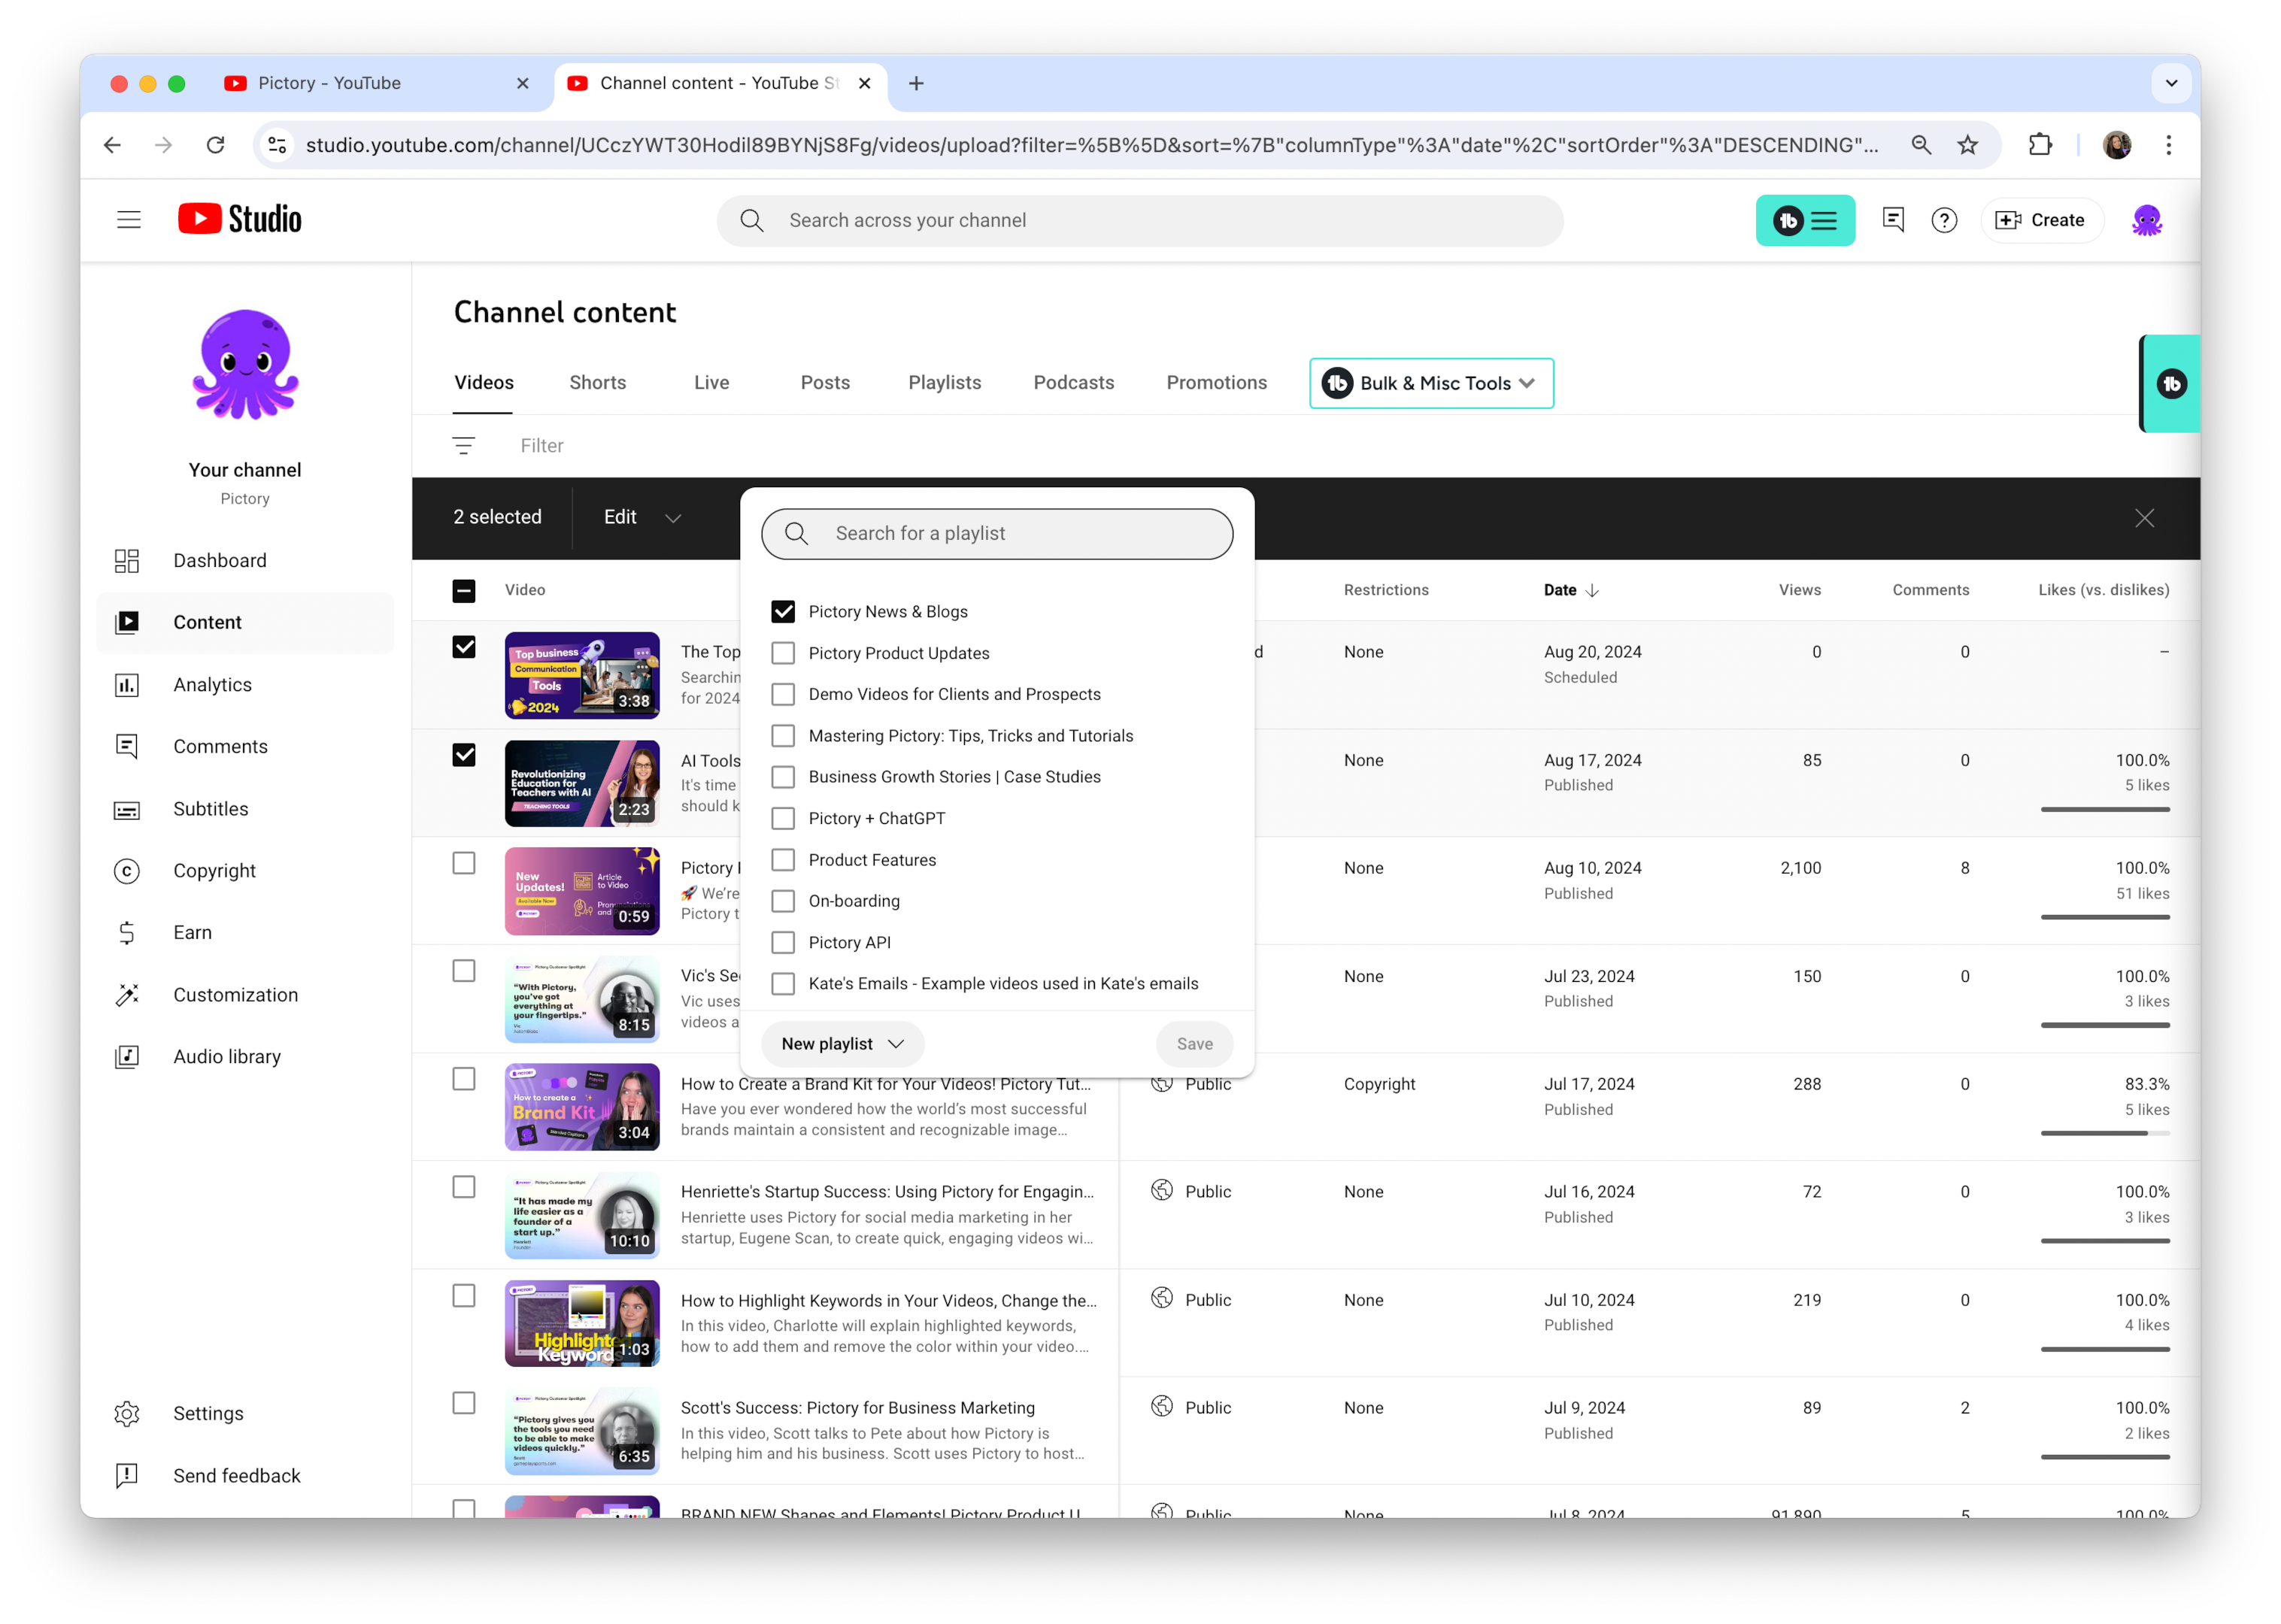
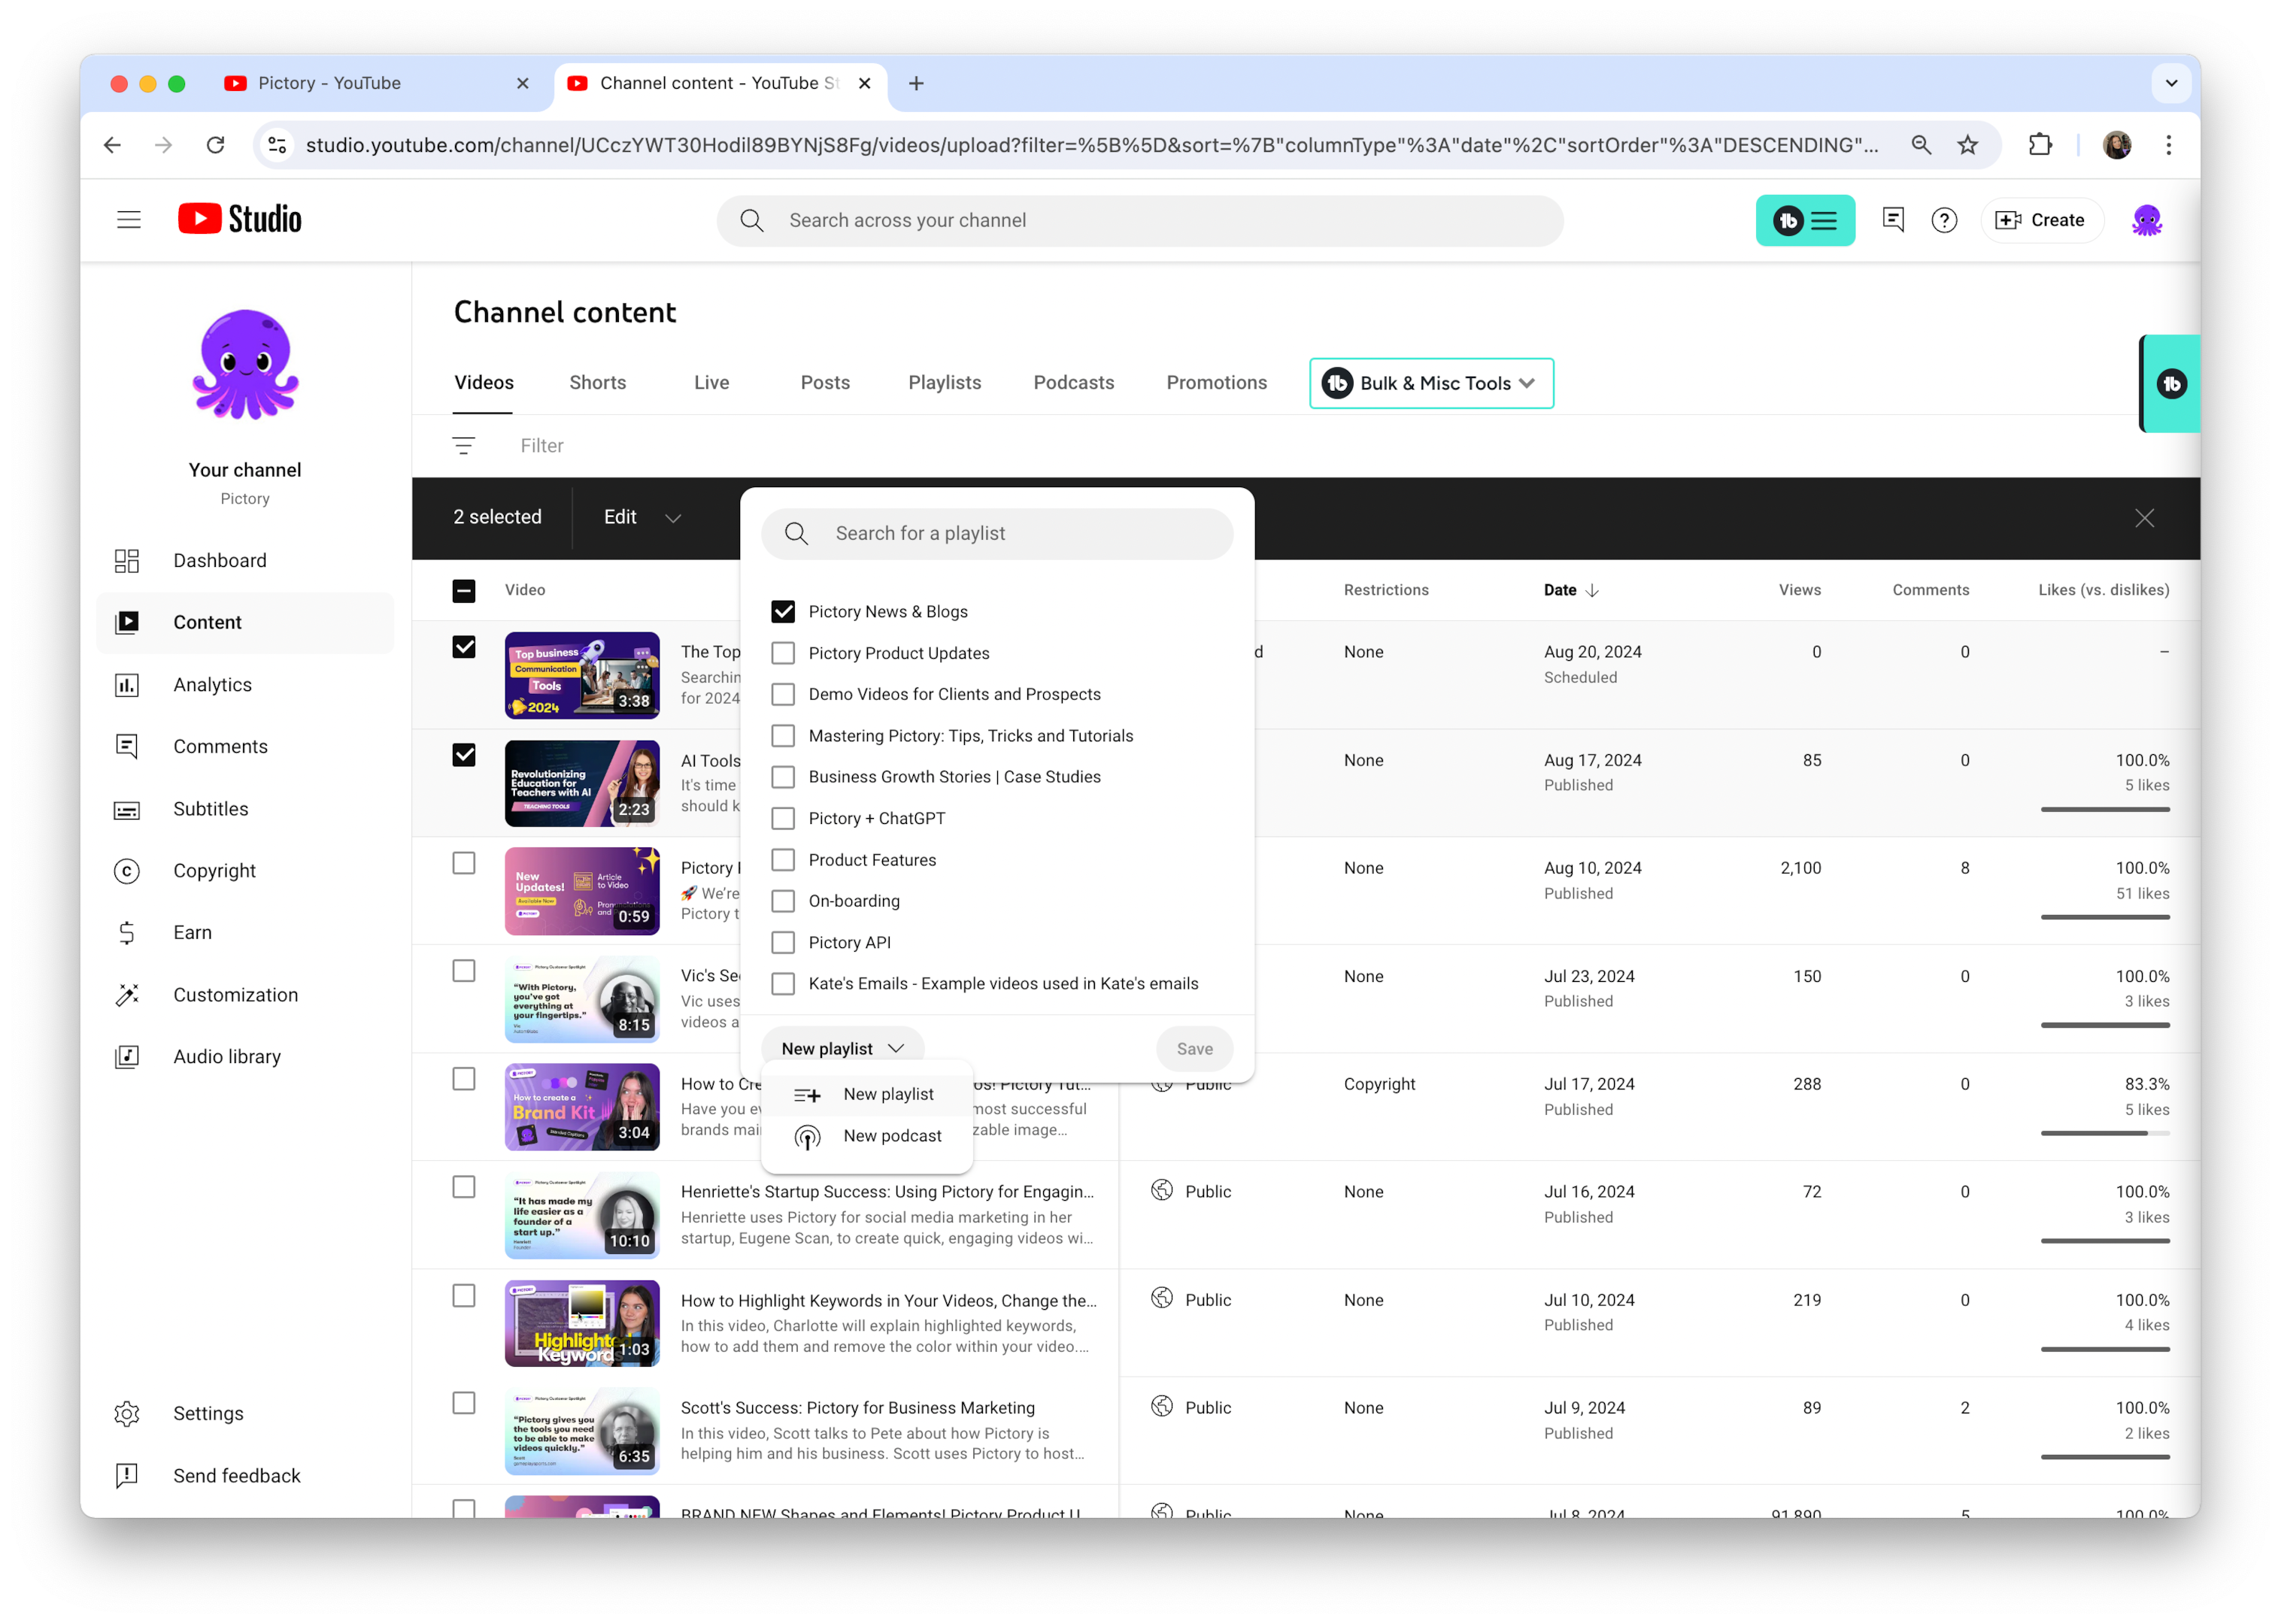
Click on the ‘New Playlist’ button that appears at the top of the screen.
-
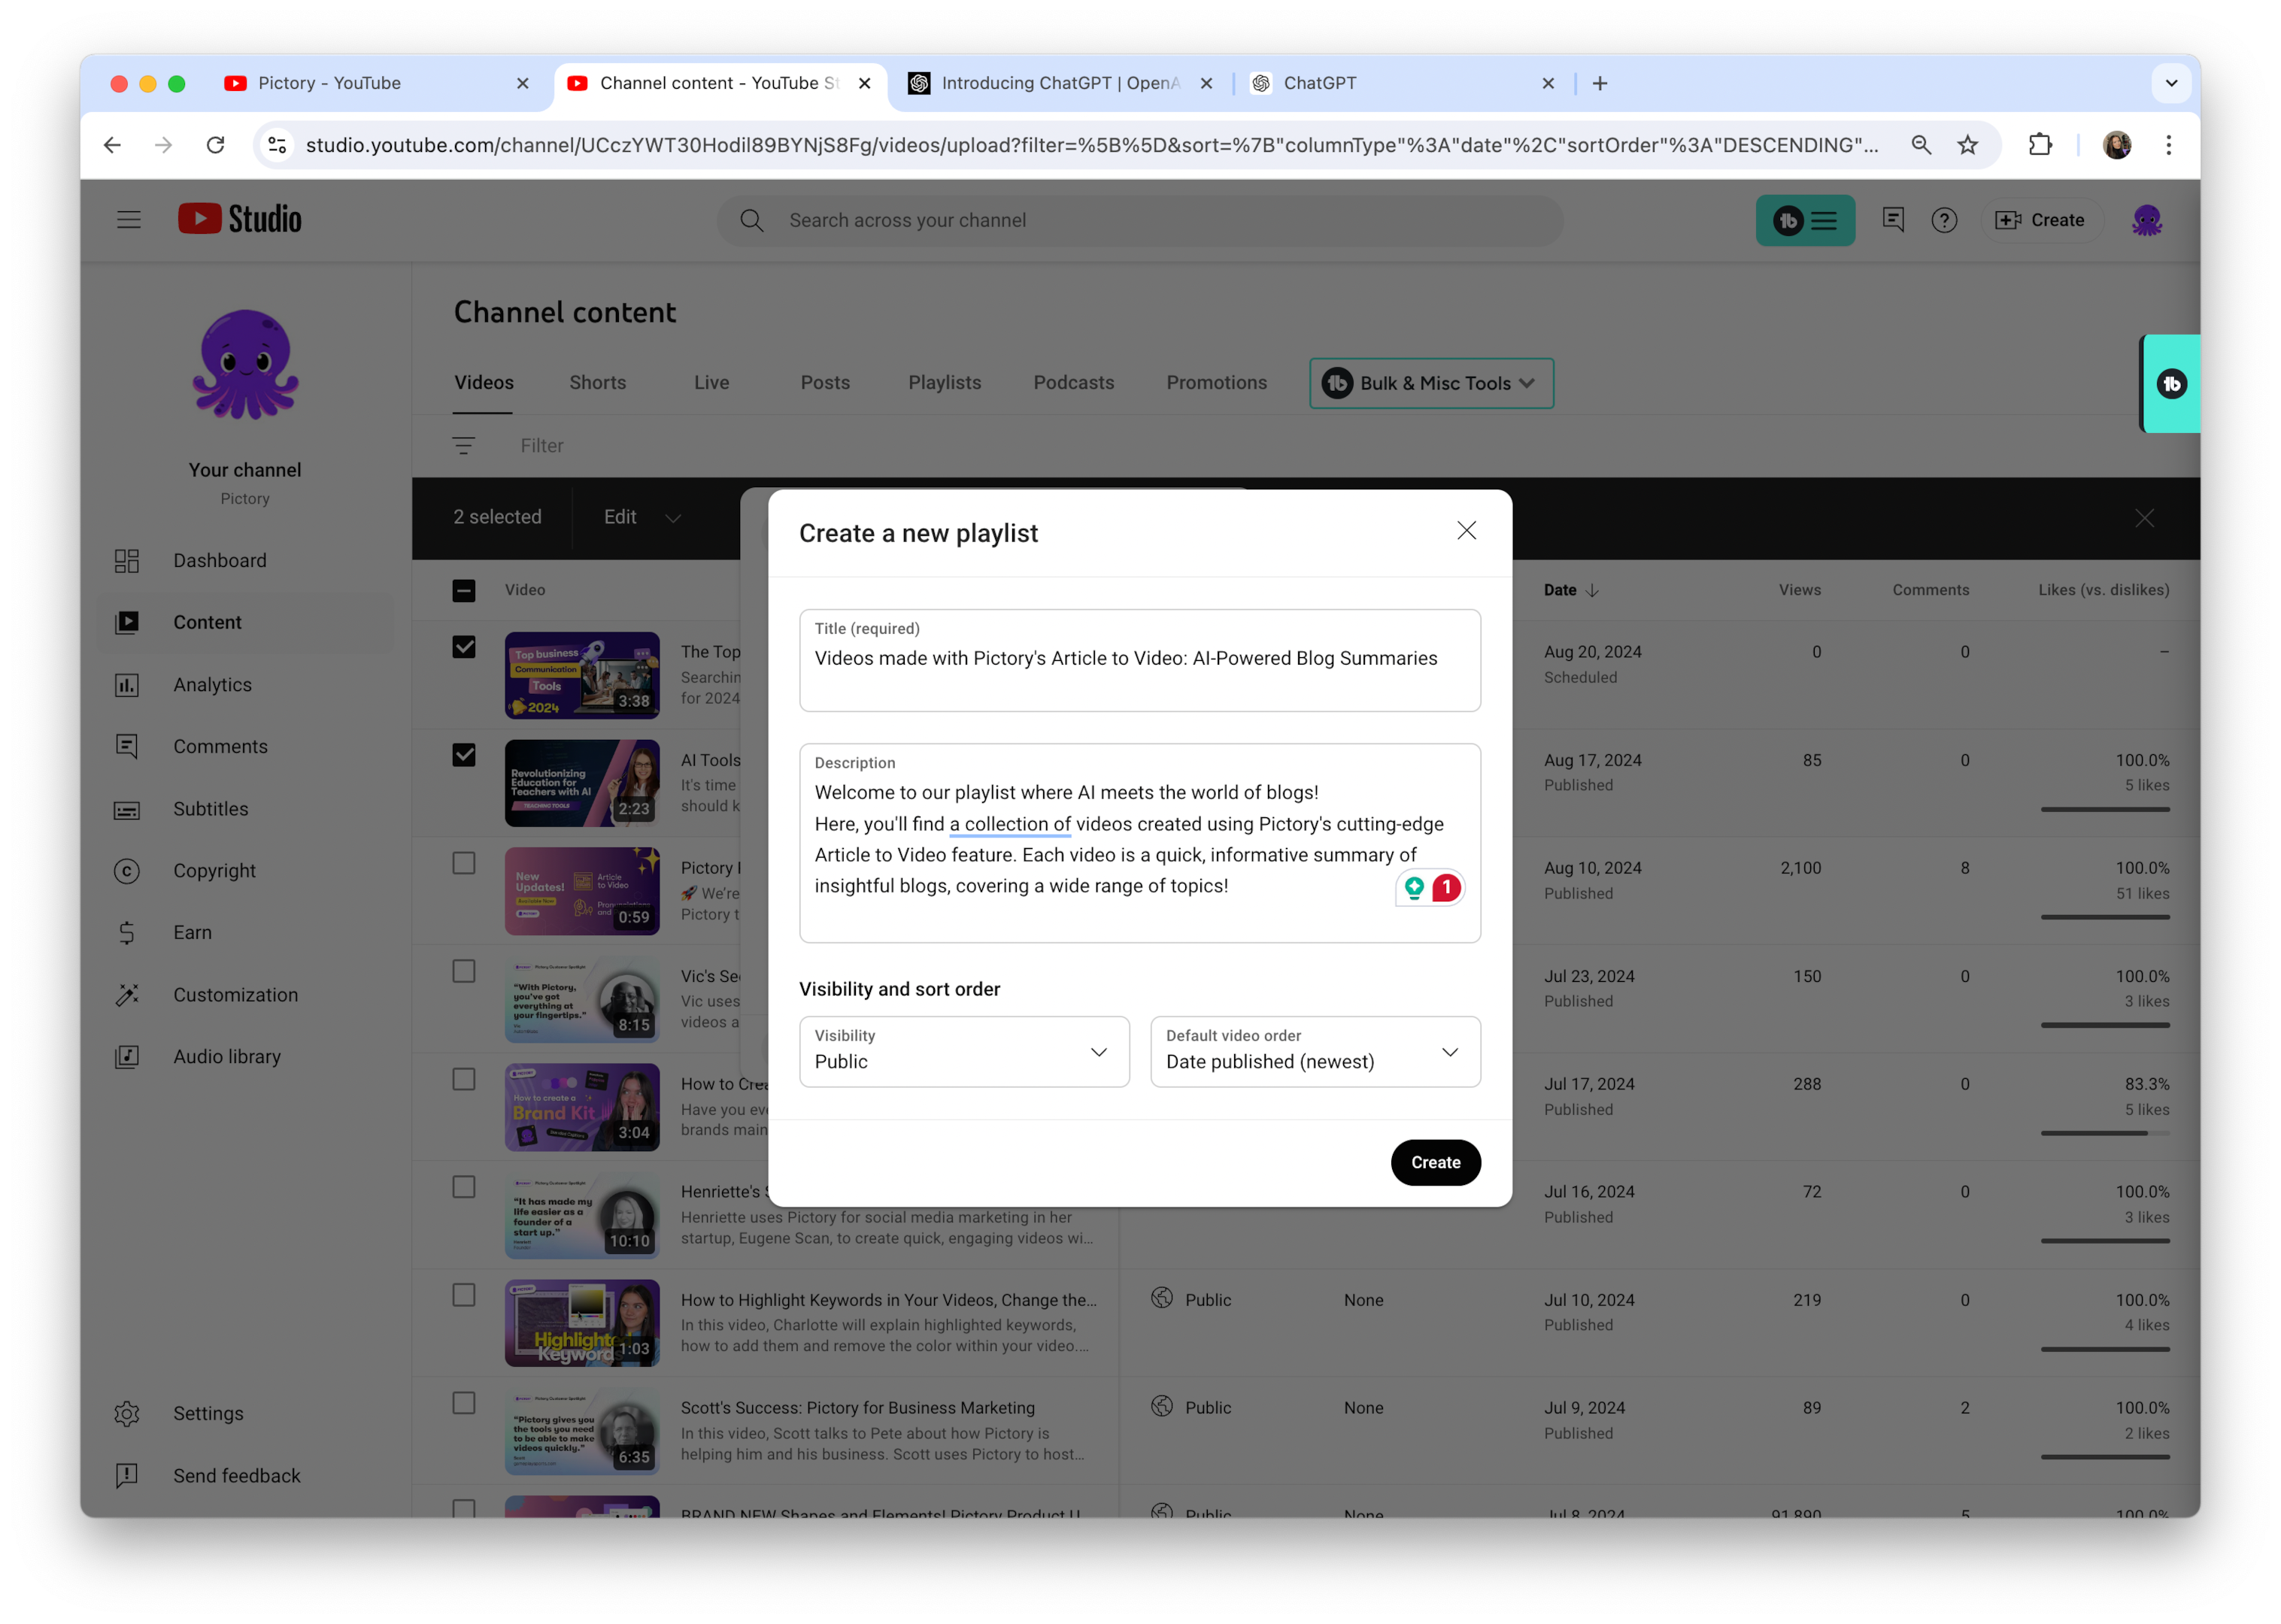
You’ll be prompted to enter a title for your playlist and choose its privacy settings. You can set it as public (visible to everyone), private (only visible to you), or unlisted (visible to anyone with the link).
-
After you’ve made your selections, click ‘Create,’ and voila! Your new playlist is born.
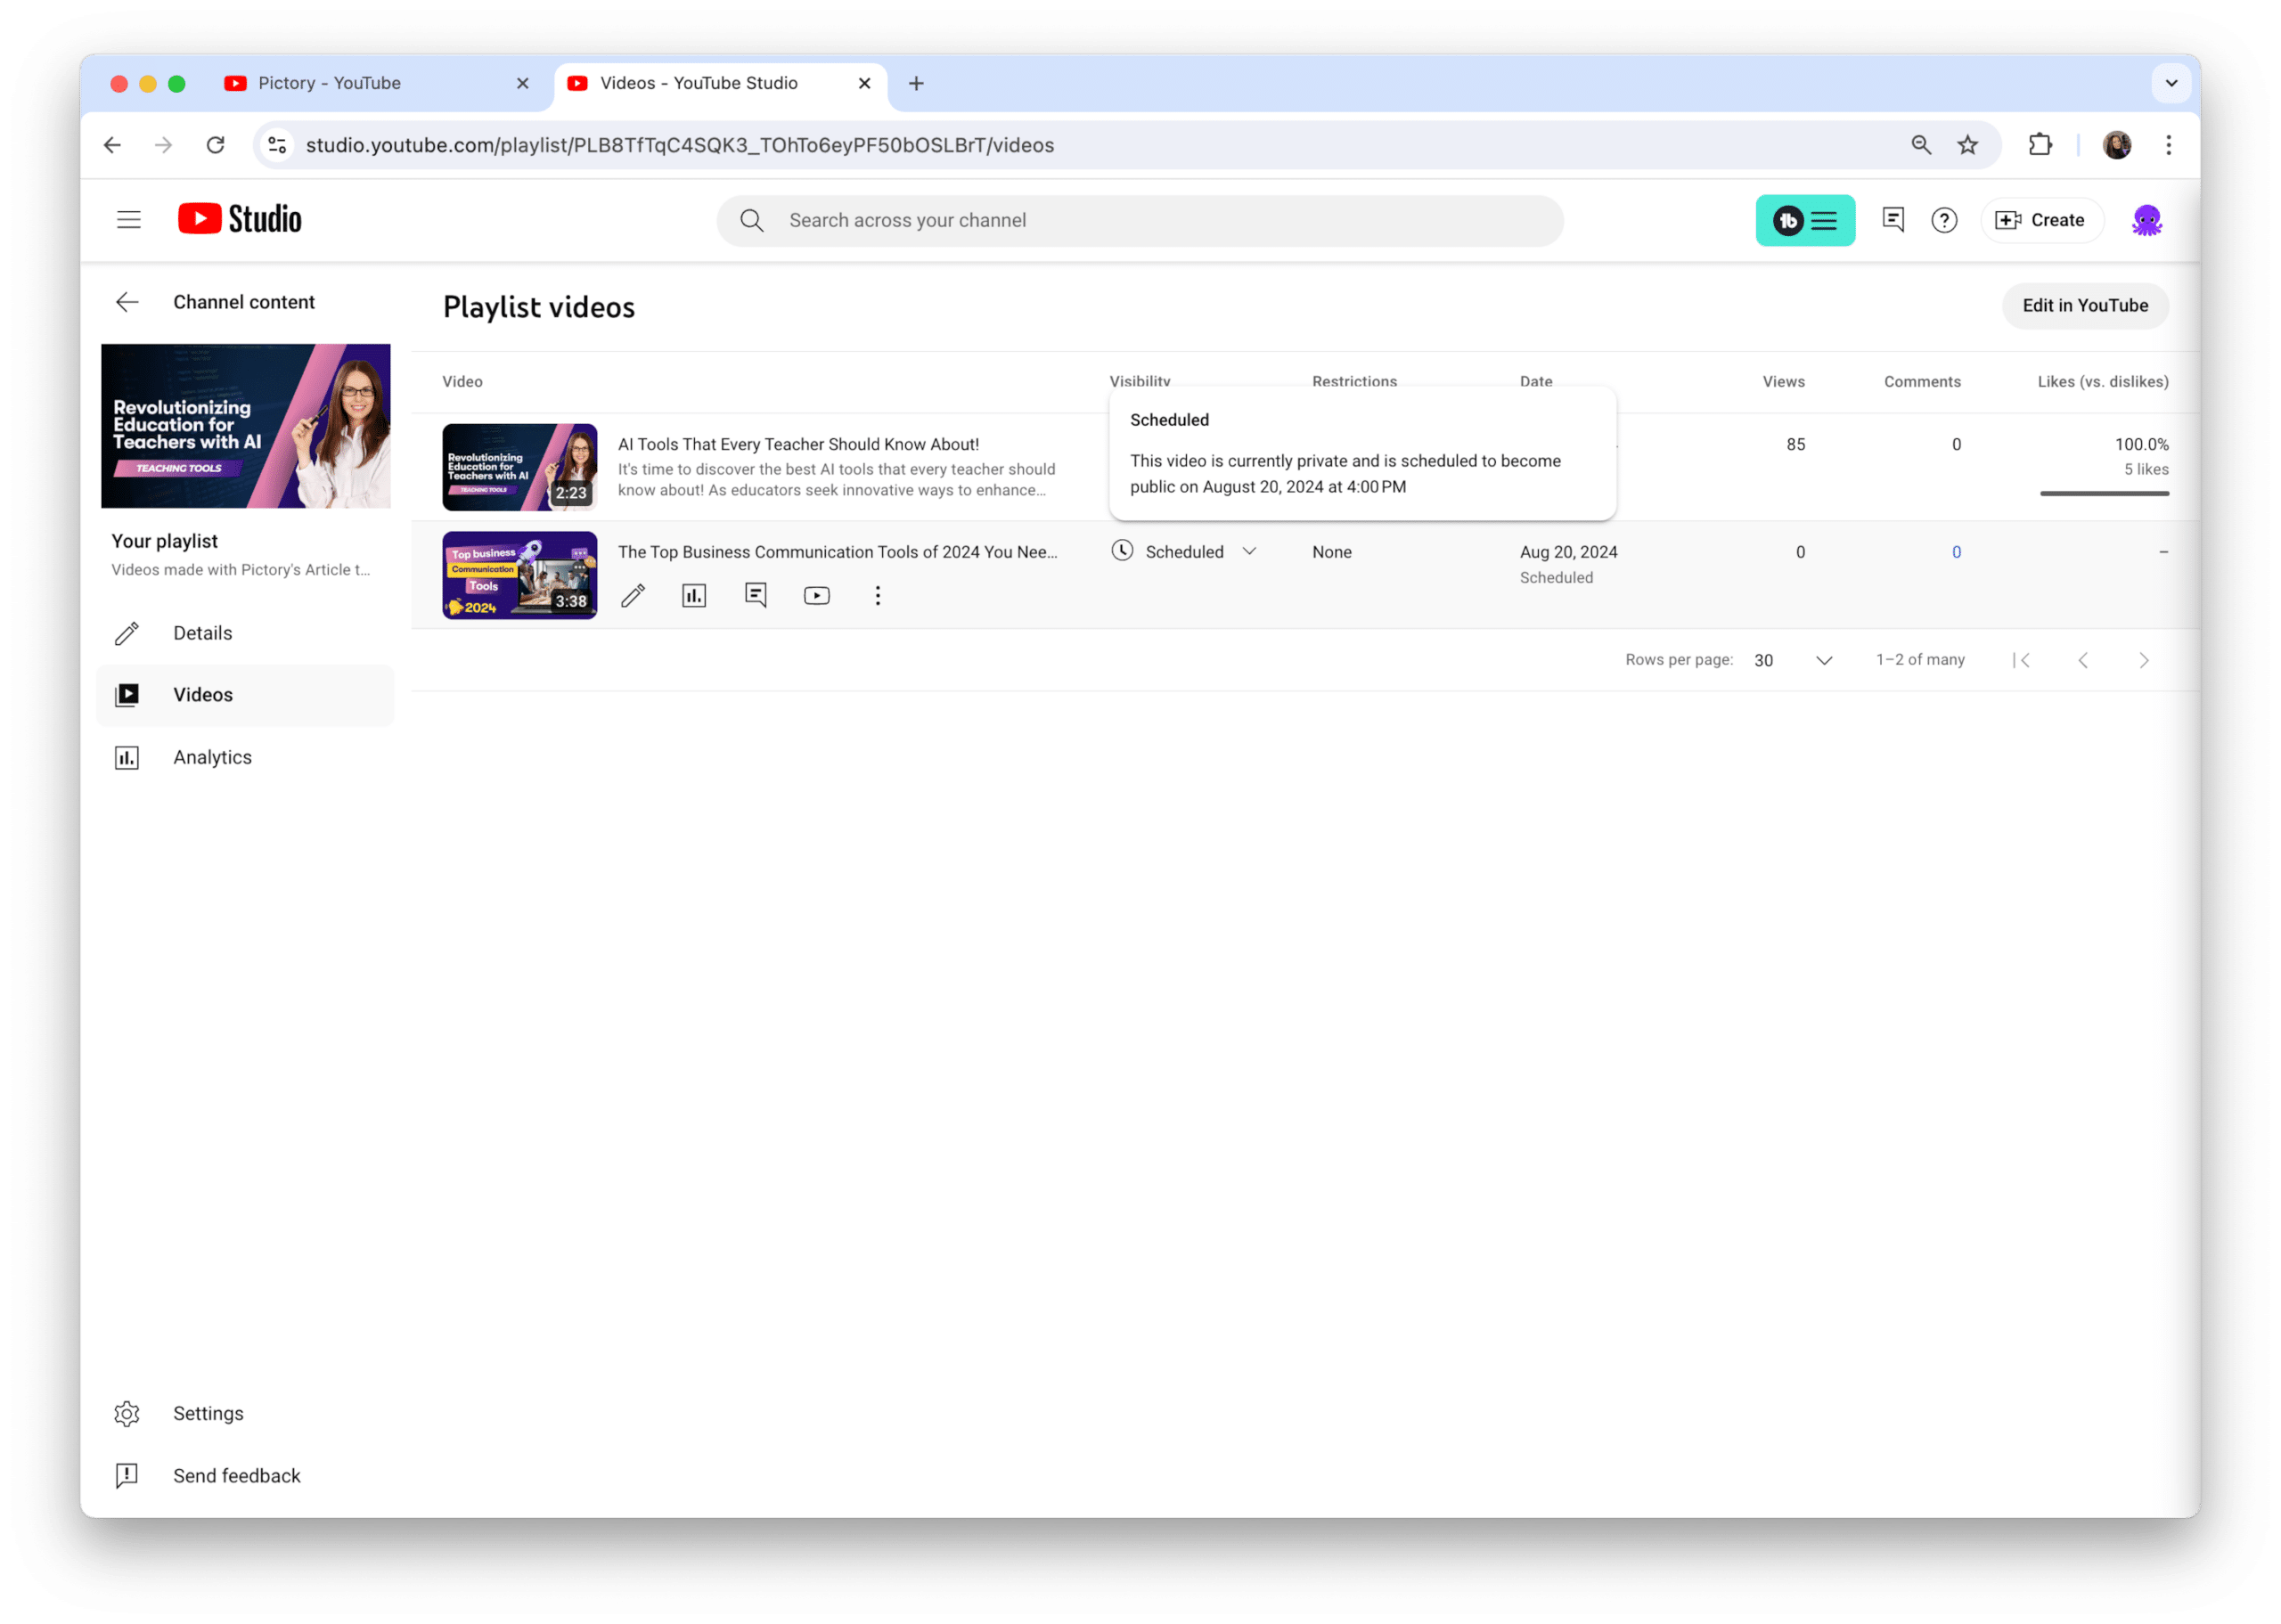
The best part? YouTube automatically saves your playlist as you create it, so you don’t have to worry about losing your work.
Accessing Your YouTube Account
Before you embark on playlist creation, you should ensure you’re correctly logged into your YouTube account. Here’s how to do it:
-
Start by visiting the YouTube homepage.
-
If you’re not already signed in, you’ll see a ‘Sign In’ button in the top right corner of the screen. Click on it.
-
Enter your Google account credentials.
Once you’re signed in, you’ll see your profile picture in place of the ‘Sign In’ button. To access YouTube Studio, where you’ll be creating your playlists, follow these steps:
-
Click on your profile picture. This will open a dropdown menu.
-
Look for the ‘YouTube Studio’ option and click on it.
-
This will take you to the YouTube Studio dashboard, your control center for all things related to your channel, including playlist creation and management.
Remember, you must be signed in to access these features, so always double-check that you’re logged into the correct account before you start creating or editing playlists.
Creating a New Playlist
Now that you’ve accessed YouTube Studio, it’s time to formulate your new playlist. The process is intuitive and user-friendly, allowing you to curate your content with ease. Here’s how to create a playlist:
-
Navigate to the video you want to add to your playlist.
-
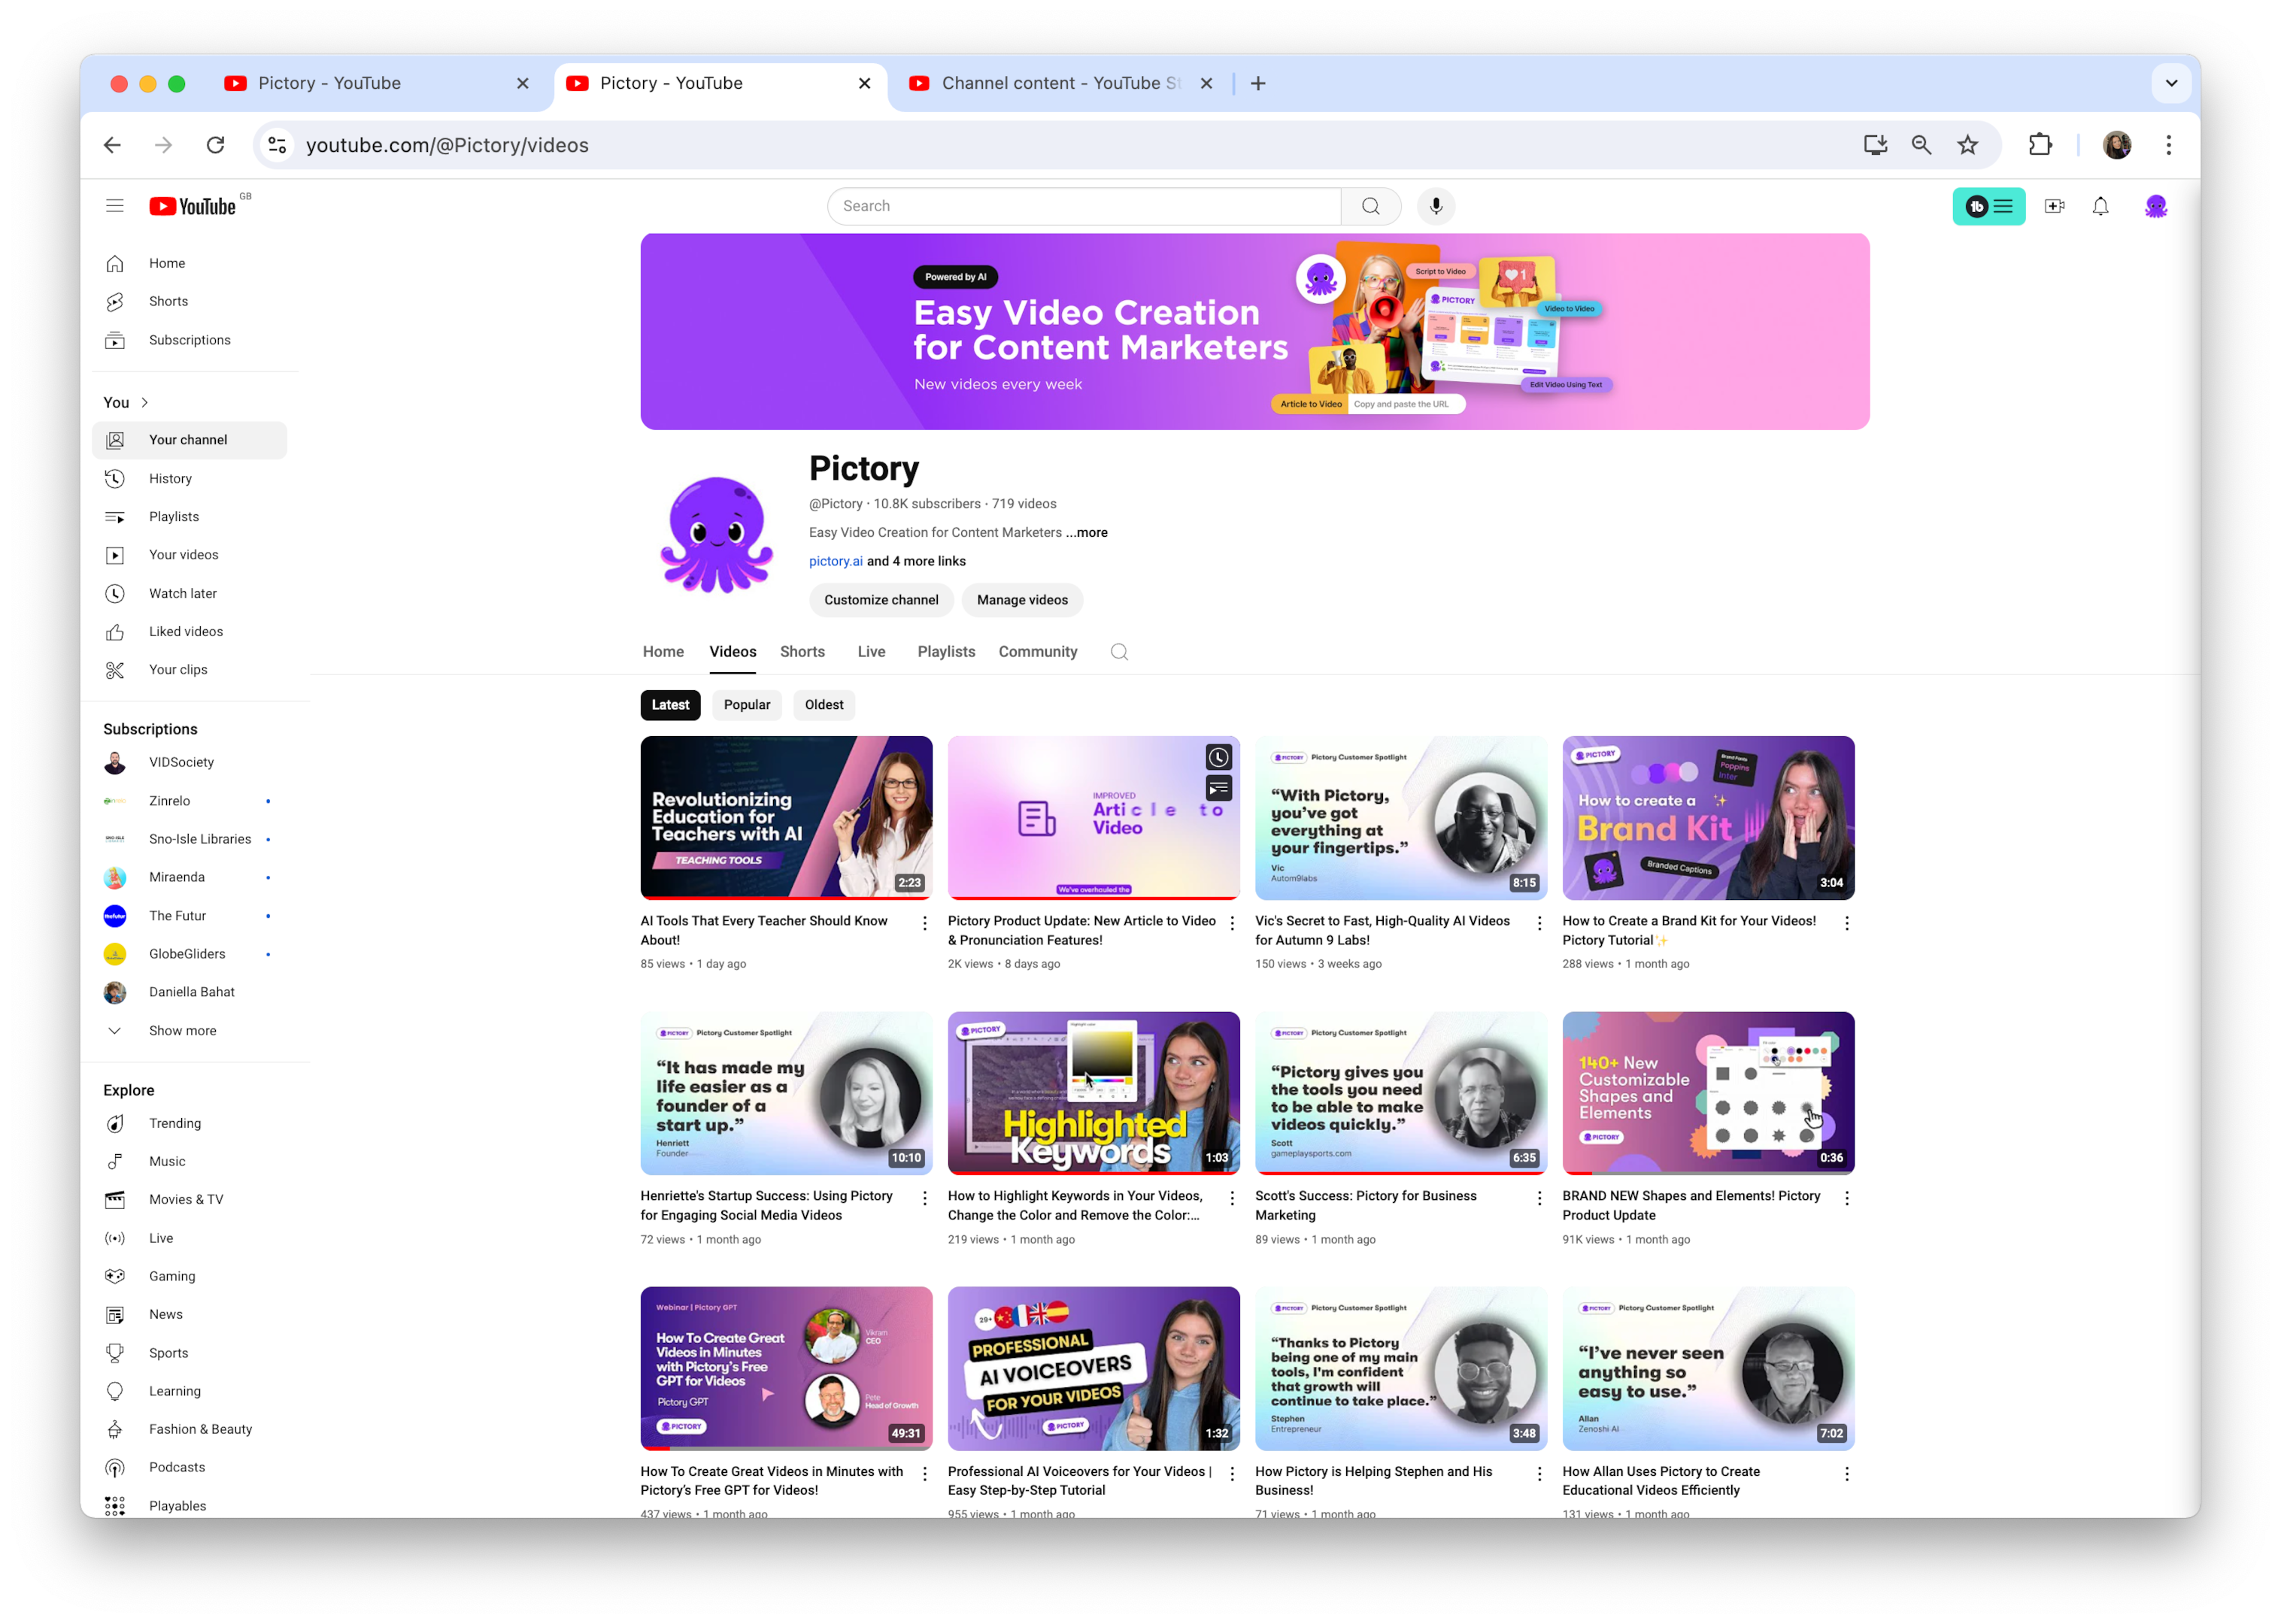
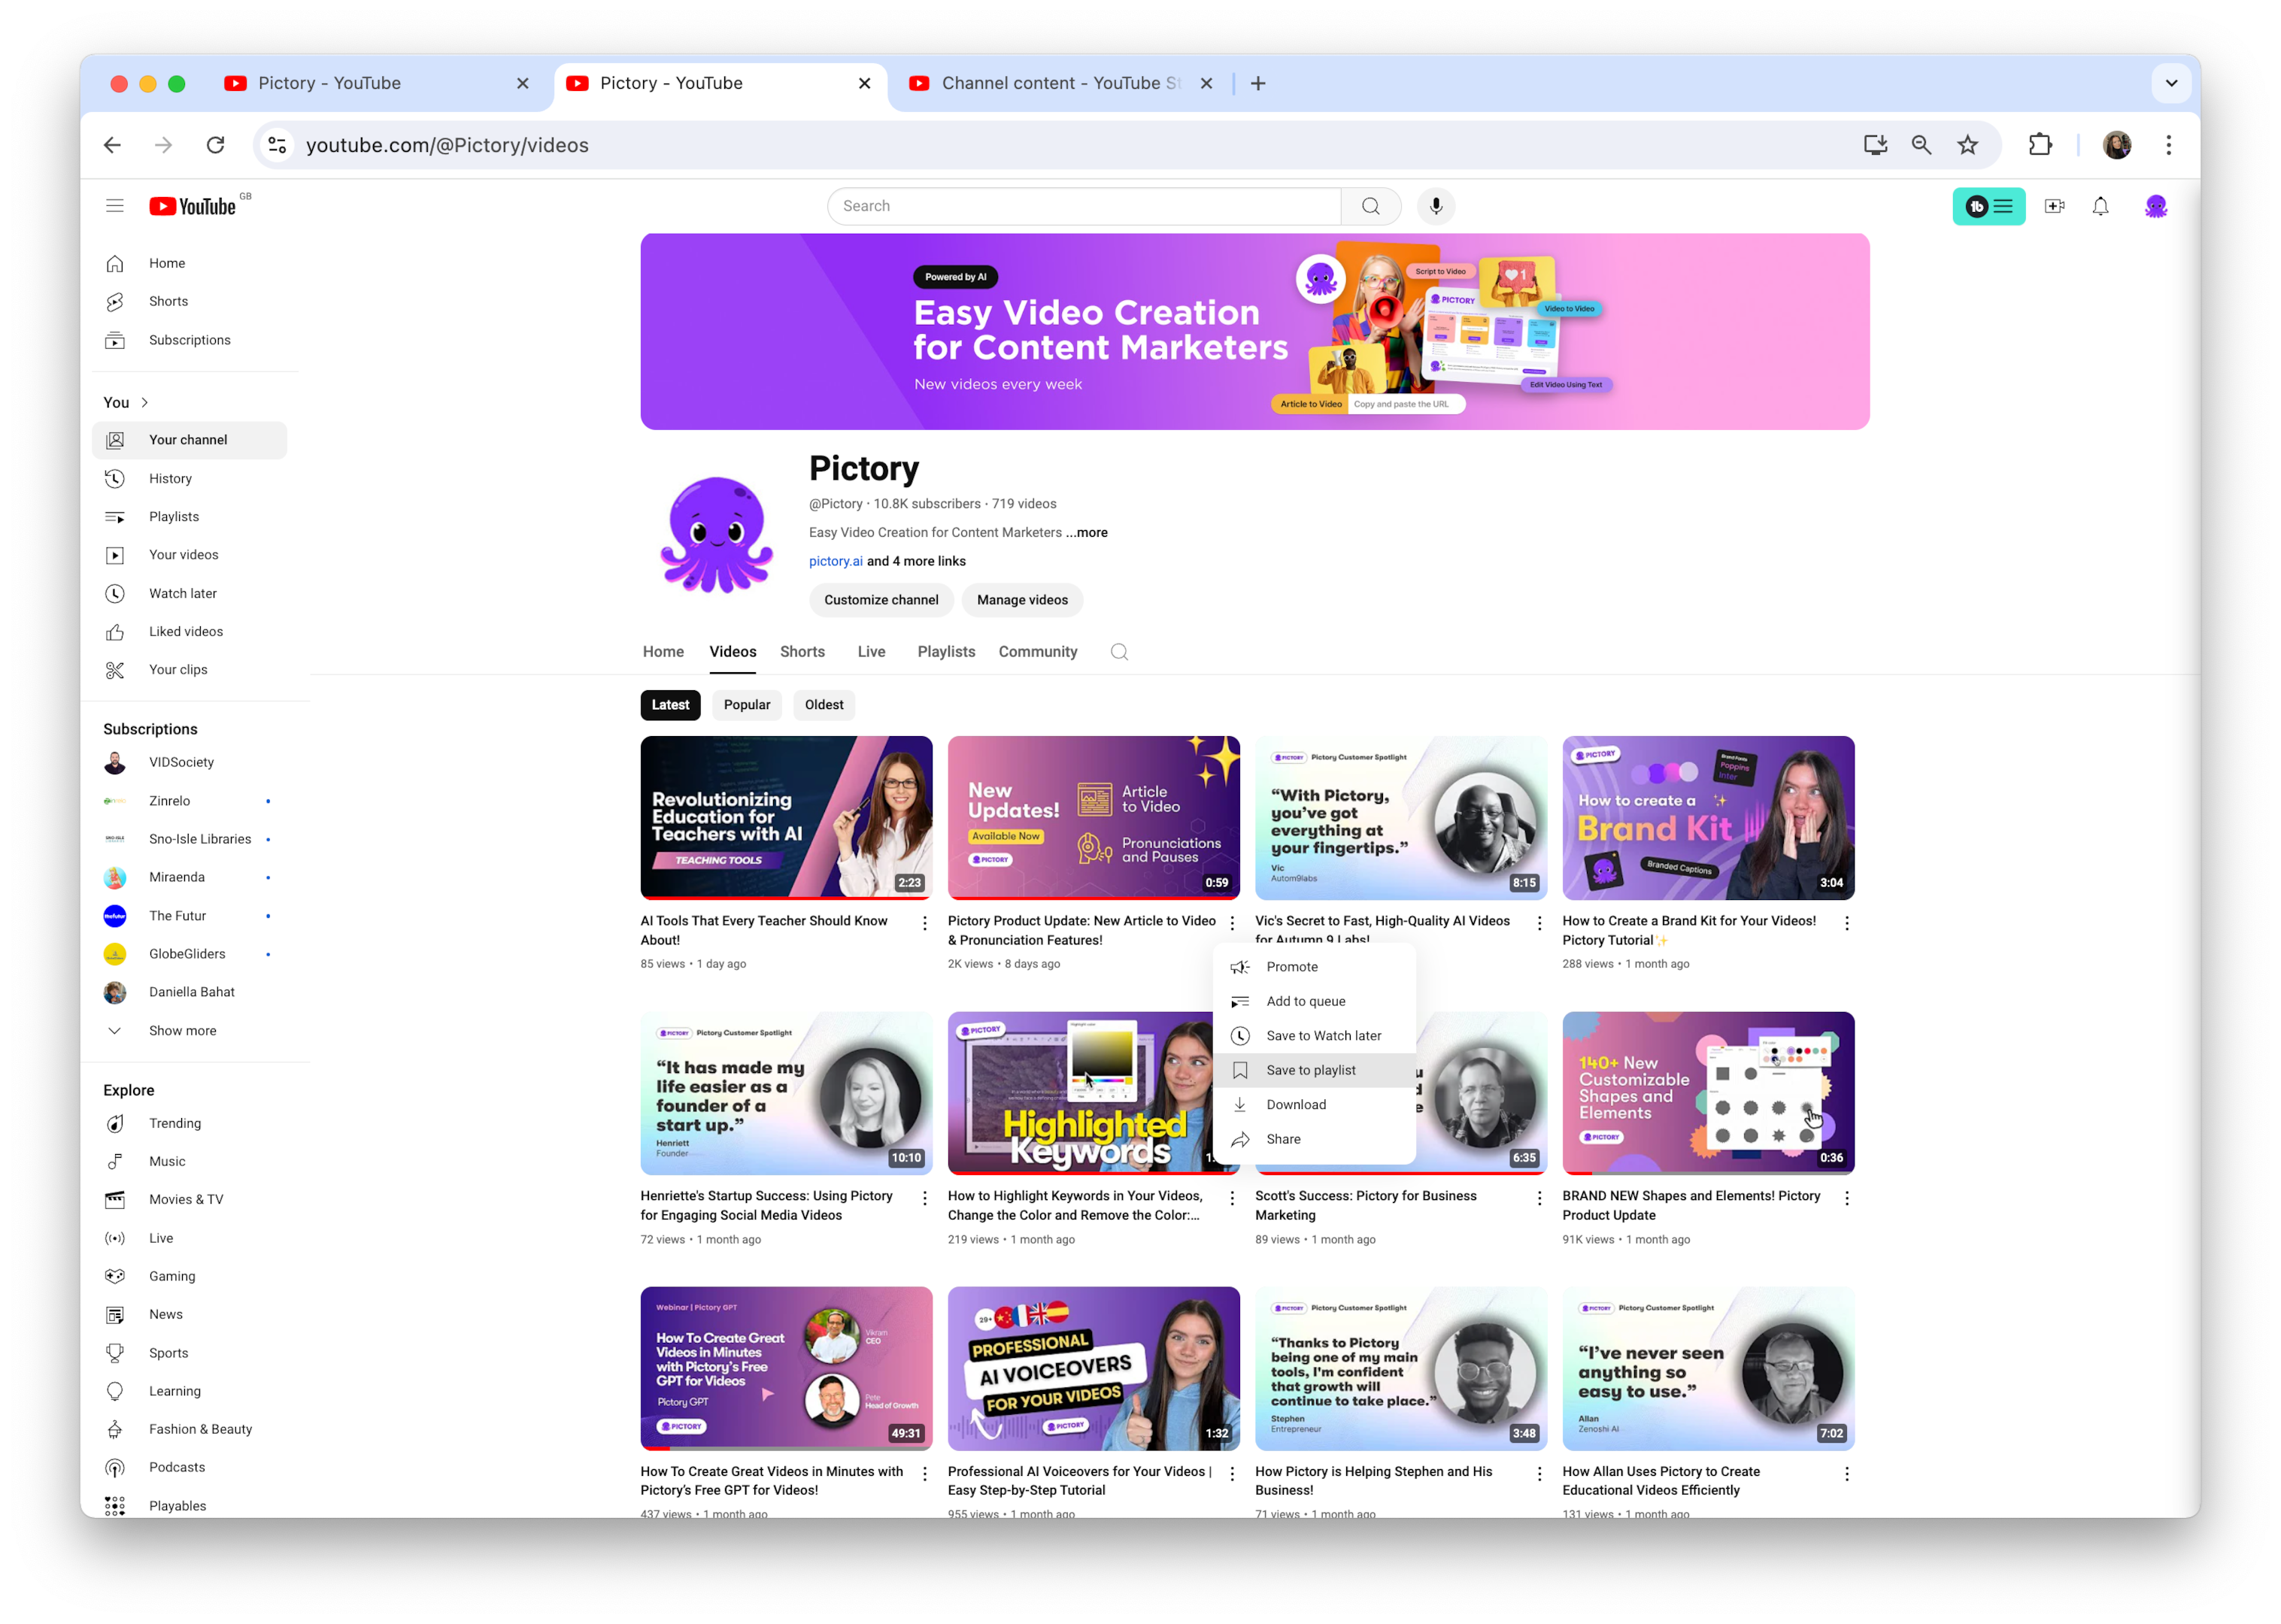
Hover over the video thumbnail, and you’ll see three dots appear.
-
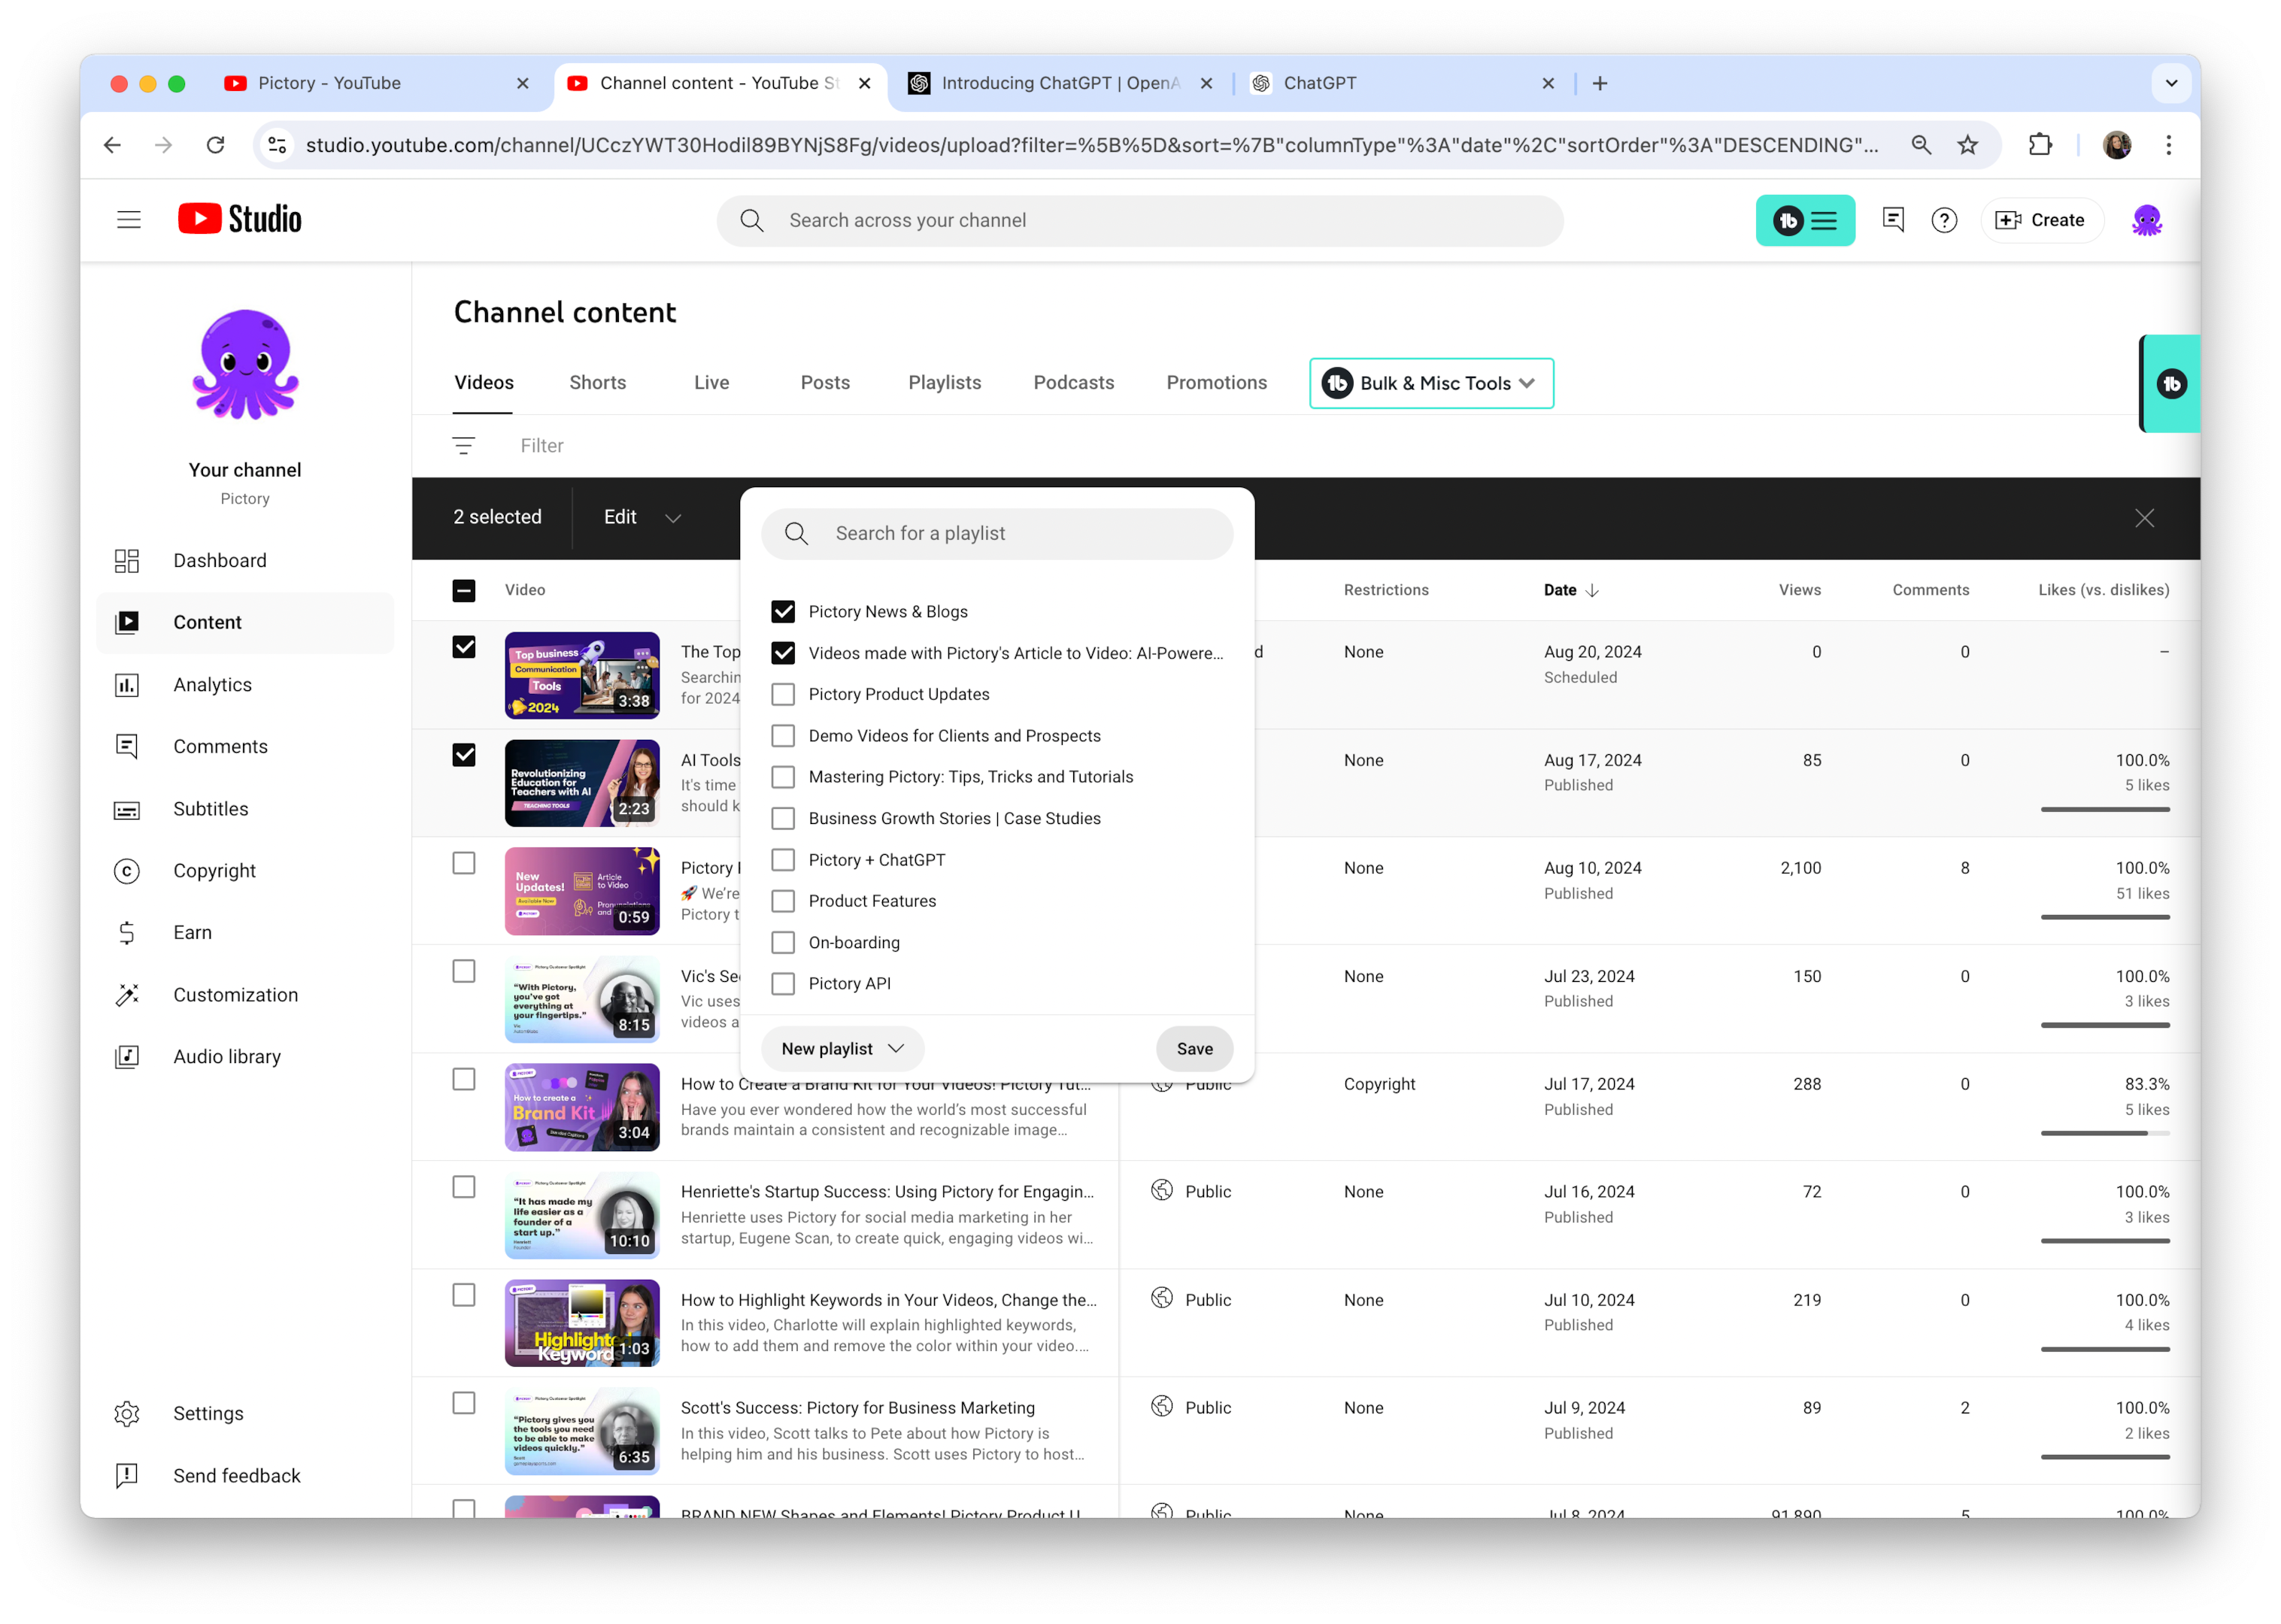
Click on these dots to open a dropdown menu, then select the ‘Save to playlist’ option.
-
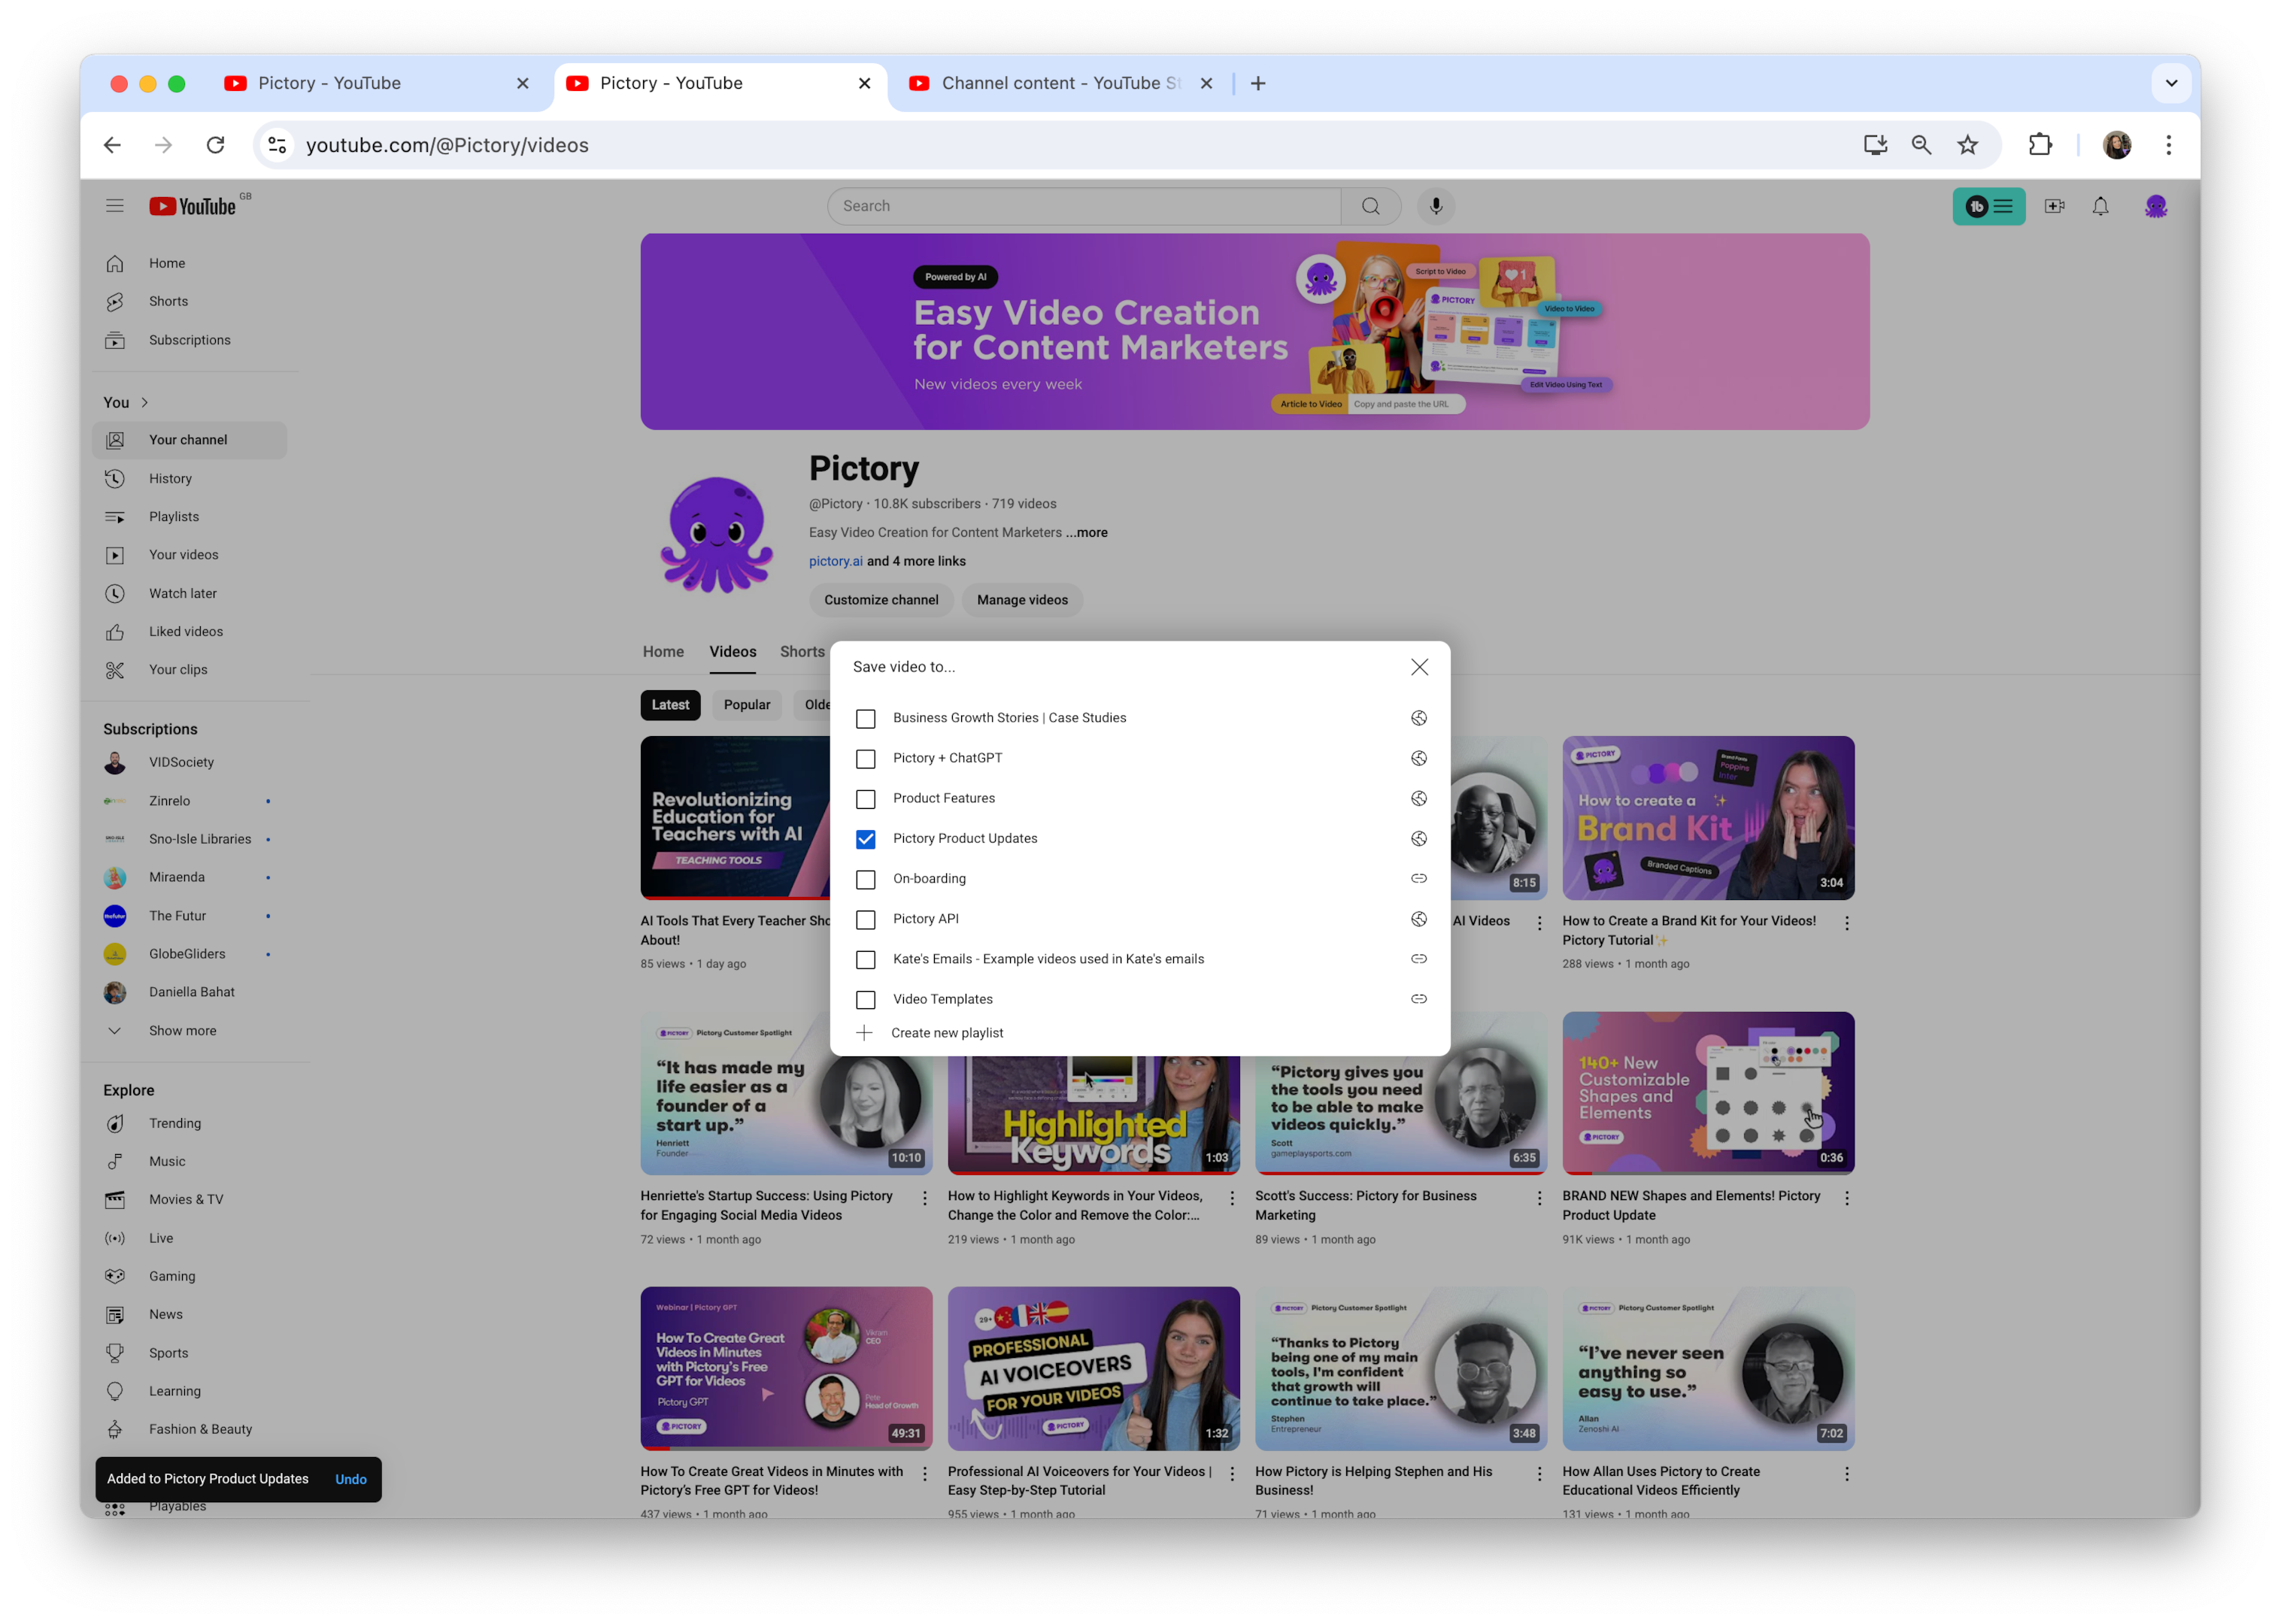
This action will open a new window where you can either add the video to an existing playlist or create a new one.
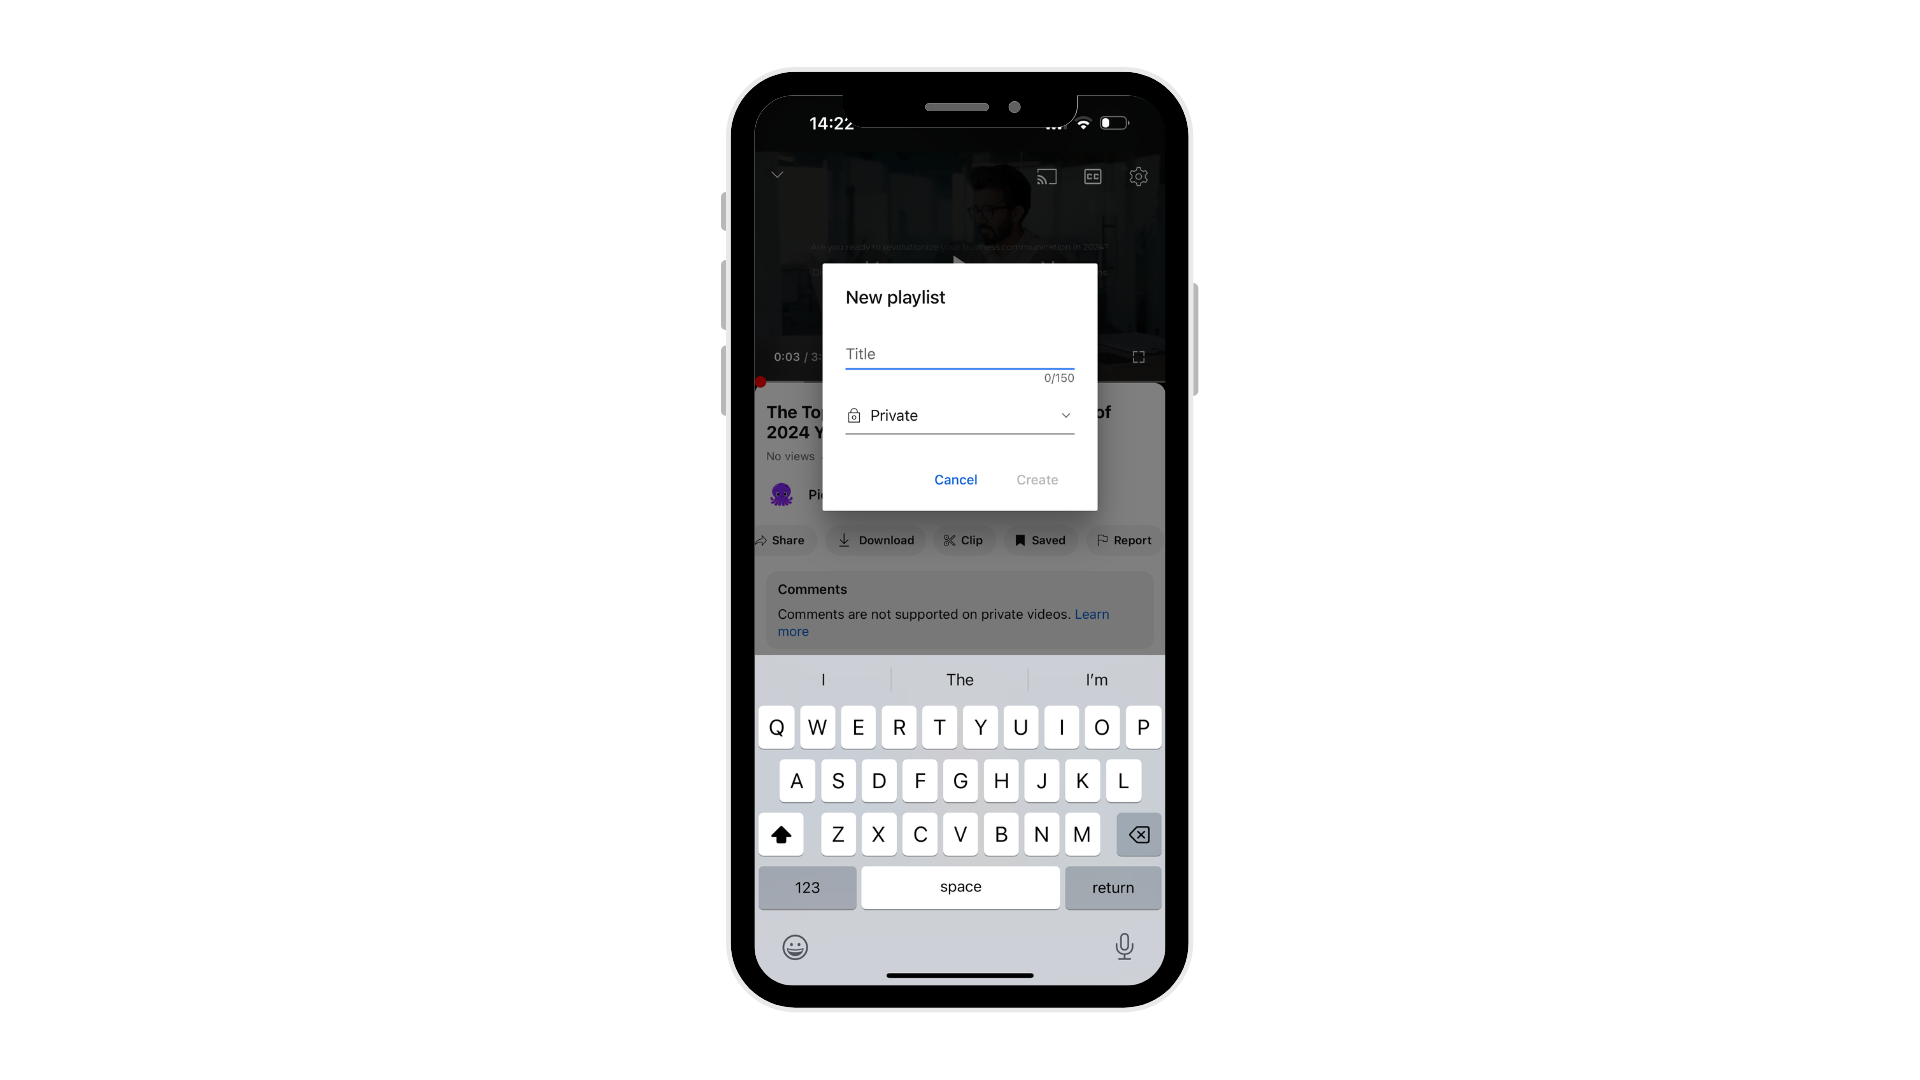
To create a new playlist, click on the ‘Create new playlist’ option. You’ll be prompted to enter a name for your playlist. Choose a title that’s descriptive and catchy – remember, this is what viewers will see when they come across your playlist. Next, you’ll need to set the privacy settings for your playlist.
You have three options: Public (visible to everyone), Unlisted (only accessible via a direct link), or Private (only visible to you). Choose the setting that best fits your goals for this playlist. Once you’ve entered the name and chosen the privacy setting, click ‘Create.’
Congratulations! You’ve just created your new YouTube playlist. You can now start adding more videos to it, rearranging the order, and sharing it with your audience.
How to Create a Playlist on YouTube (Mobile)
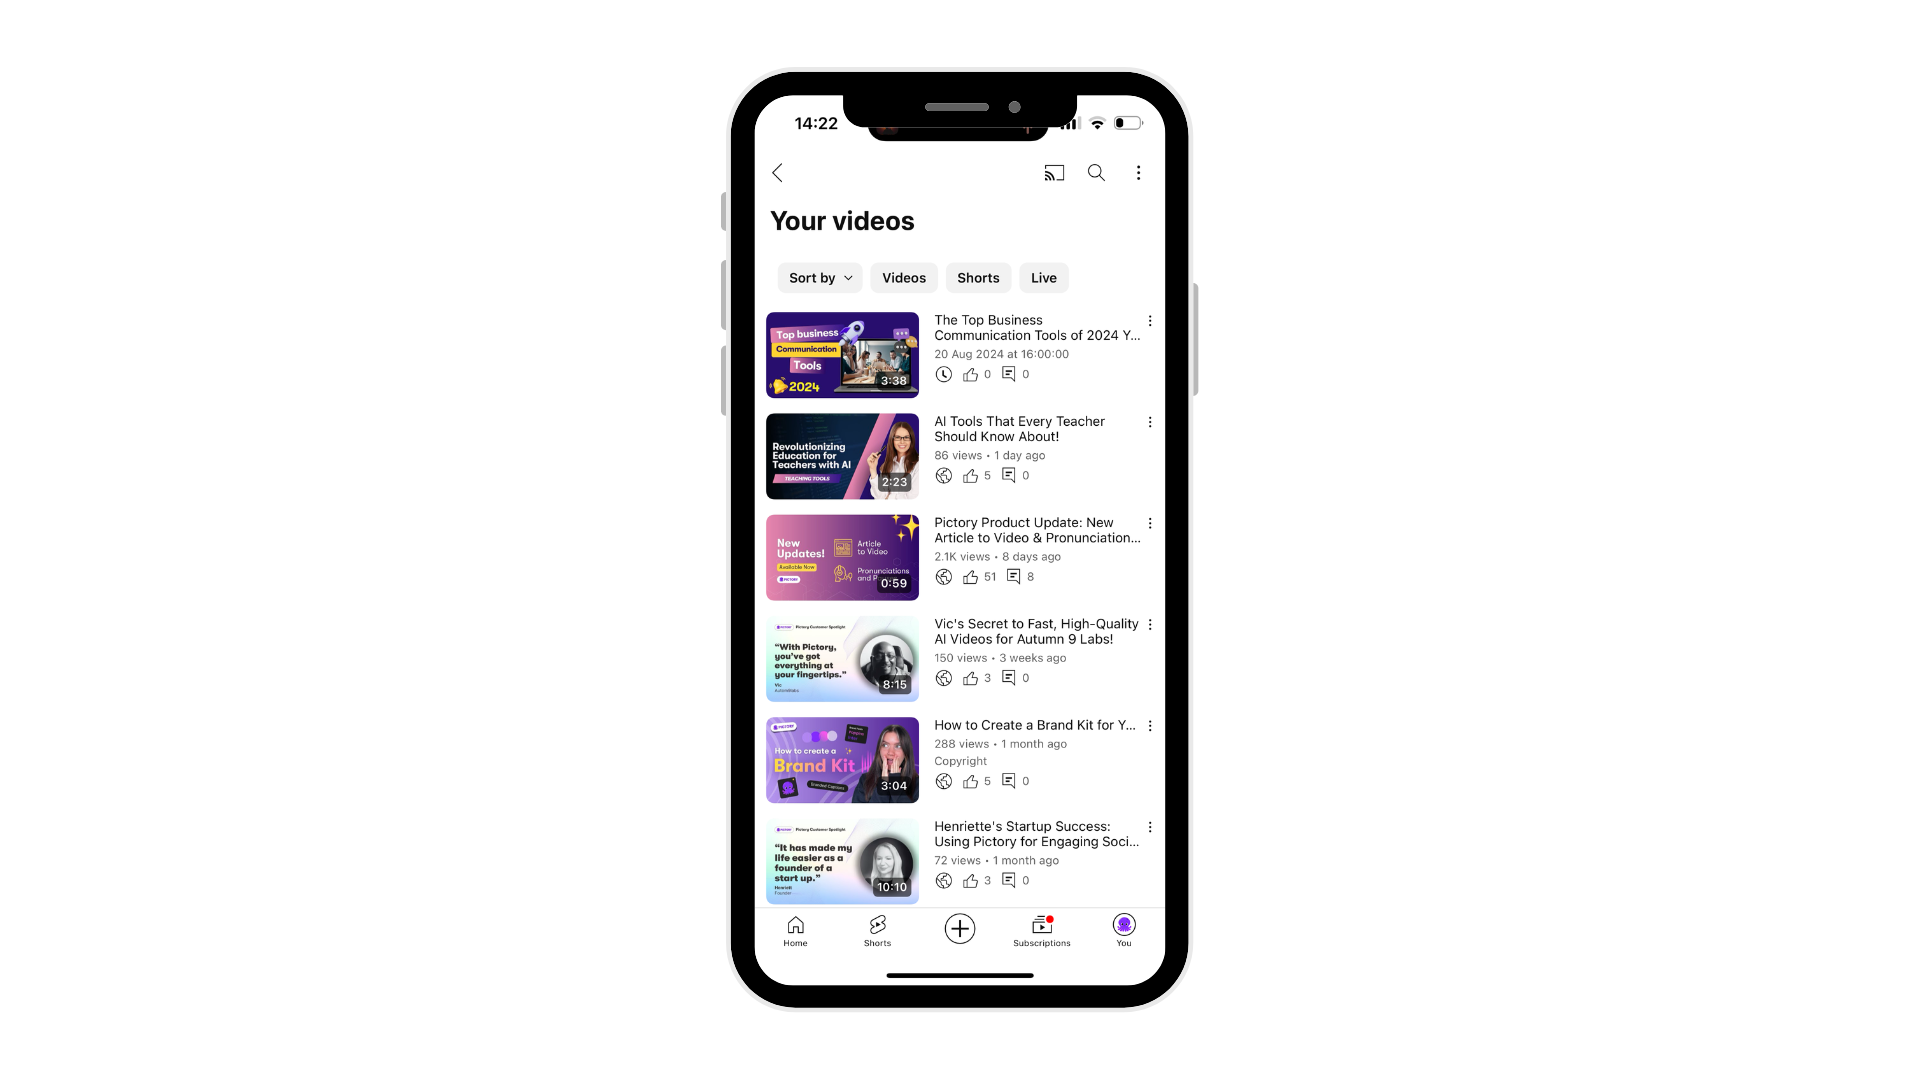
Creating a playlist on your mobile device is as effortless as on desktop, making it ideal for those spur-of-the-moment inspirations. To get started, open the YouTube app on your smartphone or tablet and make sure you’re signed in to your account. If you haven’t installed the app yet, head to your device’s app store and download it – it’s free and user-friendly.
-
Once you’re in the app, navigate to a video you’d like to add to your new playlist.
-
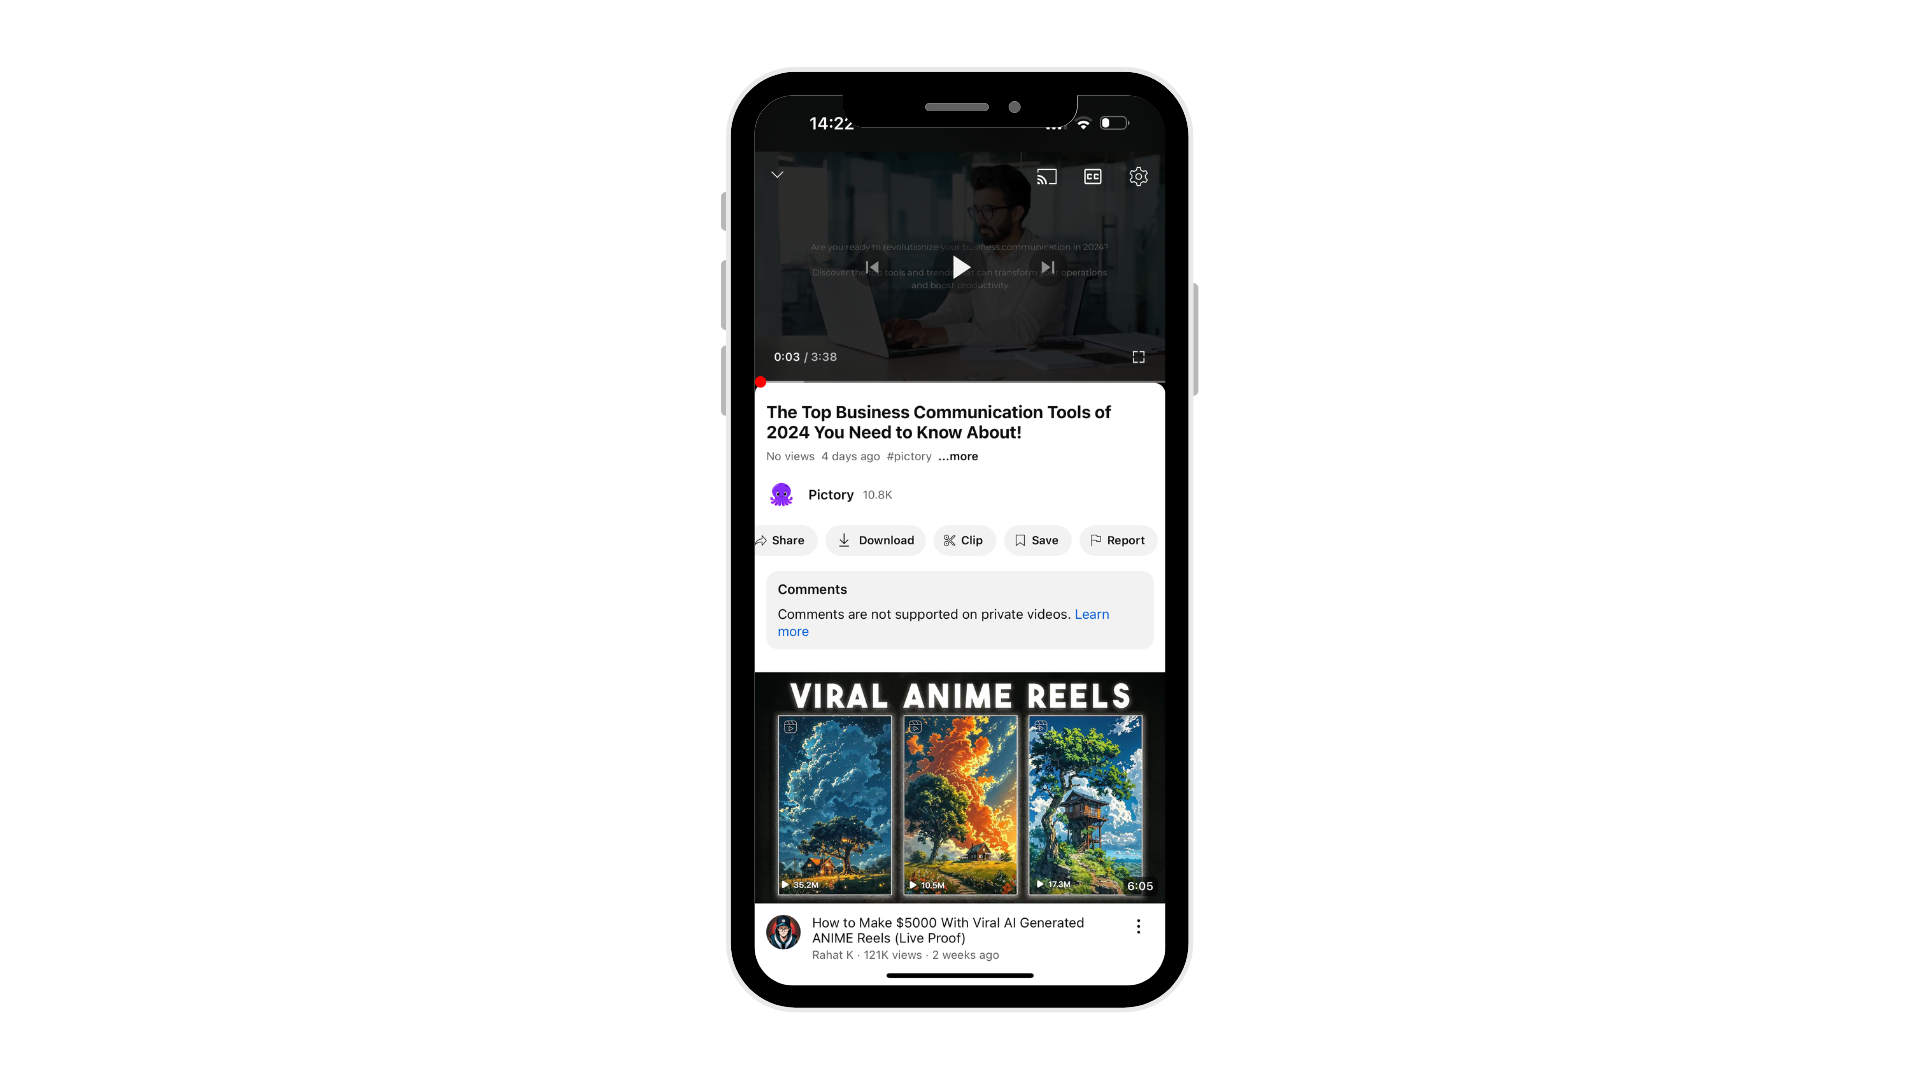
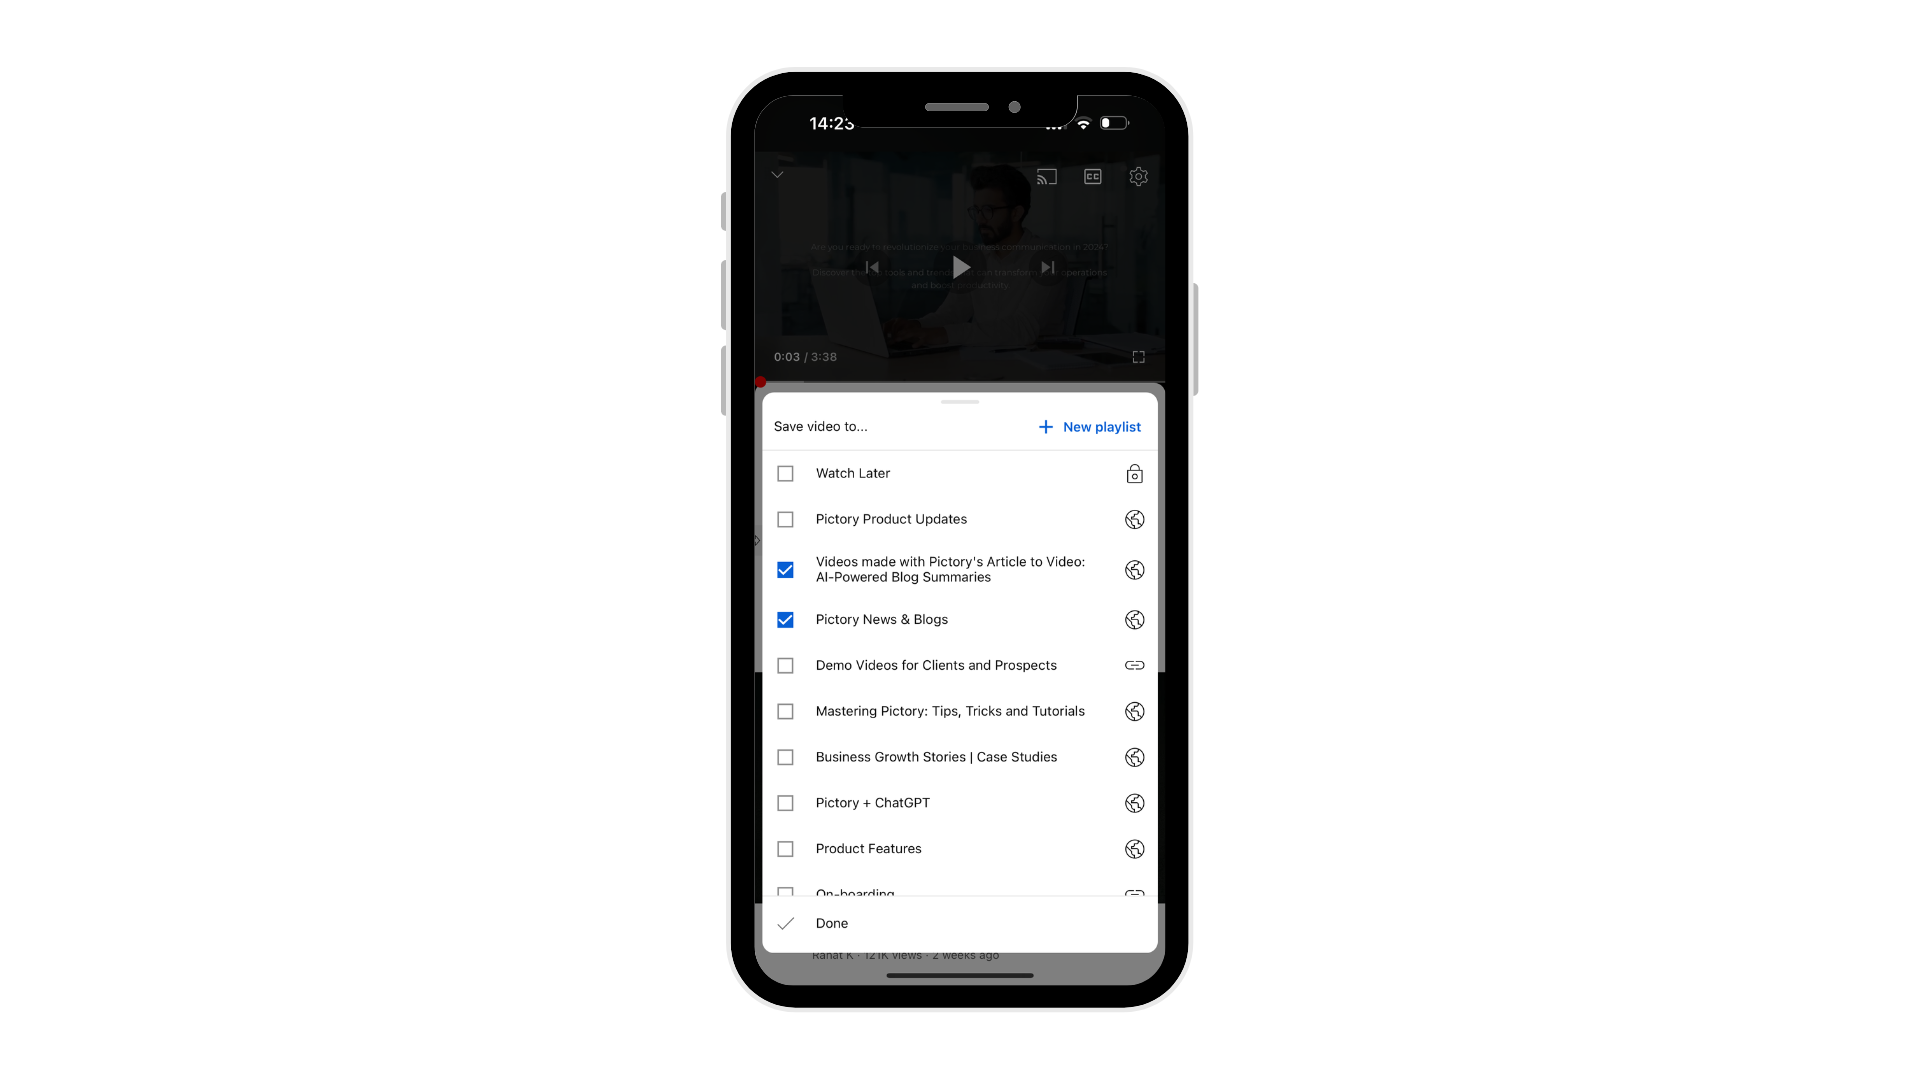
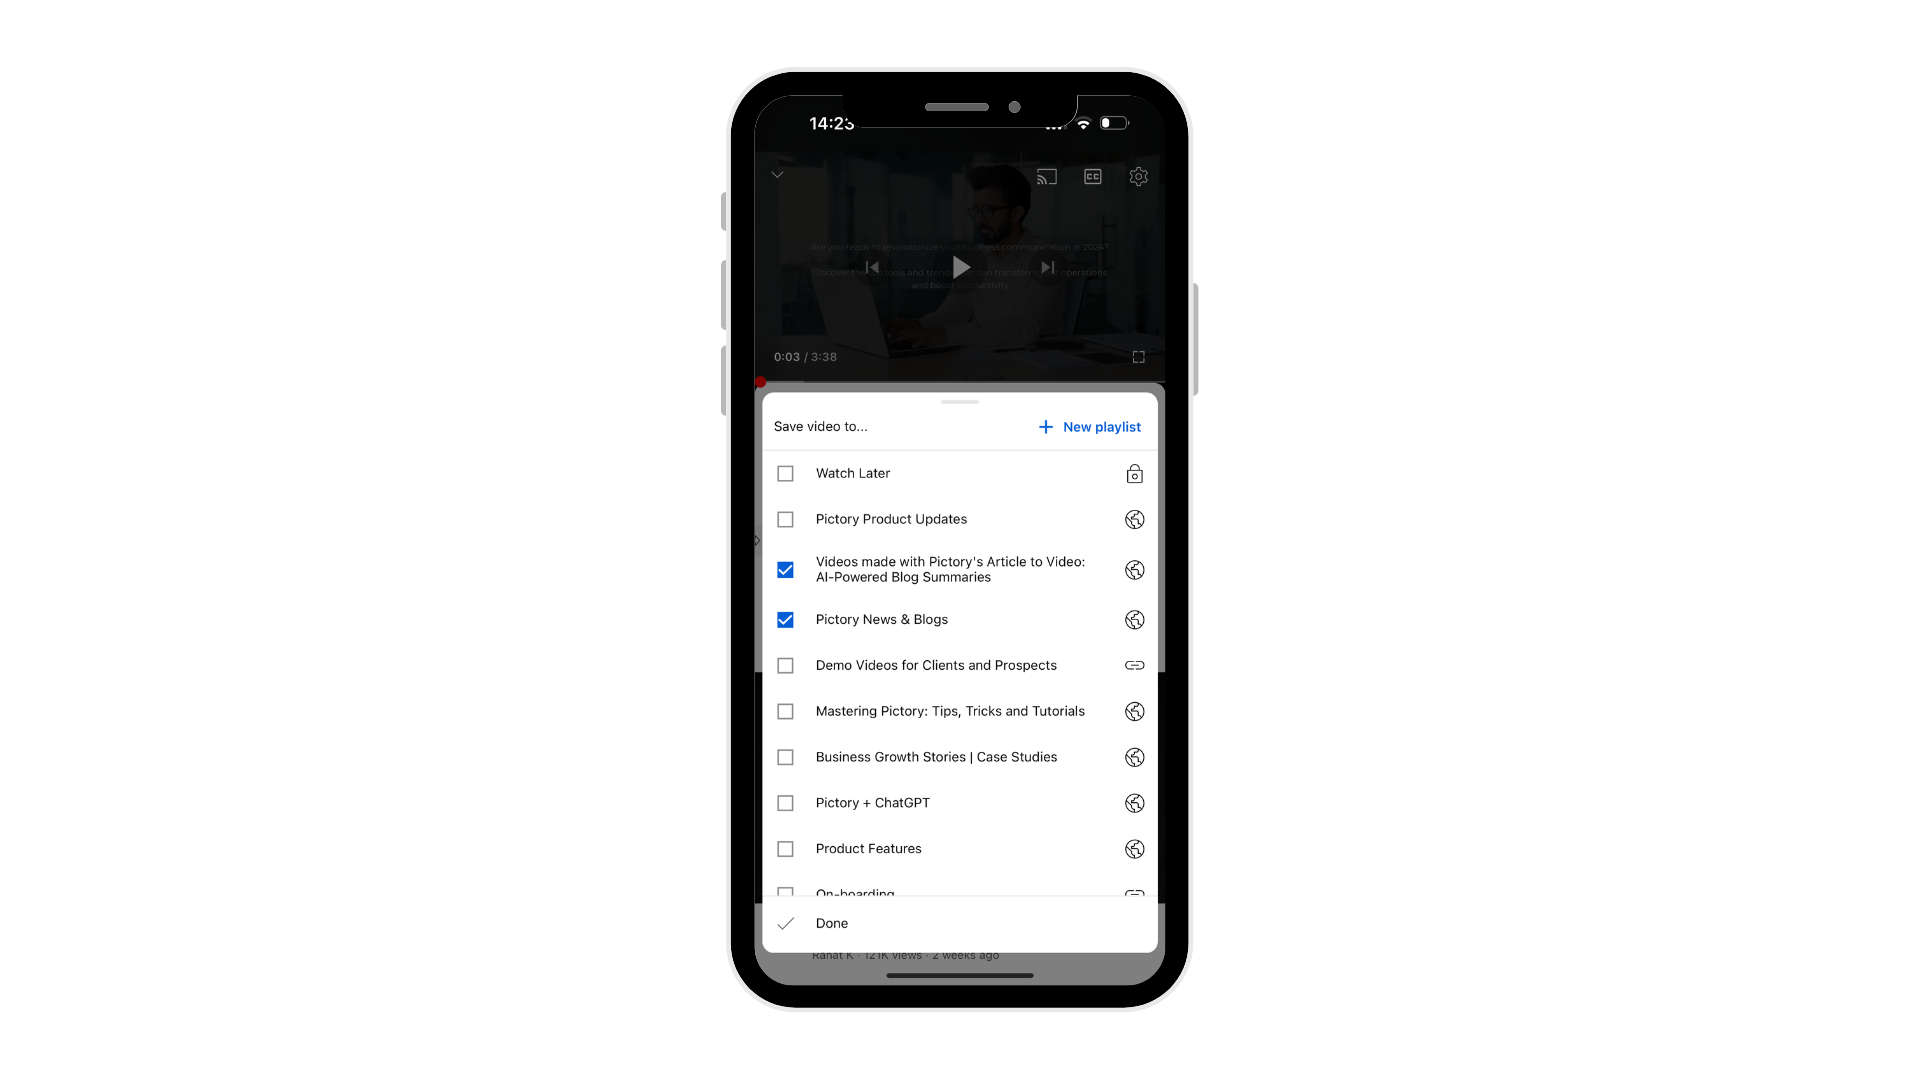
Beneath the video, you’ll see a ‘Save’ button – tap on it. This will bring up a list of your existing playlists, along with an option to create a new one.
-
Tap on ‘Create new playlist,’ give it a catchy title, and choose your preferred privacy setting (Public, Unlisted, or Private).
-
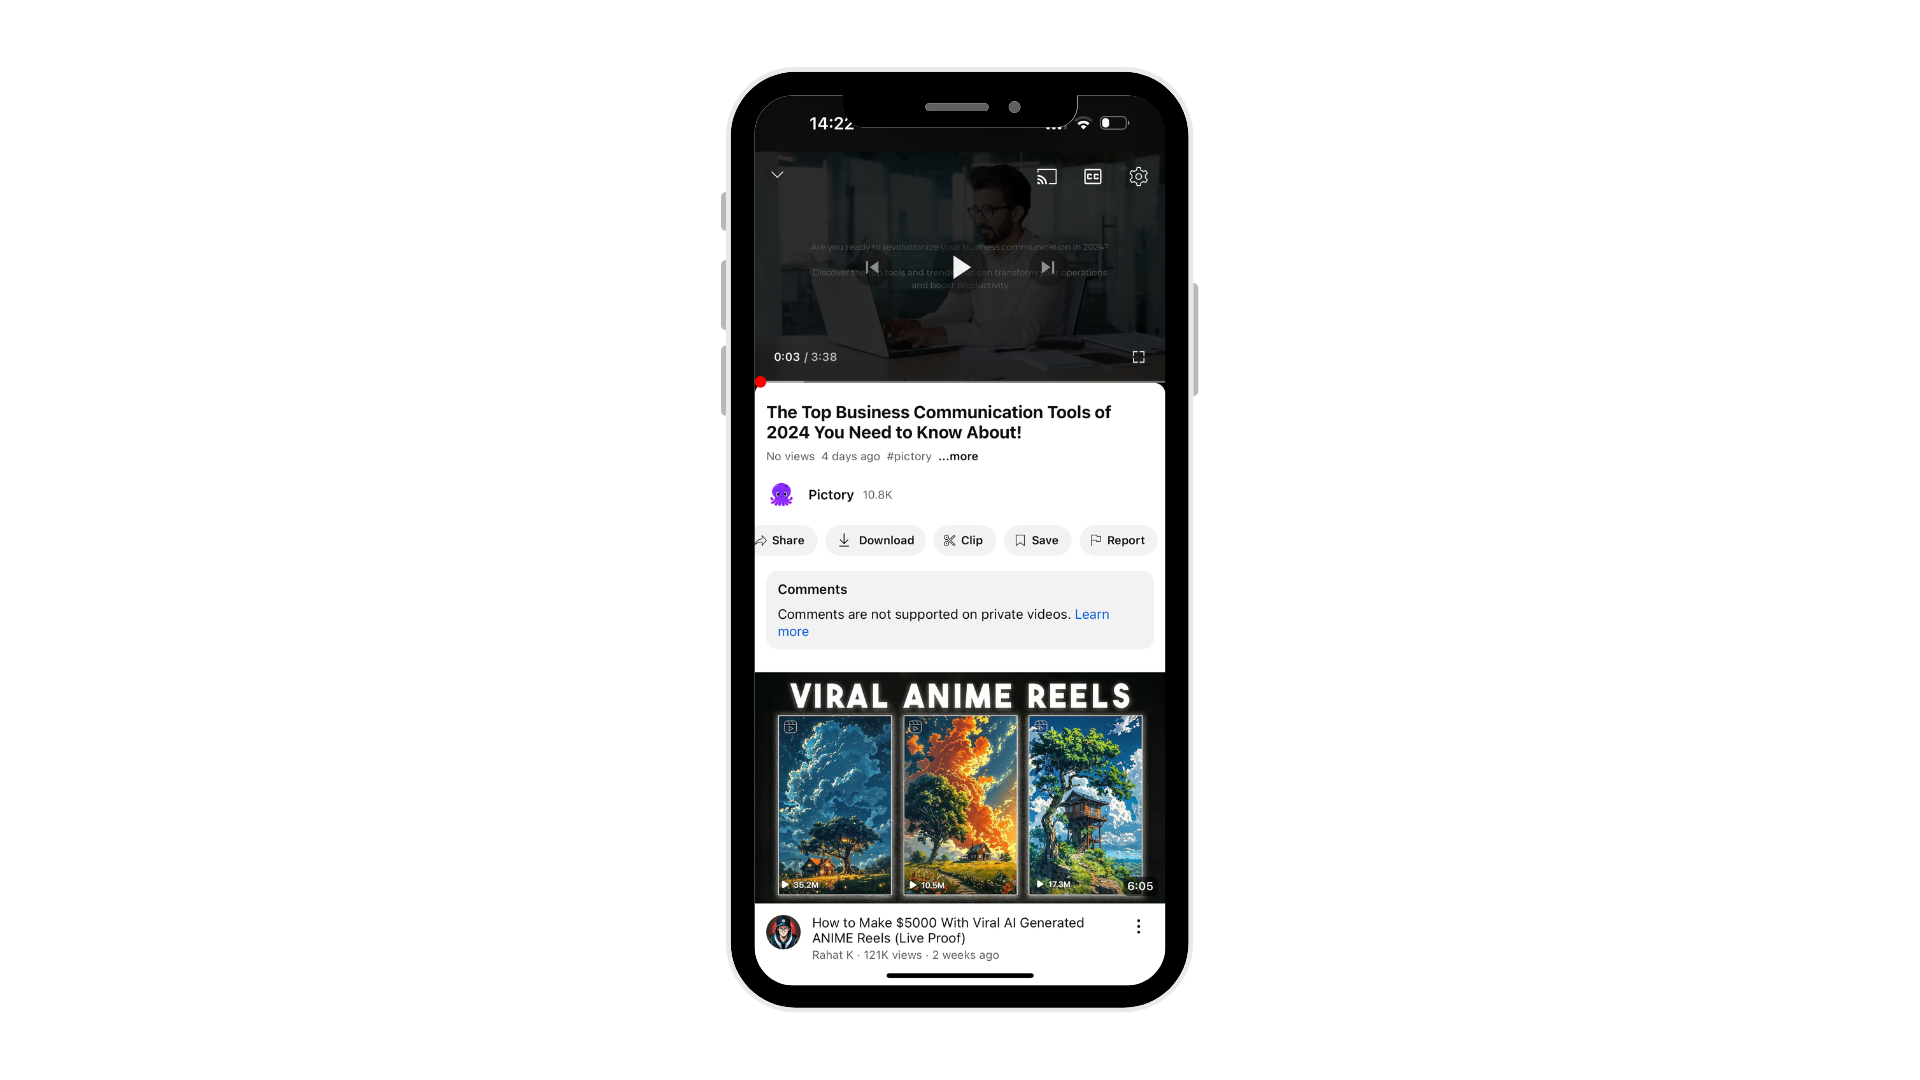
After you’ve set these up, the video will automatically be added to your new playlist. It’s that simple!
You can continue adding more videos to this playlist by following the same steps and selecting your newly created playlist from the list.
Using the YouTube App
The YouTube mobile app is a powerful tool that puts playlist creation at your fingertips. After opening the app and signing in, you have two main ways to start creating a playlist.
-
The first method is to find a video you want to add, tap the ‘Save’ button below it, and then choose ‘Create new playlist’ from the options that appear.
-
Alternatively, you can tap on the ‘Library’ tab at the bottom of the screen, then select ‘New playlist’ to start from scratch.
Both methods are equally effective, so choose the one that fits best with your current task and tap create.
Remember, the key to efficient playlist creation on mobile is familiarity with the app’s layout and features. Take some time to explore the different sections and options available – you’ll soon find that creating and managing playlists on your mobile device is just as intuitive as on desktop.
Adding Videos to Your Playlist
Once you’ve created your playlist, adding videos to it is a breeze. As you browse through YouTube on your mobile device, keep an eye out for videos that fit your playlist’s theme. When you find a suitable video, follow these steps to add it to your playlist:
-
Tap the ‘Save’ button located below the video player.
-
This will bring up a list of your playlists – simply select the one you want to add the video to.
-
And it’s done!
But what if you want to add multiple videos at once? YouTube’s mobile app has you covered. Here’s how to do it:
-
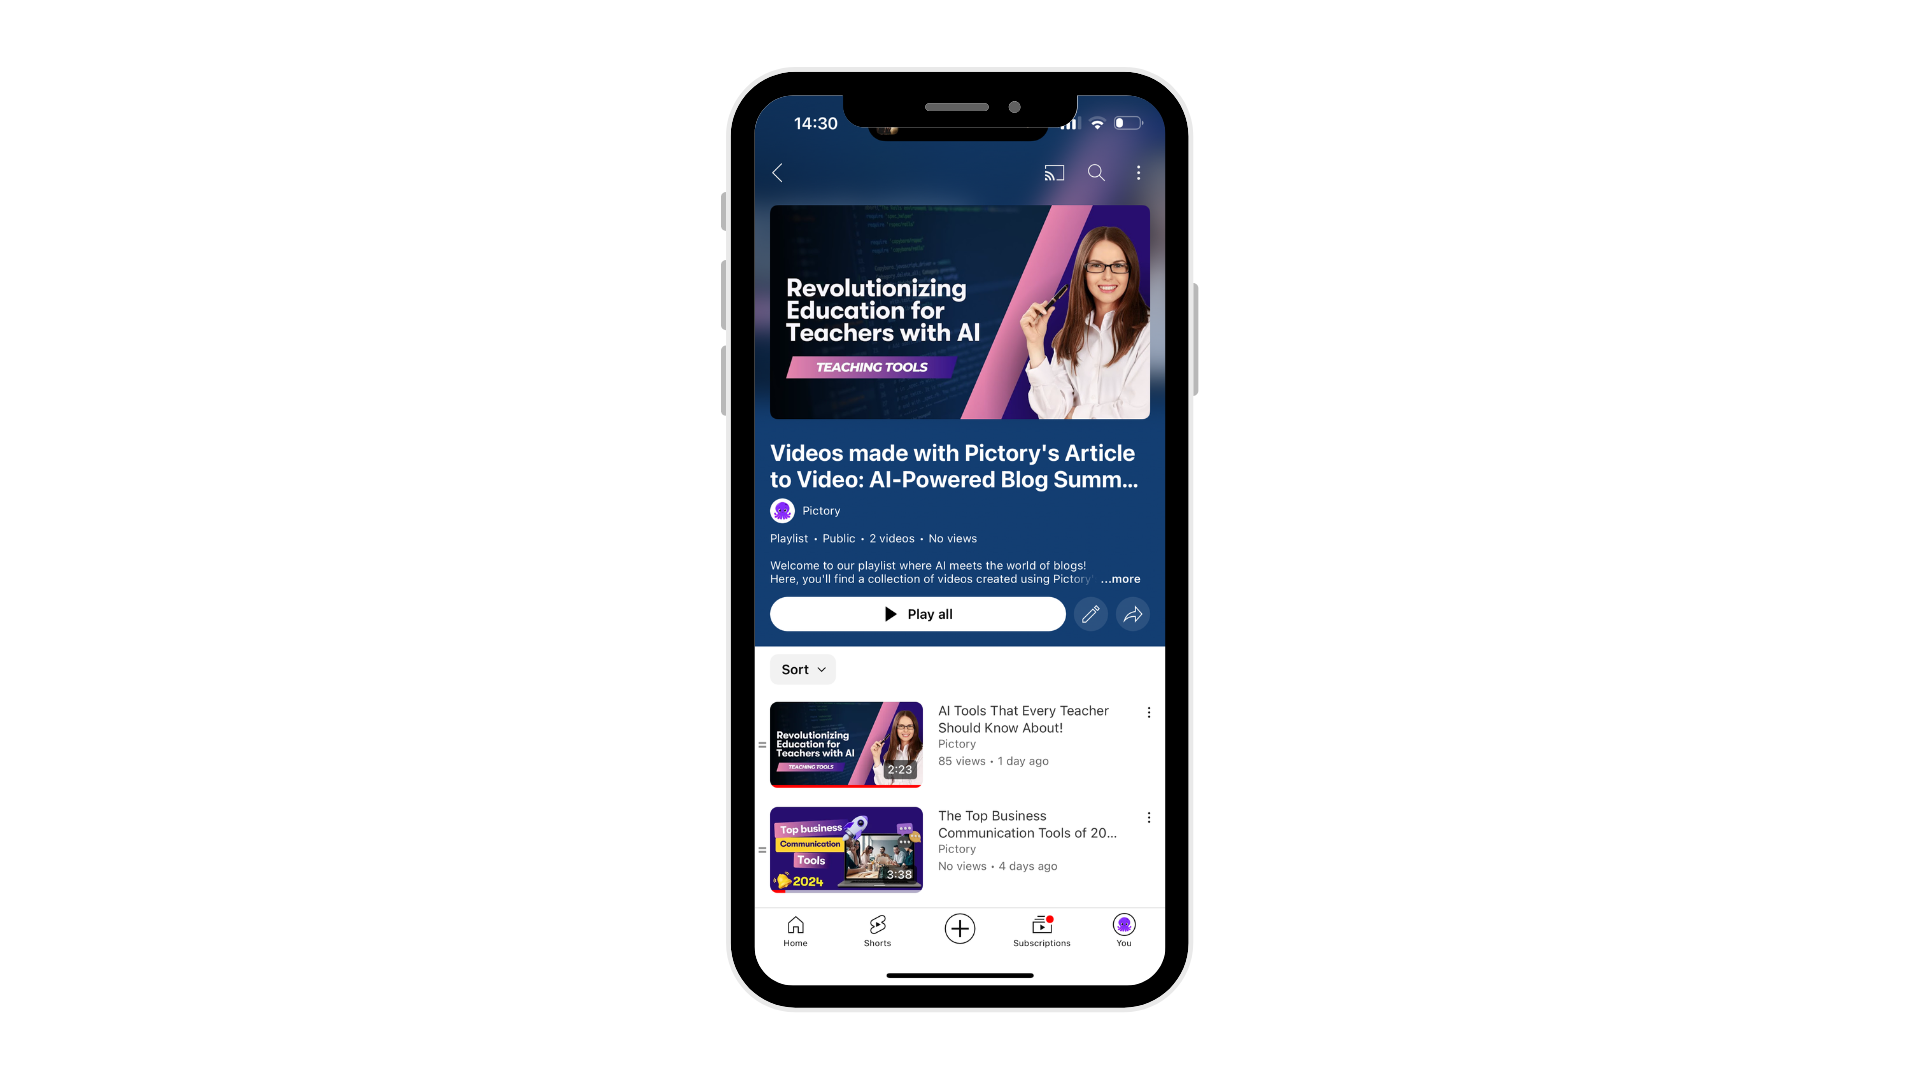
Go to your Library tab and select the playlist you want to add videos to.
-
Tap the three dots next to the playlist name and choose ‘Add videos’.
-
This will take you to a search screen where you can find and select multiple videos to add to your playlist in one go.
-
It’s a great way to quickly build up your playlist with relevant content.
Remember, you can always rearrange the order of videos in your playlist later, so don’t worry too much about the perfect order as you’re adding them. The key is to gather all the great content you want to include, and then you can fine-tune the organization later.
Editing and Managing YouTube Playlists
Creating a playlist is merely the starting point – the real enchantment lies in perfecting the editing and management of your playlists. Whether you’re using YouTube Studio on desktop or the mobile app, you have a wealth of options at your fingertips to manage playlists. From the YouTube Studio dashboard, you can easily access all your playlists and make changes as needed.
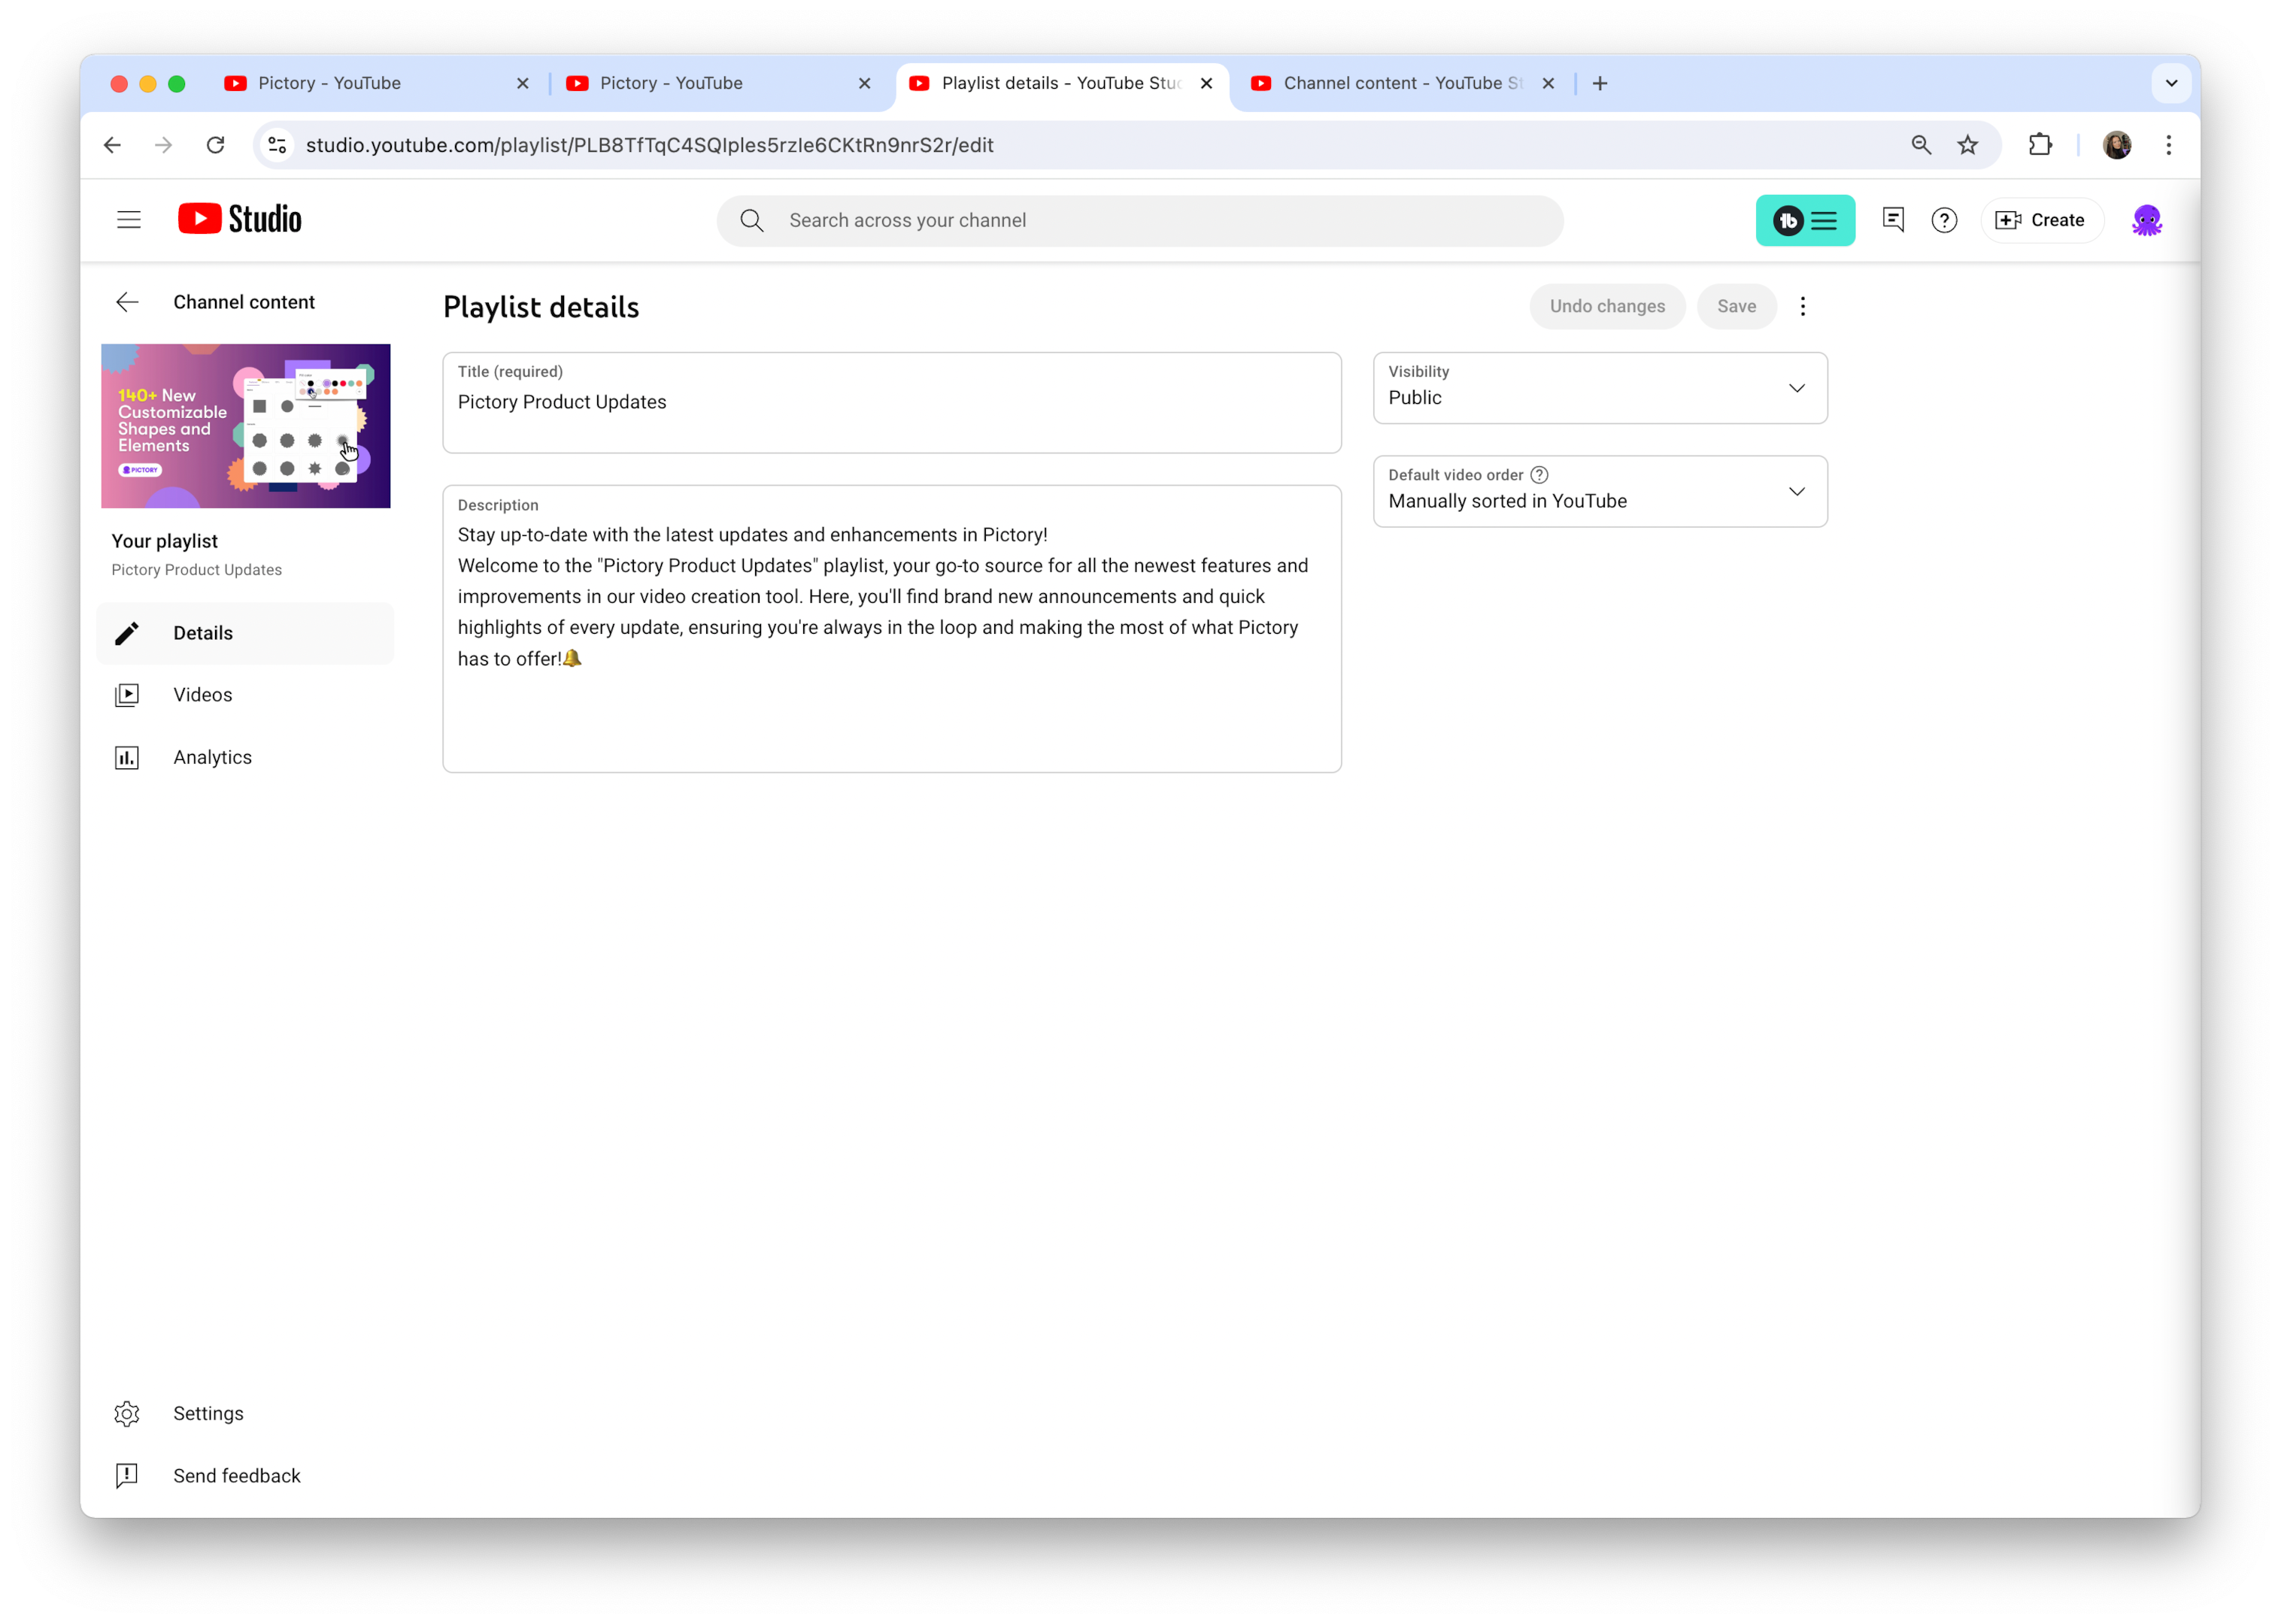
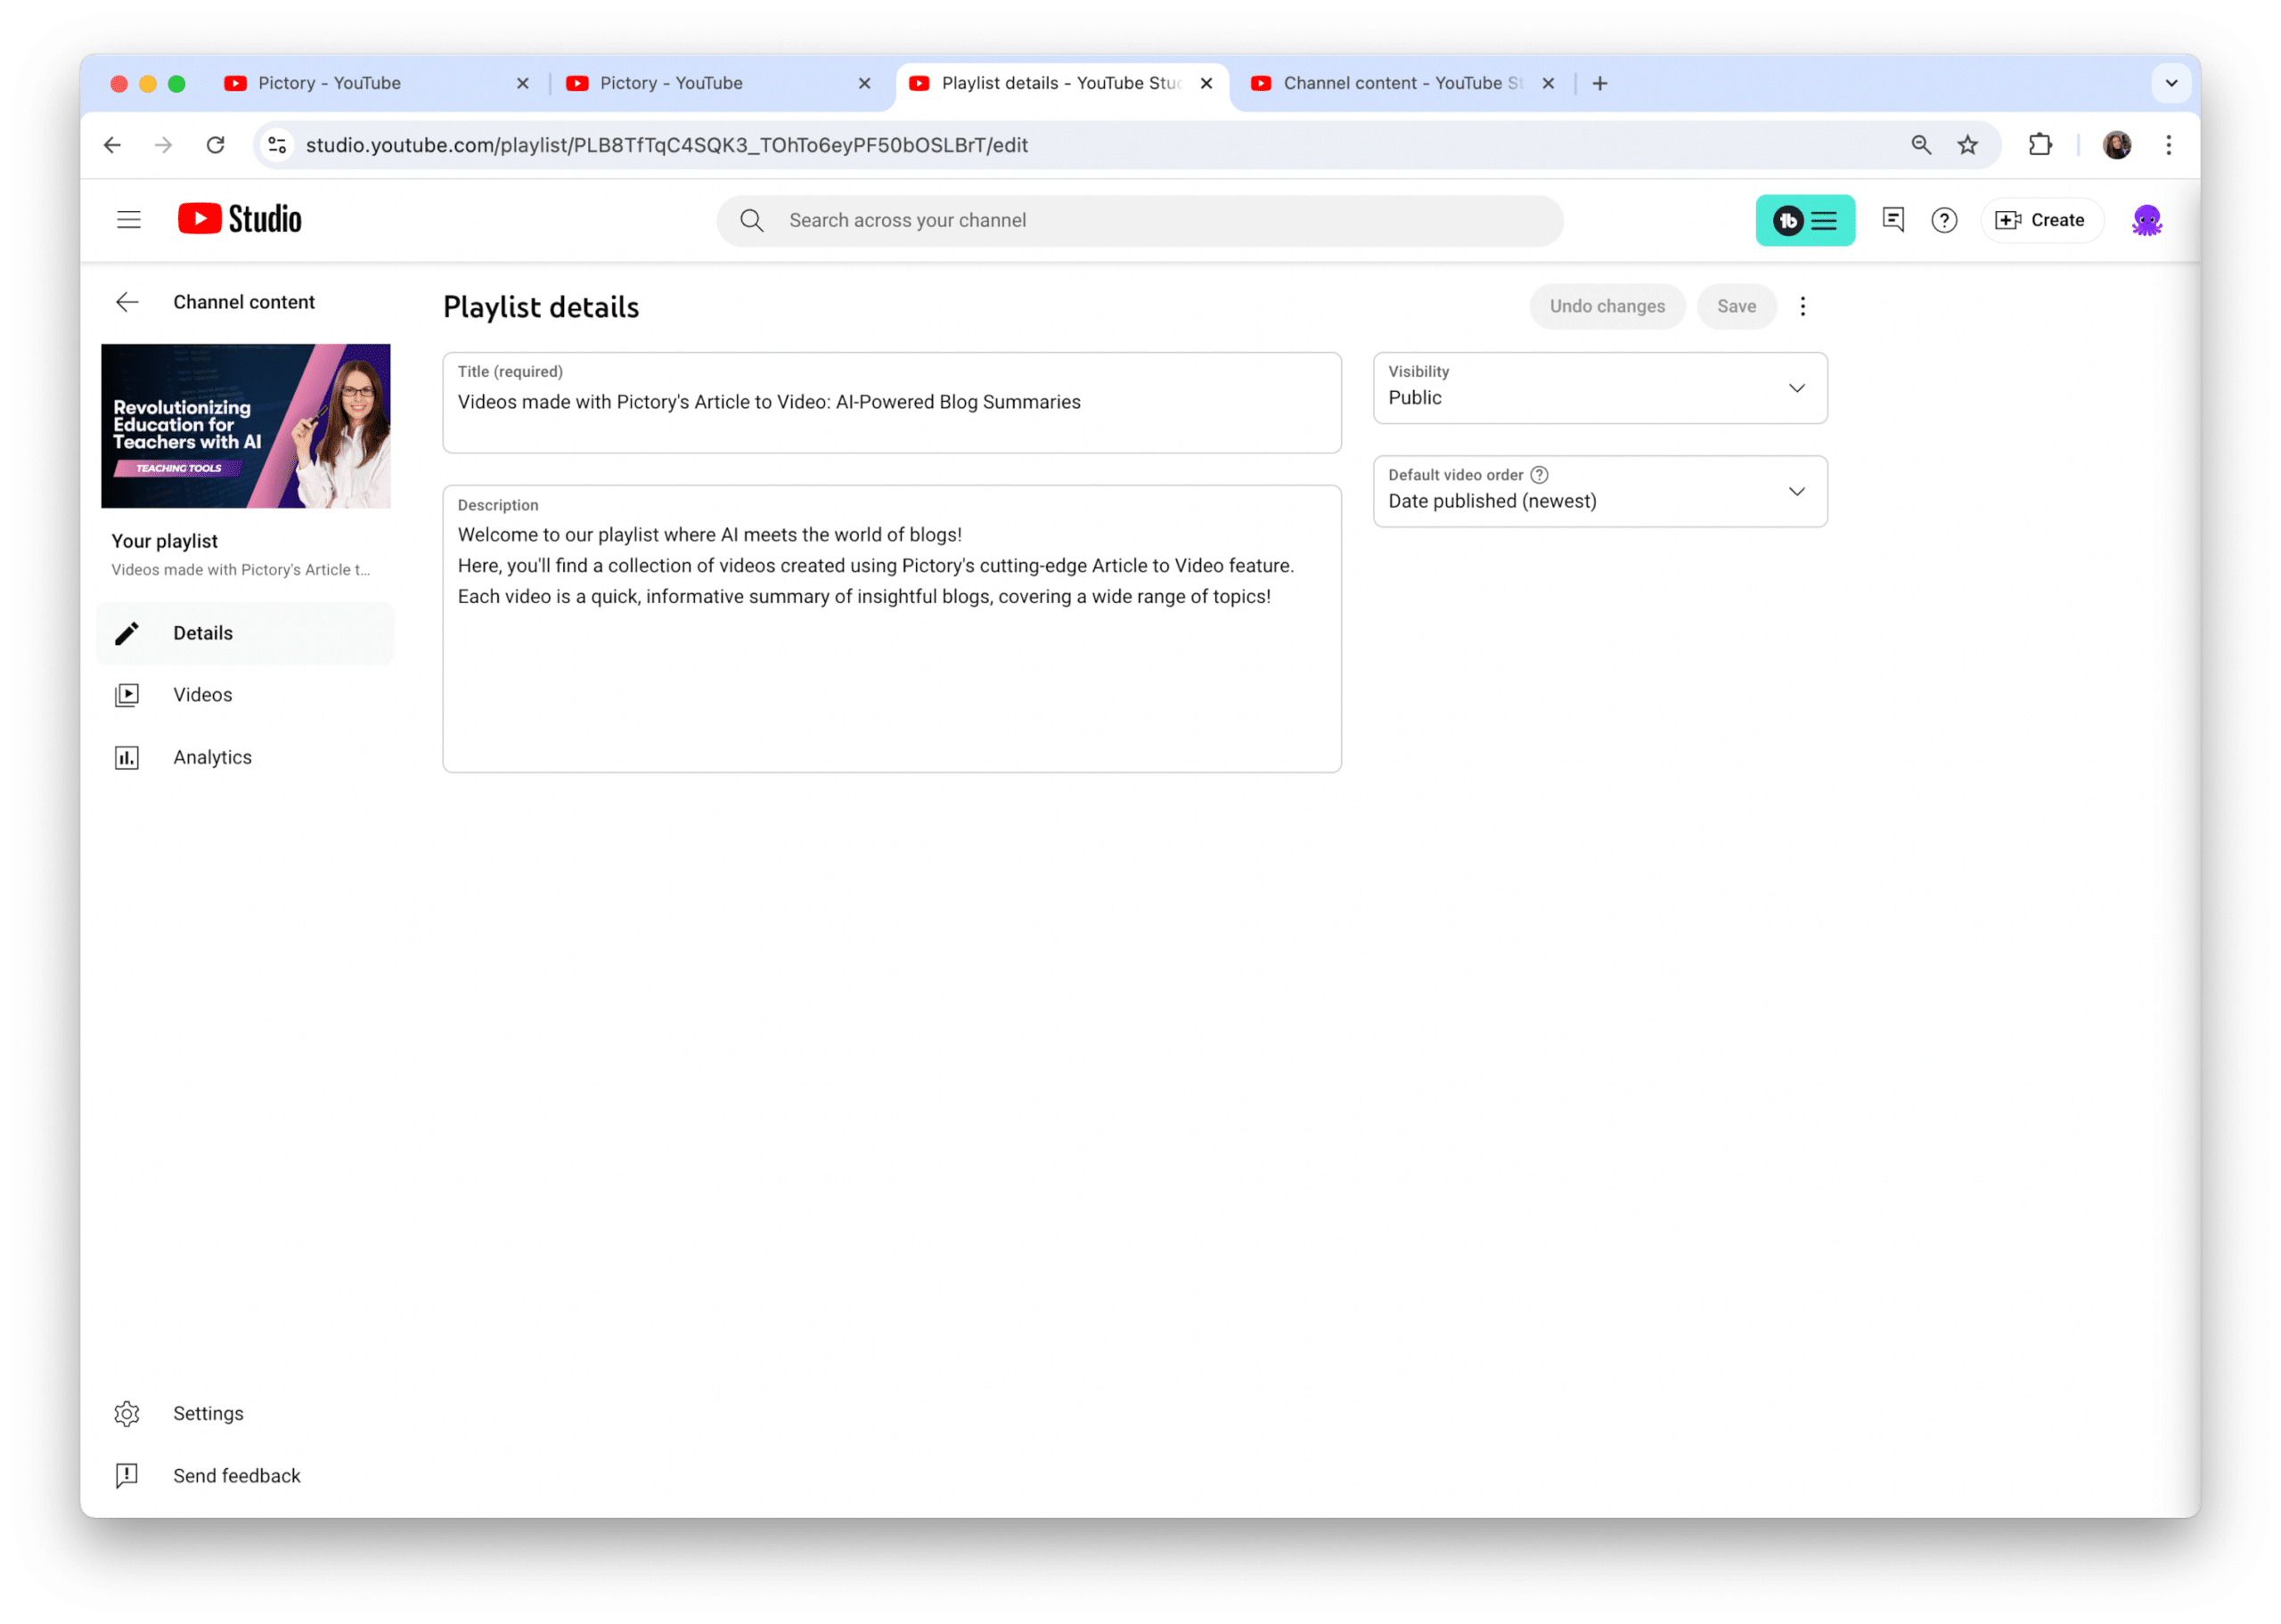
One of the most powerful features is the ability to edit playlist details. This includes changing the title, updating the description, and modifying privacy settings.
These elements are crucial for optimizing your playlist’s discoverability and appeal to viewers. Additionally, you have full control over the videos within your playlist. You can add new videos, remove ones that no longer fit, and even rearrange the order to create the perfect viewing experience.
Remember, a well-managed playlist not only looks professional but also keeps viewers engaged for longer periods, boosting your channel’s performance in YouTube’s algorithm.
Editing Playlist Details
To edit a playlist, follow these steps:
-
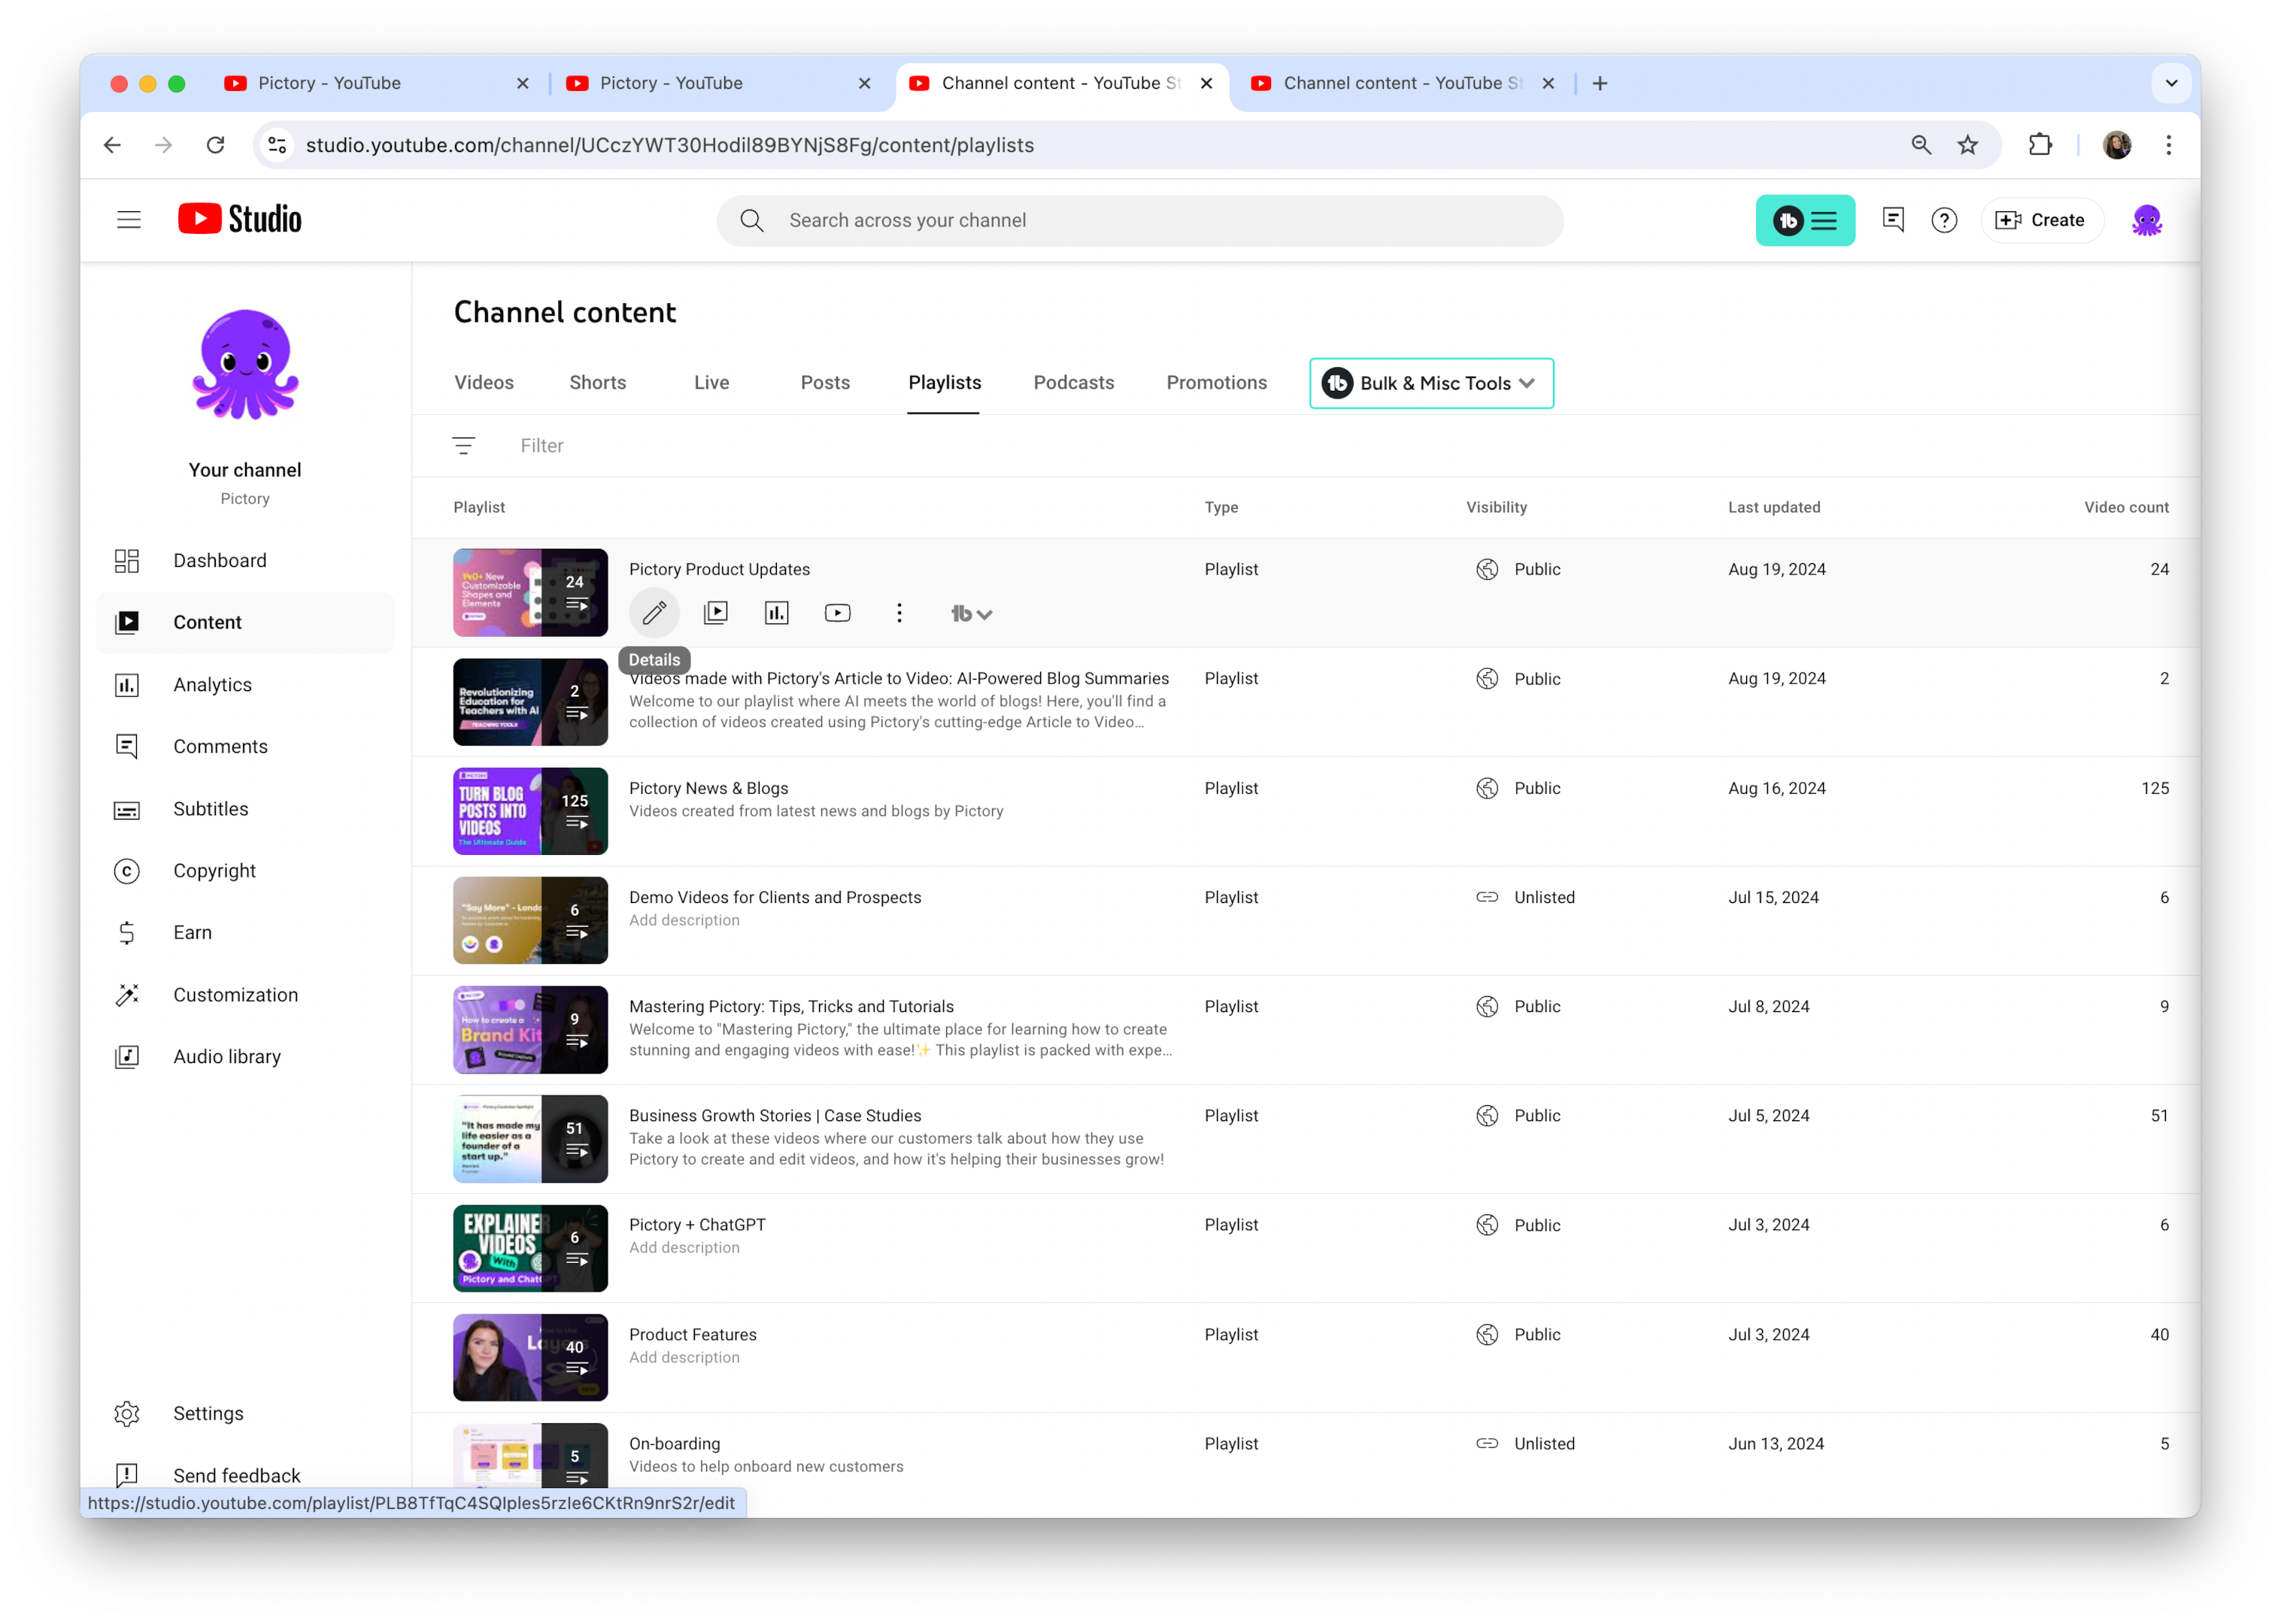
Navigate to the playlists tab in YouTube Studio.
-
Click on the pencil icon next to the playlist you want to modify.
-
This will open up a range of editing options.
Start with the title – a good playlist title should be catchy, descriptive, and include relevant keywords to improve searchability.
Next, focus on the description. Use this space to provide more context about your playlist, perhaps explaining the theme or what viewers can expect. Don’t forget to include relevant keywords here as well.
Finally, review your privacy settings. You can choose between public (visible to everyone), unlisted (only accessible via direct link), or private (visible only to you). The right setting depends on your goals for the playlist. For maximum exposure, public is usually the best choice.
Remember, you can always update these details as your playlist evolves, so don’t hesitate to make changes if you think of ways to improve.
Rearranging Videos
The sequence of videos in your playlist can greatly affect the viewer experience, hence the need for thoughtful arrangement. Luckily, YouTube makes this process simple and intuitive.
To reorder videos, go to your playlist in YouTube Studio or the mobile app. You’ll see a list of all the videos in your playlist.
On desktop, you can simply click and drag videos to new positions. On mobile, tap and hold a video, then drag it to its new spot.
Consider the flow of information or the story you’re trying to tell with your playlist of music videos. You might want to put your most engaging video first to hook viewers, or you could arrange videos in a logical sequence if you’re teaching a skill or explaining a complex topic. Don’t be afraid to experiment with different orders – you can always change it again if you’re not satisfied.
Remember, a well-organized playlist can keep viewers watching for longer, boosting your overall watch time and channel performance.
Deleting a Playlist
In the midst of the excitement of creating and managing playlists, there might arise scenarios necessitating the deletion of a playlist. Perhaps it’s outdated, or it no longer aligns with your channel’s focus. Whatever the reason, deleting a playlist is a straightforward process. Here’s how to tap delete playlist:
-
Navigate to the playlist you want to remove.
-
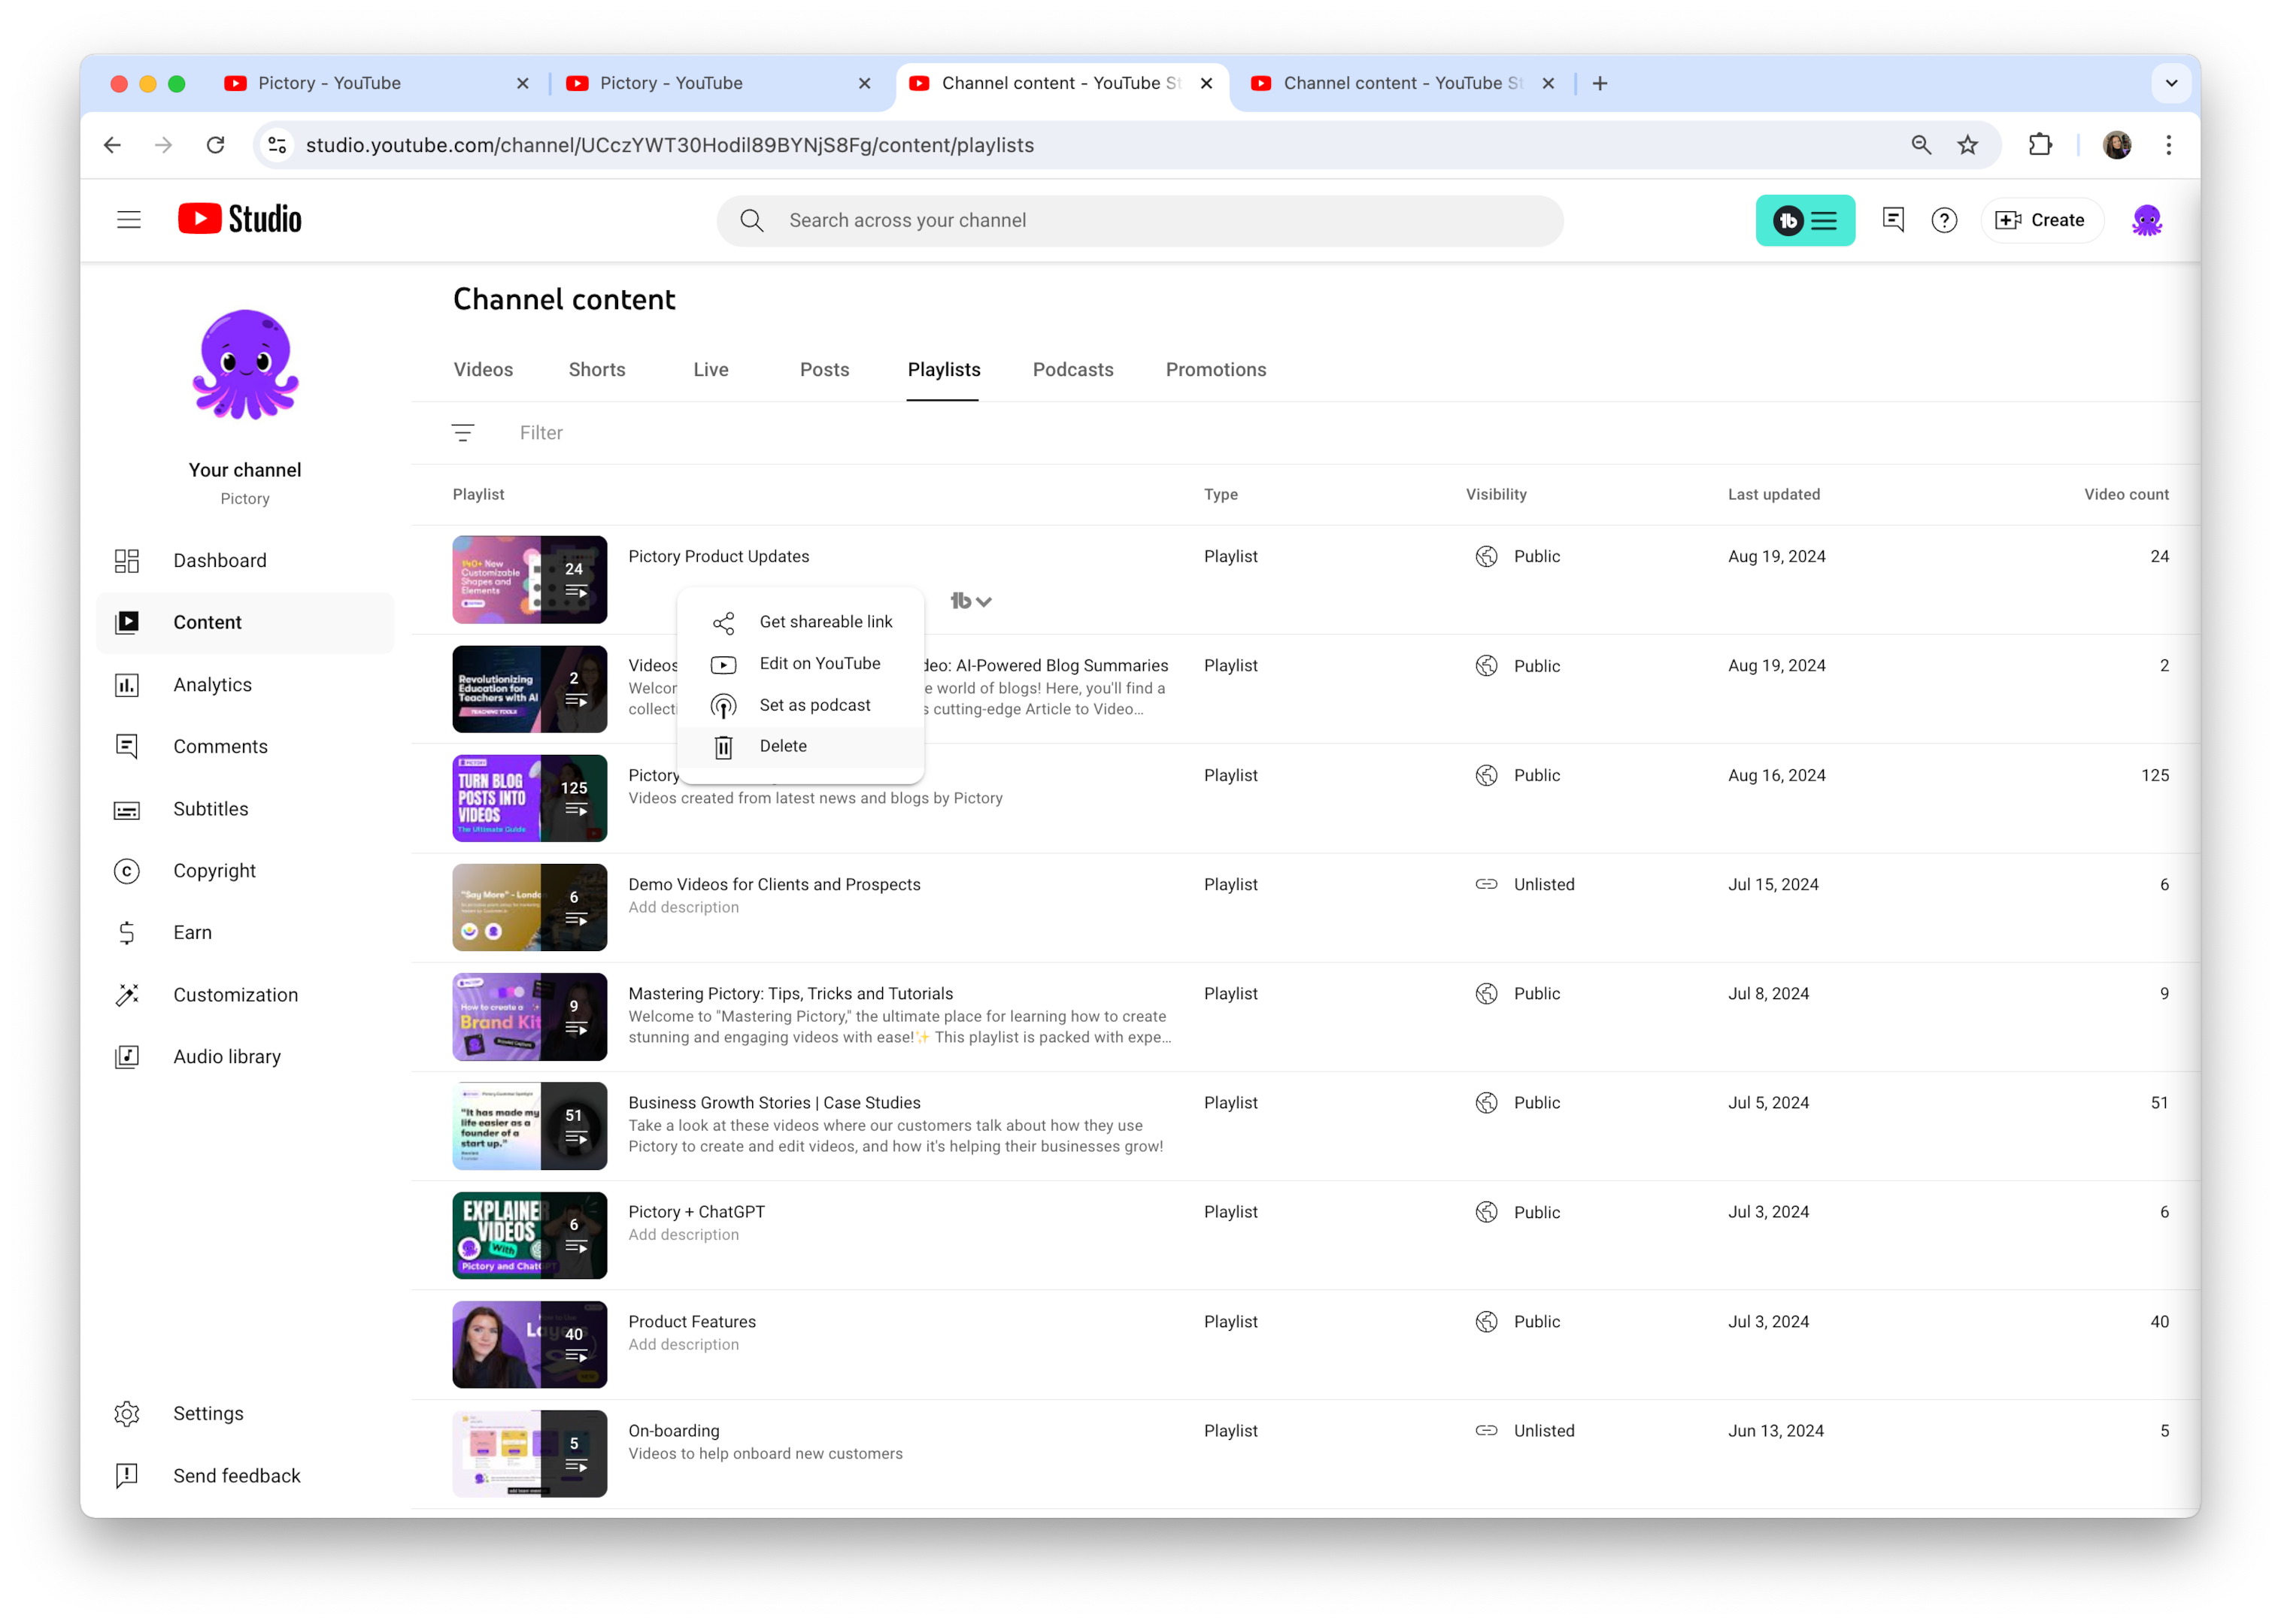
Click on the ‘More’ option (usually represented by three dots).
-
Select ‘Delete playlist’.
-
YouTube will ask you to confirm this action to prevent accidental deletions.
It’s important to note that deleting a playlist is a permanent action – once it’s gone, you can’t recover it. The good news is that deleting a playlist doesn’t affect the individual videos within it. They’ll still exist on your channel or wherever they were originally uploaded. Before you hit that delete button, consider whether archiving or privatizing the playlist might be a better option. This way, you can keep the playlist for future reference without it being visible to your audience.
Best Practices for YouTube Playlists
Having mastered the basics of creating and managing YouTube playlists, it’s time to level up your playlist skills with some best practices. These strategies will help you maximize the impact of your playlists, boost your channel’s visibility, and keep your viewers engaged for longer.
First and foremost, consistency is key. Try to maintain a consistent theme or topic for each playlist. This not only helps viewers understand what to expect but also signals to YouTube’s algorithm what your playlist is about, potentially improving its search rankings. Additionally, update your playlists regularly with fresh content. This keeps your playlists relevant and gives viewers a reason to come back.
Another crucial practice is to pay attention to the order of your videos. Here are some tips to keep in mind:
-
Start with your strongest, most engaging content to hook viewers from the get-go.
-
Arrange the rest of the videos in a logical sequence that keeps viewers interested and encourages them to watch more.
-
Remember, the goal is to create a seamless viewing experience that keeps your audience watching video after video.
By implementing these best practices, you’ll be well on your way to creating playlists that not only attract viewers but keep them coming back for more.
Optimizing Titles and Descriptions
Never underestimate the influence of a well-crafted title and description for your YouTube playlist. These elements are your first point of contact with potential viewers and play a crucial role in your playlist’s discoverability. When creating a title, think about what your target audience might be searching for. Include relevant keywords, but make sure the title remains catchy and easy to read. For example, if you’re creating a playlist of baking tutorials, a title like “Easy Baking Recipes for Beginners: Step-by-Step Guides” is both descriptive and keyword-rich.
As for the description, this is your opportunity to provide more context and entice viewers to click on your playlist. Here’s how you can structure it:
-
Start with a brief, engaging summary of what viewers can expect from the playlist.
-
List some of the key videos or topics covered.
-
Don’t forget to include relevant keywords naturally throughout the description – this can help your playlist show up in more search results.
For instance, continuing with our baking example, you might write: “Master the art of baking with our beginner-friendly recipes. From fluffy cakes to crispy cookies, this playlist covers all the basics you need to know. Perfect for new bakers or those looking to brush up on their skills.”
Remember, both your title and description should accurately reflect the content of your playlist. Misleading titles or descriptions might get you initial clicks, but they’ll lead to disappointed viewers who won’t stick around.
Using Compelling Thumbnails
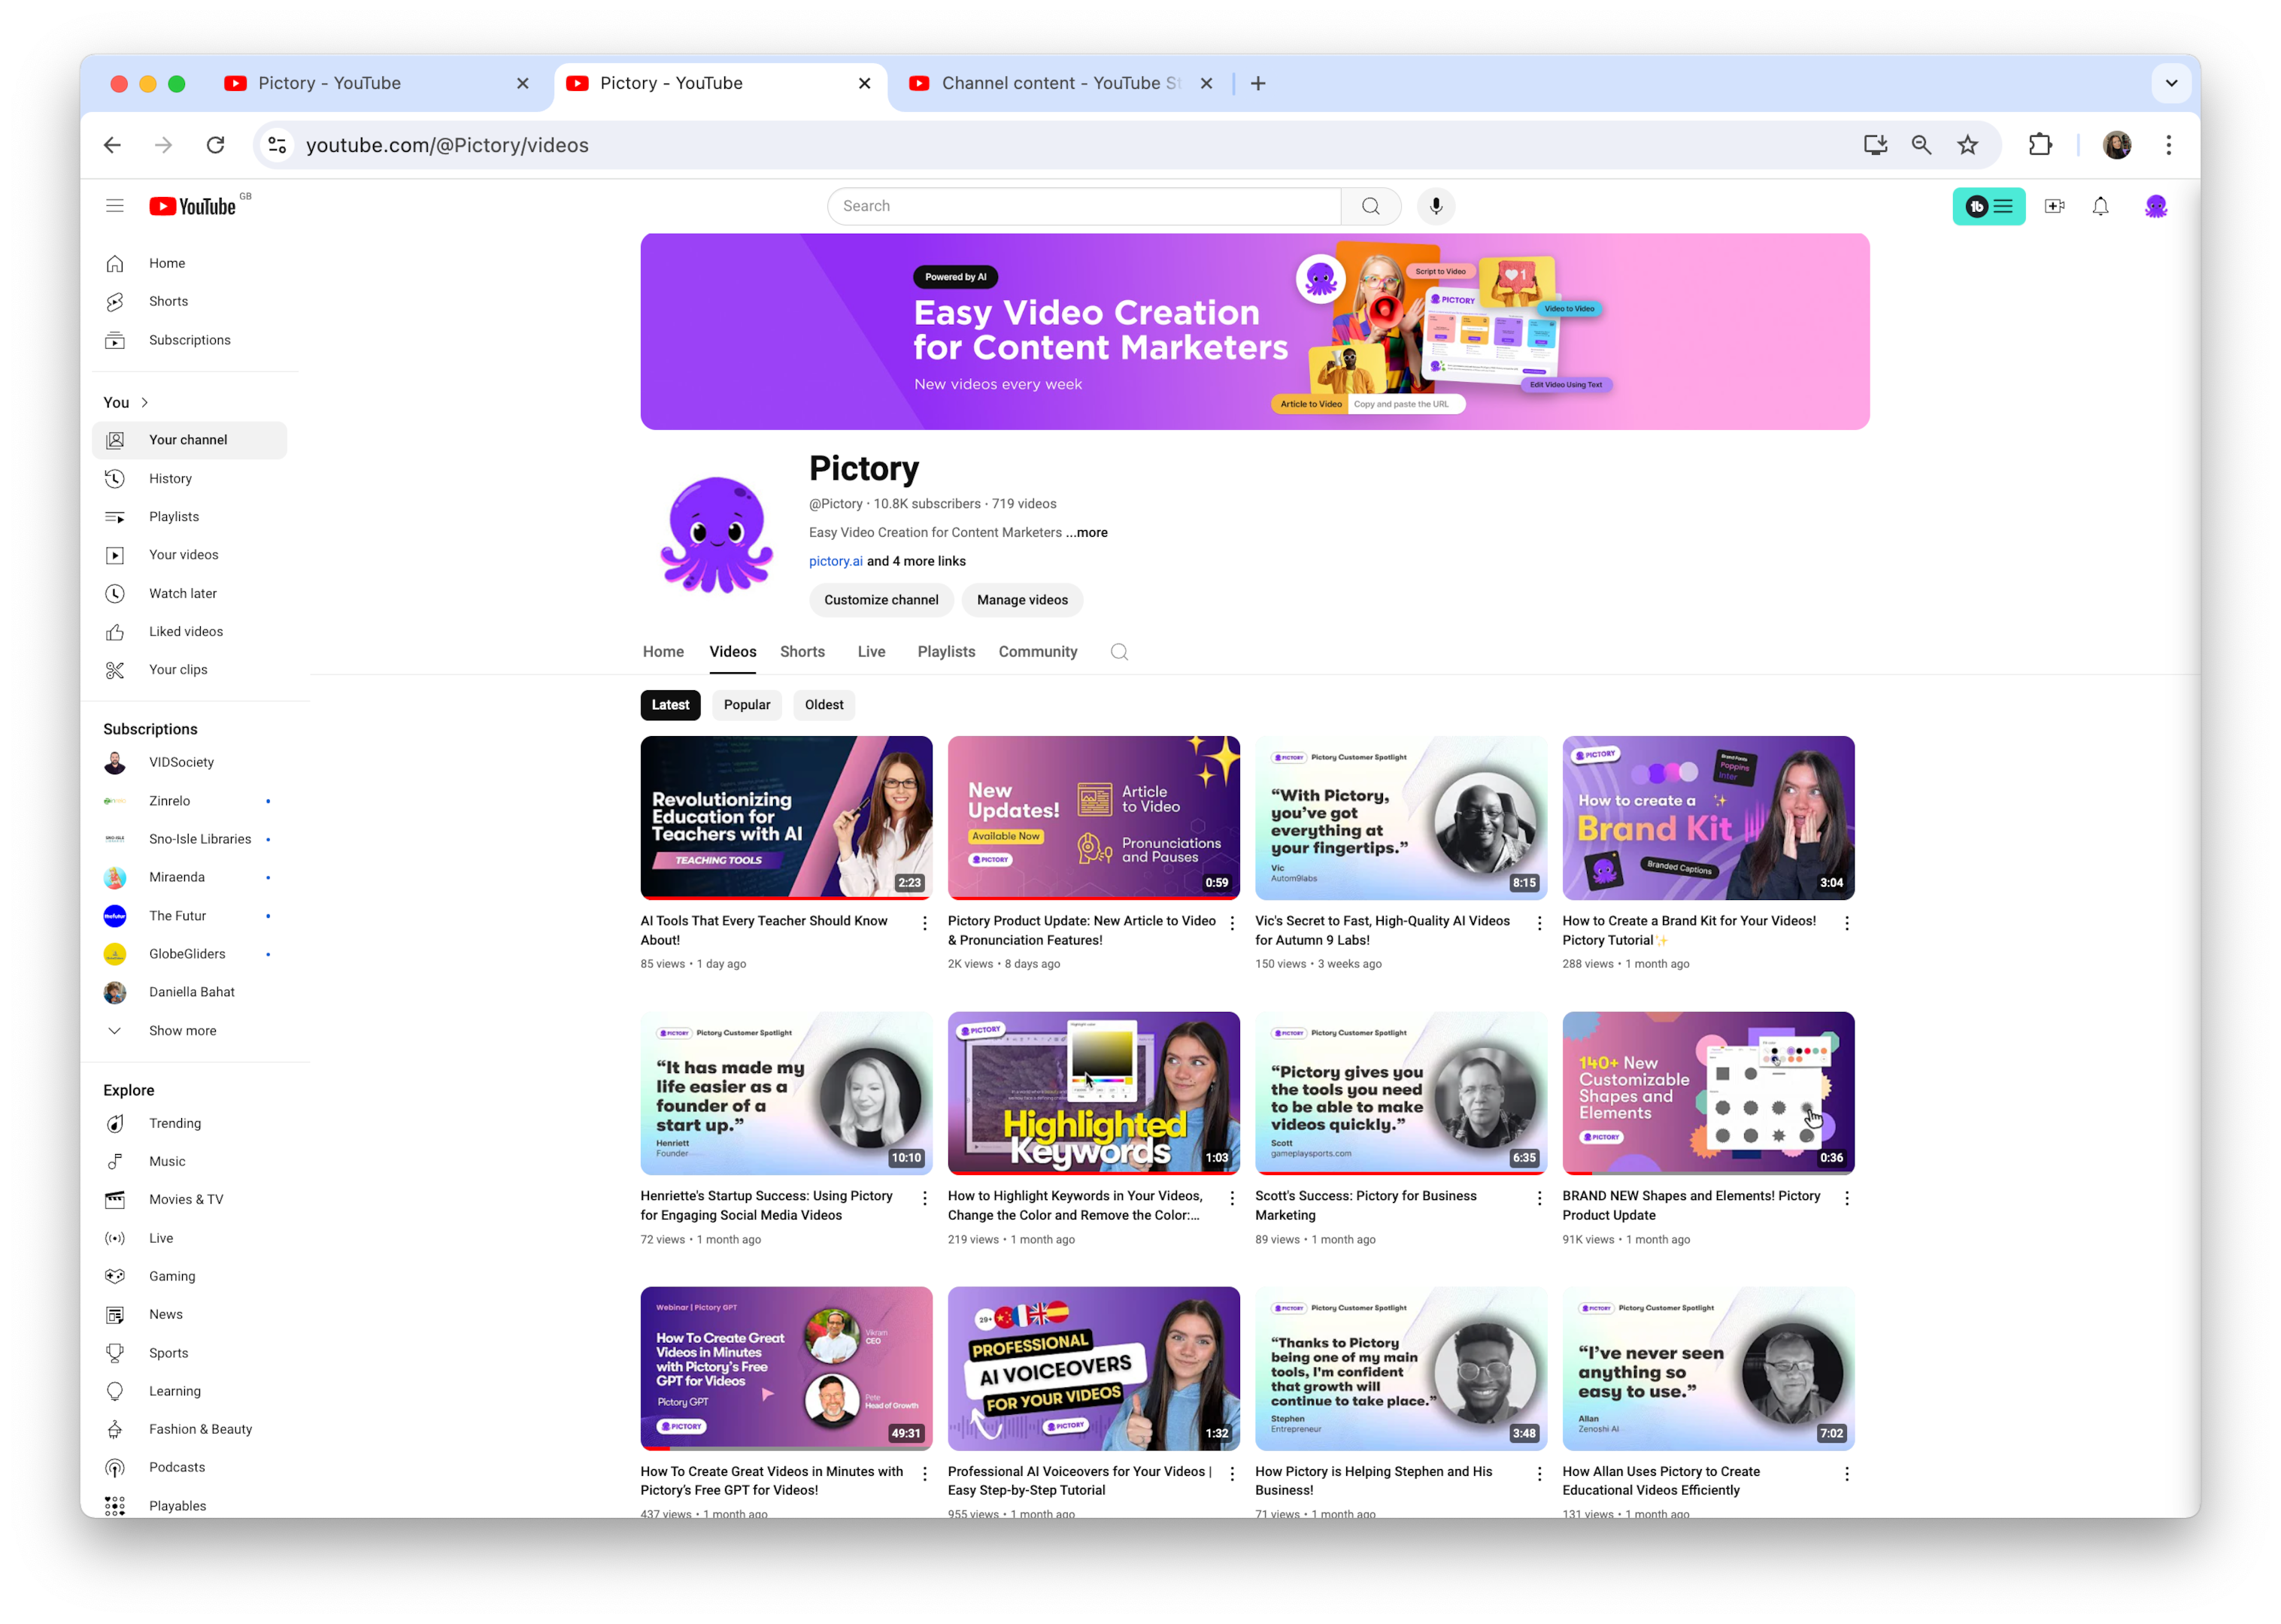
Given the visually-driven nature of YouTube, compelling thumbnails can significantly influence the success of your playlist. A well-designed thumbnail acts as a virtual billboard for your playlist, catching the eye of potential viewers and enticing them to click.
When creating thumbnails for your playlists, consistency is key. Use a similar style or theme across all the videos in a playlist to create a cohesive look. This not only looks professional but also helps viewers quickly identify videos that are part of the same series.
Some tips for creating effective thumbnails are:
-
Include text to provide context, but keep it brief and easy to read
-
Use contrasting colors to make your thumbnails pop
-
Consider including a friendly face in your thumbnail, as research shows that thumbnails featuring human faces tend to perform better
These tips will help you create eye-catching thumbnails that attract viewers.
Remember, your thumbnail is often the first thing a viewer sees, so make it count!
Ensuring Public Visibility
While it may seem evident, the critical step of setting your playlists to ‘Public’ is sometimes overlooked. Public visibility is key to maximizing the reach and impact of your playlists. When a playlist is public, it can be discovered through YouTube’s search function, appear in recommended content, and be easily shared by viewers. This increased visibility can lead to more views, longer watch times, and potentially new subscribers for your channel.
To check or change your playlist’s visibility, go to the playlist settings in YouTube Studio. Here, you can select ‘Public’ from the privacy dropdown menu. Remember, you can always change the visibility settings later if needed. For instance, you might set a playlist to ‘Private’ while you’re still adding videos and perfecting the order, then switch it to ‘Public’ when it’s ready for your audience.
By ensuring your playlists are public, you’re opening the door to a wider audience and giving your carefully curated content the best chance to shine.
Sharing Your YouTube Playlists
The creation of an excellent playlist is merely half the task – the real wonder unfolds when you share it globally. Sharing your YouTube playlists is a powerful way to increase your content’s reach, engage with your audience, and potentially attract new viewers to your channel. There are several ways to share your playlists, each with its own advantages.
The simplest method is to share the playlist URL directly. This can be done on social media platforms, in emails, or even in the description of your YouTube videos. Another effective method is embedding your playlist on a website or blog. This allows viewers to watch your playlist directly on your site, potentially increasing engagement and time spent on your page.
Remember, the more places your playlist appears, the more opportunities people have to discover your content. Don’t be shy about sharing – your playlists are valuable content that deserves to be seen!
Sharing via URL
Sharing your YouTube playlist through a URL provides a swift and simple avenue to disseminate your content across diverse platforms. To get the shareable link, follow these steps:
-
Open your playlist.
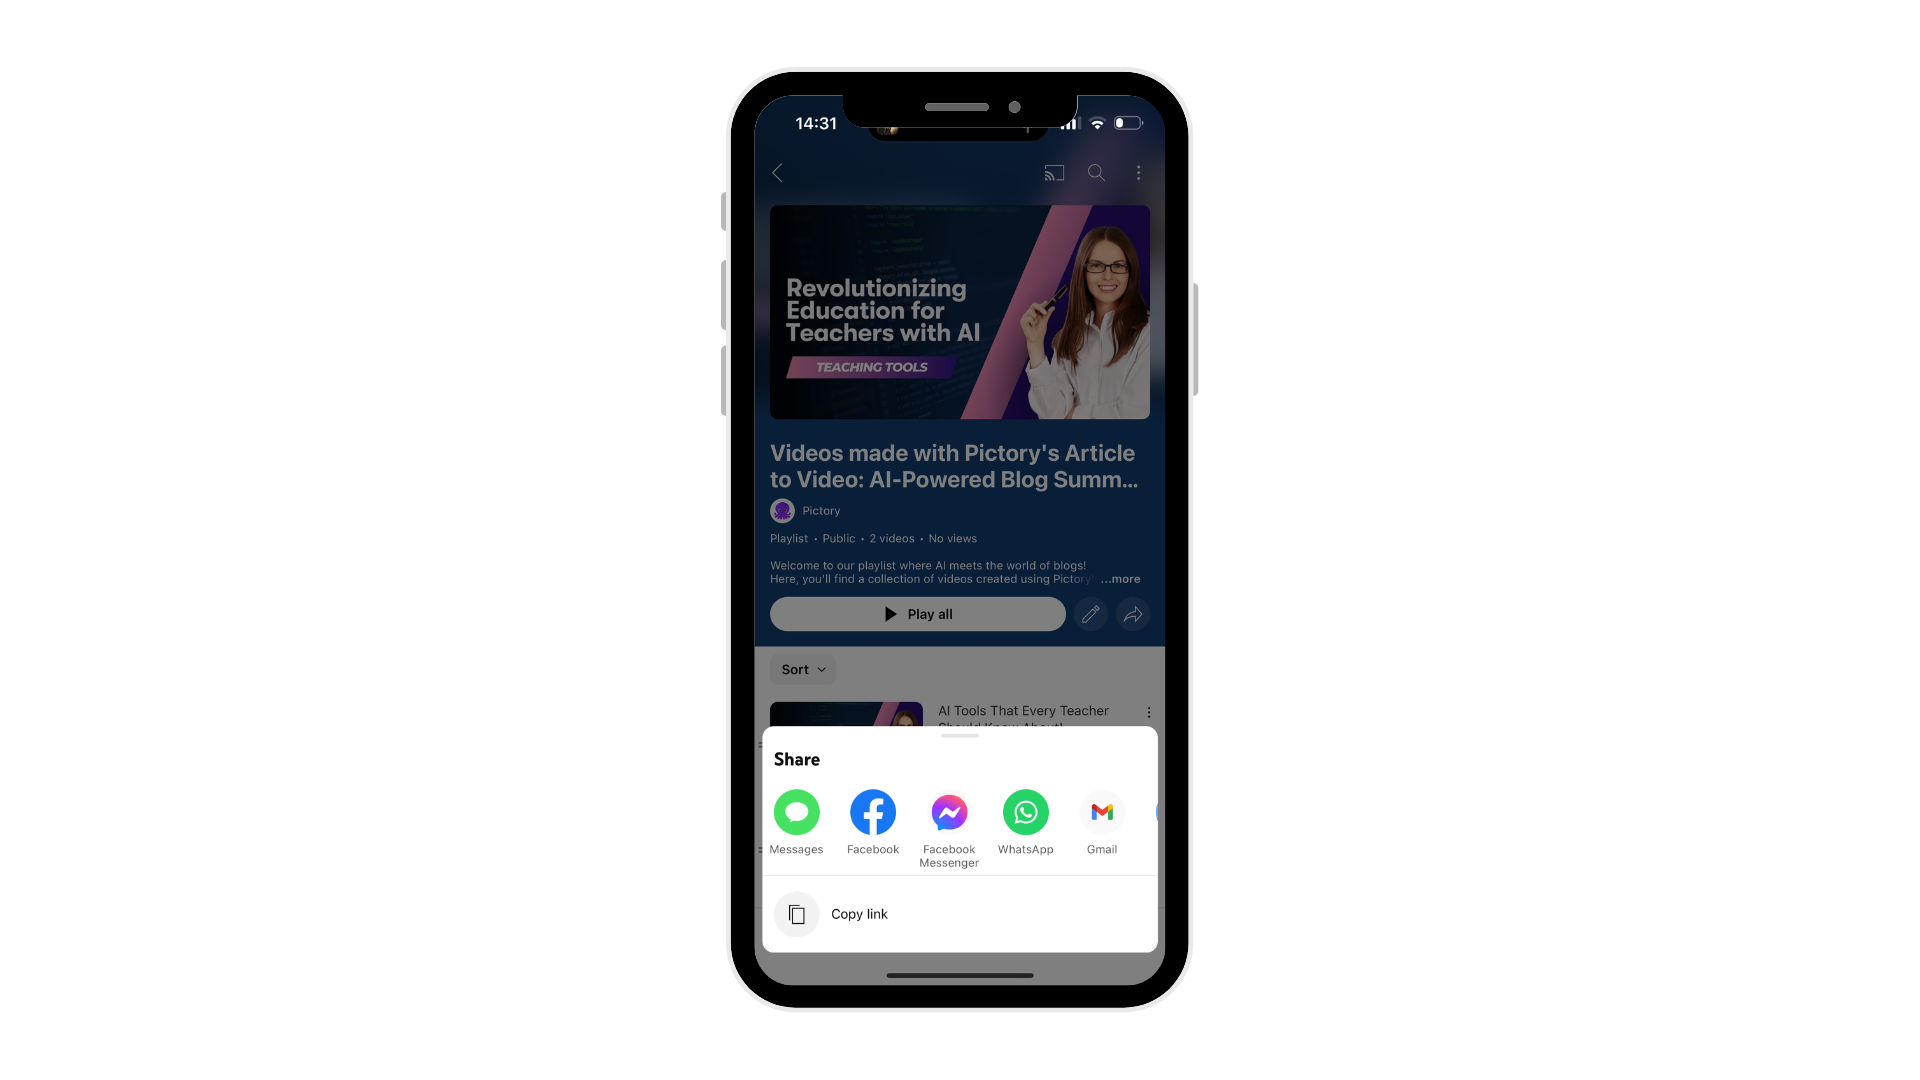
-
Click on the ‘Share’ button, usually represented by an arrow icon.
-
YouTube will generate a short URL that you can copy and paste wherever you like.
This link is perfect for sharing on social media platforms, in emails, or even in text messages. When someone clicks on this link, they’ll be taken directly to your playlist on YouTube.
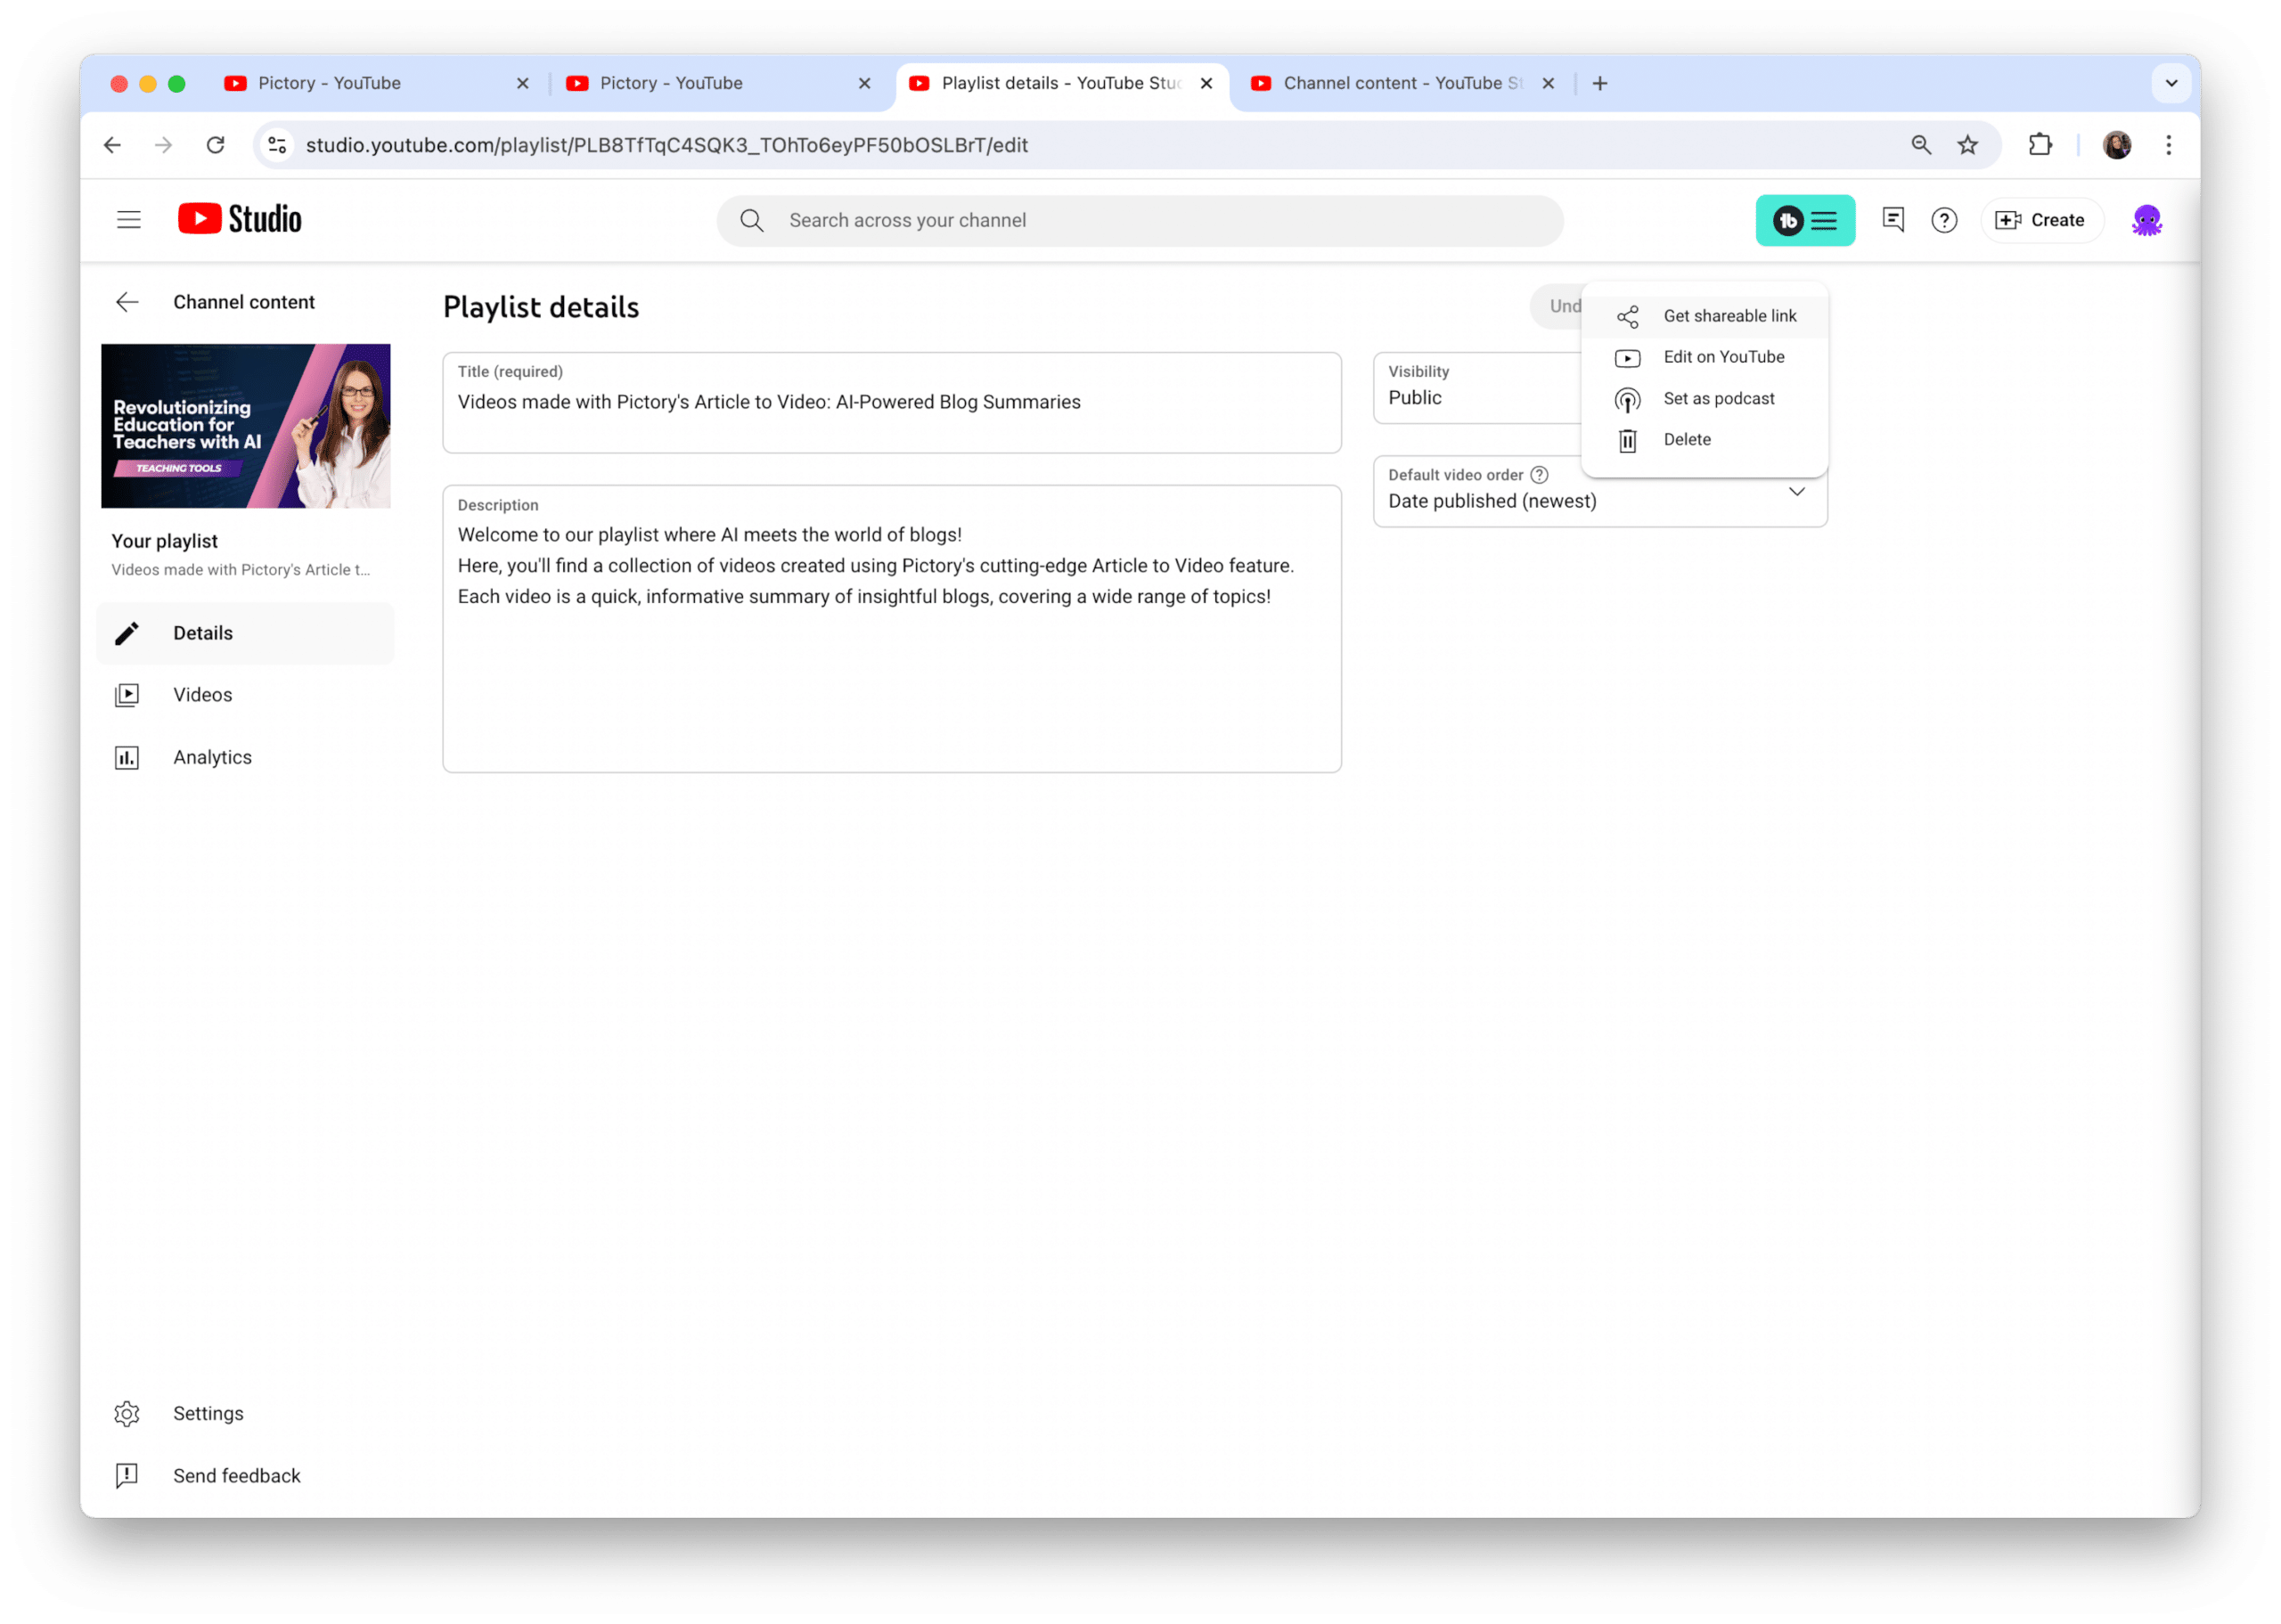
One tip to remember: if you’re sharing on platforms with character limits like Twitter, you might want to use a URL shortener to save space. Also, when you’re sharing the link, consider adding a brief description or call-to-action to entice people to click. For example, “Check out my latest baking tutorials playlist – perfect for beginners!” This gives potential viewers a reason to click and sets their expectations for what they’ll find.
Embedding Playlists
Showcasing your content and engaging visitors is made effortless by embedding your YouTube playlist on a website or blog. To embed a playlist, follow these steps:
-
Set your playlist to ‘Public’ in your playlist settings – this ensures it’s visible to everyone.
-
Click the ‘Share’ button beneath your playlist and select the ‘Embed’ option.
-
YouTube will generate an HTML code that you can copy and paste into your website’s HTML editor.
-
This code creates a player on your site that displays your entire playlist, allowing viewers to watch without leaving your page.
-
You can customize the embedded player’s size and appearance to fit your website’s design.
One of the biggest advantages of embedding is that it can increase your video views and watch time, as people are more likely to watch multiple videos when they’re conveniently displayed on a page they’re already visiting. Plus, it adds dynamic, engaging content to your website, potentially keeping visitors on your site longer. Whether you’re a blogger, business owner, or content creator, embedding playlists can be a powerful tool in your content strategy.
Advanced Tips and Tricks
Having acquired proficiency in the basics of creating and managing YouTube playlists, it’s now time to delve into advanced techniques that can elevate your playlist skills. These tips and tricks are designed to help you maximize engagement, boost watch time, and create a truly memorable viewing experience for your audience.
Employing storytelling in your playlists emerges as a potent technique. Instead of just grouping similar videos together, try to create a narrative arc that keeps viewers hooked from one video to the next. This could mean starting with an introductory video that sets the stage, then progressing through increasingly complex or in-depth topics.
Another approach involves the strategic ordering of your videos. Consider placing some of your most popular videos at the beginning to hook viewers, then interspersing less-viewed content throughout. This can help boost views on your underperforming videos. Remember, the goal is to keep viewers watching for as long as possible, so think carefully about how each video leads into the next.
Collaborative Playlists
Collaborative playlists, an engaging feature, can aid in expanding your reach and fostering connections within the YouTube community. To create a collaborative playlist, start by enabling the ‘Collaborate’ option in your playlist settings. Once enabled, you can:
-
Share a special link with other creators, allowing them to add their videos to your playlist.
-
Curate content from multiple sources.
-
Showcase different perspectives on a topic.
-
Host a virtual event.
This is a great way to collaborate with other creators and create a dynamic playlist that offers a variety of content to your audience.
For example, you could create a collaborative playlist for a specific theme or challenge, inviting other creators in your niche to contribute. Not only does this provide value to your viewers by offering a diverse range of content, but it also helps you network with other creators. Just remember to set clear guidelines for the types of videos that can be added to maintain the quality and relevance of your playlist.
Collaborative playlists can be a powerful tool for community building and cross-promotion, so don’t be afraid to get creative with how you use them!
Using Analytics
YouTube Analytics presents a wealth of information aiding in the refinement and improvement of your playlists over time. By regularly checking your playlist analytics, you can gain valuable insights into how viewers are interacting with your content. Pay attention to metrics like watch time, average view duration, and audience retention. These can tell you which videos in your playlist are performing well and which might need to be replaced or reordered.
One particularly useful feature is the ability to see where viewers are dropping off. If you notice a significant drop in viewership at a certain point in your playlist, consider what might be causing this. Is the video at that point less engaging? Does it not flow well from the previous video? Use these insights to continually refine your playlist structure.
Additionally, pay attention to which playlists are driving the most traffic to your channel. This can help you understand what topics or themes resonate most with your audience, guiding your future content creation. Remember, creating a successful playlist is an ongoing process. Use your analytics data to experiment, adjust, and optimize your playlists for maximum impact.
Summary
As we wrap up this comprehensive guide to YouTube playlists, let’s recap the key points we’ve covered. We’ve explored the importance of playlists in organizing your content, improving channel exposure, and enhancing the viewer experience. We’ve walked through the step-by-step process of creating playlists on both desktop and mobile platforms, and delved into best practices for optimizing your playlists with compelling titles, descriptions, and thumbnails. We’ve also discussed advanced techniques like collaborative playlists and the strategic use of analytics to continually refine your playlist strategy.
Now, it’s time for you to put this knowledge into action. Start by creating your first playlist, or if you already have some, take a fresh look at them with these new insights in mind. Remember, the key to success with YouTube playlists is consistency and continual optimization. Keep experimenting, analyzing your results, and refining your approach. Your playlists have the potential to not only organize your content but also to tell a compelling story, engage your audience, and significantly boost your channel’s performance. So go ahead, dive in, and start harnessing the full power of YouTube playlists. Your viewers – and your channel – will thank you for it!
Frequently Asked Questions
How many videos can I add to a YouTube playlist?
You can add as many videos as you want to a YouTube playlist, but it’s recommended to keep the playlist focused and not excessively long, aiming for 20-50 videos depending on the topic and video lengths. Keep it user-friendly!
Can I add videos from other channels to my playlist?
Absolutely! You can add any public YouTube video to your playlist, whether it’s from your own channel or another creator’s channel. It’s a fantastic way to curate content and offer value to your audience.
How do I change the order of videos in my playlist?
To change the order of videos in your playlist, you can simply drag and drop the videos on desktop or tap and hold on mobile to rearrange them. Just remember to save your changes after reordering.
Can I make money from my YouTube playlists?
Yes, you can’t directly make money from playlists, but they can indirectly boost your channel’s revenue by increasing watch time and engagement, potentially leading to more ad revenue and sponsorship opportunities. So, focus on creating engaging playlists to maximize your earnings.
How often should I update my playlists?
It’s a good idea to review and update your playlists regularly, aiming for at least once a month. This helps to keep them fresh and engaging.

